In this Topic Hide
Modify the connection settings after installation as follows:
1. Go to this directory on the server hosting ATS ARS:
c:\inetpub\wwwroot\ATSAdvancedReporting\
2. Open web.config in a text editor.
3. Find the <reportServerInfo> section. The example below shows a line describing the fields followed by a line containing an example:
<reportServerInfo>
<servers>
<clear />
<add name="Display name" reportServer="Server hosting reports" rootFolder="Folder on report server" />
<add name="InspectReports" reportServer="http://ATSVM234:80/ReportServer" rootFolder="Inspect" />
</servers>
</reportServerInfo>
4. Modify the display name, report server and root folder as required.
If you have added reports manually then the root folder corresponds to the folders you created (see here).
When you use multiple servers in different folders it can be useful to access them all at the top level without needing to drill down. This can be done as follows:
1. Go to this directory on the server hosting ATS ARS:
c:\inetpub\wwwroot\ATSAdvancedReporting\
2. Open web.config in a text editor.
Lets say you have a reporting instance with the following folder structure:
\
\Inspect
\Inspect\PlantA
\Inspect\PlantB
3. In the <reportServerInfo> section the following lines can be added. The highlighted section shows where the folders on the report server are specified.
<add name="Inspect PlantA" reportServer="http://server:80/ReportServer" rootFolder="Inspect/PlantA" />
<add name="Inspect PlantB" reportServer="http://server:80/ReportServer" rootFolder="Inspect/PlantB" />
4. Save and close the file.
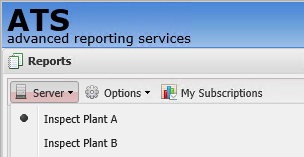
The result will be as follows.
If you have added reports manually then the root folder corresponds to the folders you created (see here).