In this Topic Hide
MQTT channels support the ISO standard (ISO/IEC PRF 20922) protocol that is used in a lot of IOT applications. MQTT is a light-weight telemetry protocol (publish/subscribe) on top of TCP.
More information about MQTT can be found online here.
1. Select the Workcenter Bus Stop tab.
2. Click MQTT Channels.
A list of the existing MQTT channels is shown.
3. Click Add.
A new window opens.
4. Enter a name for the channel.
The name of the channel must be unique within the entire ATS Bus configuration.
5. Enter a description in the default language and any other required languages.
6. Enter the Host Address. This is the IP address or hostname of the MQTT broker.
7. Enter the Port of the MQTT broker.
8. Enter the Client identification. This is a unique identifier used by the MQTT broker. The Workcenter bus stop name is automatically prepended during runtime to prevent conflicts when multiple bus stops are sharing the same channel configuration.
9. Enable Clean session to clear all session information for the given MQTT client in the broker.
10. Select the Protocol version. Consult the MQTT broker documentation to see which version is needed.
11. Enable Will retain to retain the last will and testament message.
More information on the last will and testament can be found online here.
12. Select the Will QoS level. Possible values are:
o At most once
o At least once
o Exactly once
13. Enable the Will flag if required.
14. Select the Will topic. This is the topic that the last will and testament will use.
15. Enter the Will message which is the payload of the Will topic.
16. Enable Certificate required to use certificates for secure communication. Enable it will present the following options:
o Client certificate: The client certificate.
o CA certificate: The Certification Authority certificate.
o Host port number: Port number of host.
17. Enable Authentication required if username and password authentication are required by the broker. You will then need to enter the username and password.
Message Definitions must be created before channel messages can be created.
Channel messages can be created once an MQTT channel has been defined.
1. While editing an MQTT Channel select the Channel Messages tab.
All existing channel messages contained in the channel are listed. The table shows the name of the channel message, the direction in which the message is going and whether or not the message is currently active.
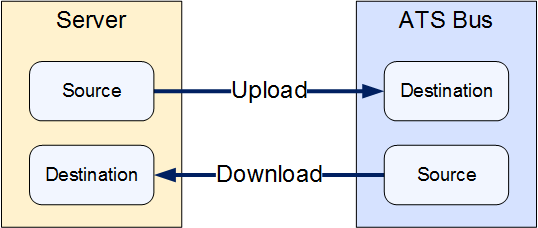
Messages are Uploaded towards the Bus and Downloaded away from it.
2. Click Add.
3. Enter a name for the channel message.
The name of the channel message must be unique within the entire ATS Bus configuration.
4. Select a Message definition. Message Definitions act as templates when adding messages to a Channel. They specify whether the message is being uploaded from equipment or downloaded to equipment and also list the different data fields that will be available in the message.
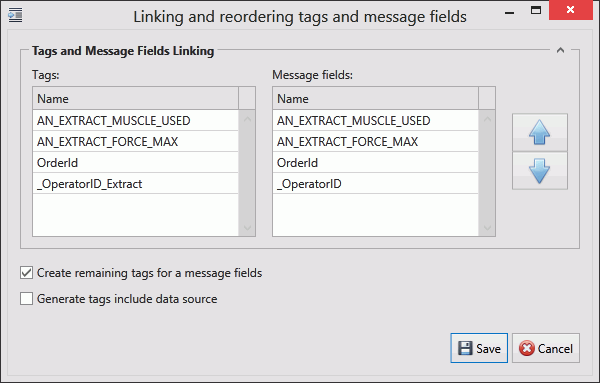
The Tags control opens. In the right-hand pane it lists the fields contained within the message. The left-hand pane lists tags that will be created that match those fields.

If the field has an Index value associated to it this will be added to the end of the tag name. For example, if the field name is _OperatorID and the field index is Extract then the tag name will be _OperatorID_Extract.
5. If you don't want tags to be created automatically disable Create remaining tags for message fields.
6. Use the arrows on the right-hand side to re-order the fields. To refresh the list of tags to match it disable and enable Create remaining tags.
7. If required, enable Generated tags include data source.
8. Click Save. You are returned to the New Channel Message window.
9. Select the Data source type. This can be one of the following:
o Native: The topic payload will contain a native datatype so only one tag can be configured.
o XML: The topic payload will contain XML formatted data. Multiple tags can be configured to hold the extracted data. Each tag should then use an XPATH query to extract the proper data. If a download message definition is used then an XML output schema can be specified which will format and validate the outgoing XML payload.
o JSON: The topic payload will contain JSON formatted data. Multiple tags can be configured to hold the extracted data. Each tag should then use a JPATH query to extract the proper data. If a download message definition is used then an JSON output template can be specified which will format and validate the outgoing JSON payload.
o Array: The topic payload will contain an array of native datatypes. Each segment of array is configured as one tag. An Array length must be specified.
10. Enter the Topic to associate to the message.
11. Select the QoS level for the topic. Possible values are:
o At most once
o At least once
o Exactly once
o Use default for channel
12. Enable Retained message to retain the last will and testament message.
13. Enable Active so that the channel message can be used.
The MQTT tag is based on the general Acquisition tag with the addition of an XPath or JPATH query when using the XML or JSON data source type in the channel message. The outcome of the XPath /JPath is used as a tag value.
14. Click Add below the Tags pane (or Edit to modify an existing tag).
A new window opens.
15. Enter the name of the tag in the Description field.
16. Select a Data Type. This is the format in which the data will be received (e.g. Integer, Text, Char, etc.).
17. Enable the Active checkbox to ensure the tag is active.
18. If required, enable Mandatory. If a message is received and a mandatory tag doesn't have a value then the message won't be processed.
The source and destination can now be selected. The source and destination will depend on whether it is an Upload or Download message definition.

19. Select the Data source and the additional information the data source requires. This can be one of the following:
Name |
Description |
Required Information |
MQTT |
XML, JSON or Byte array |
Enter the XPath/JPath string. If message format is Array you will also need to set the Array offset, Bit length and Data type. |
Message Field (download only) |
The message field. |
Select the message field. |
Constant value |
The tag will always be the same value. |
Enter the value to be used. |
Translation table |
The value is read from an OPC data source and then translated using a data translation table. |
Select the translation table to use and the access path for the source value that will be translated. |
Function evaluation |
The value is read from an OPC data source and then modified using a function. |
Enter the function to use and the access path for the source value that will be modified by the function. |
20. Select the Destination.
21. Click OK.
The tag is added to the channel message.
22. Click OK.
The channel message is added to the channel.
23. Click OK.
The channel is saved.