In this Topic Hide
The MTConnect channel is used by the workcenter bus stop and supports communication with an MTConnect agent to obtain information from manufacturing equipment. The MTConnect channel periodically sends requests to the MTConnect agent and processes responses that contain changed data items.
MTConnect is a standard based on an open protocol for data integration. The MTConnect standard enables manufacturing equipment to provide data in structured XML. It uses the HTTP protocol for messaging.
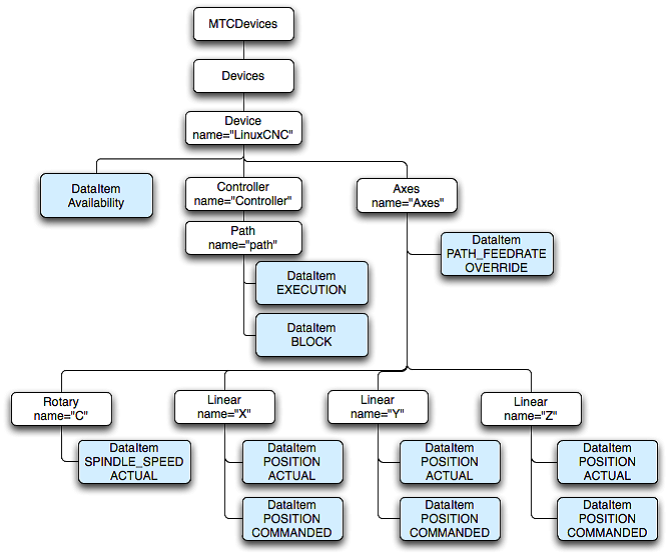
Clients communicate with an MTConnect agent that represents at least one device. Each device may contain several components and each component may contain other components. Devices and components then contain data items, which the client obtains from the agent. Here is an example of the structure.
Communication is carried out using the following methods:
● probe – to retrieve the components and the data items for the device.
● current – to retrieve a snapshot of the data item’s most recent values or the state of the device at a point in time.
● sample – to retrieve the Samples, Events, and Condition in time series.
The application contacts the Agent through the URI. The first step is a request for the device’s descriptive information using the probe request. The probe will return the component composition of the device as well as all the data items available.
The application requests the current state for the device. The results will contain the device stream and all the component streams for this device. Each of the data items will report their values as Samples, Events or Conditions. The application will receive the nextSequence number from the agent to use in the subsequent sample request.
The application uses the nextSequence number to sample the data from the Agent starting at sequence number. The results will be Events, Condition, and Samples. As the count is not specified, it defaults to 100 Events, Samples, and Conditions.
Workcenter bus stops maintain the last sequence number for communication itself. If communication is reestablished then the last sequence number is obtained from configuration and we can continue from the last position so no data is lost when the bus stop is not running.
When communication is re-established, the last sequence number is used in the current request to retrieve a snapshot of data items at a point in time. Then we start sending sample requests to retrieve data items in time order.
1. Select the Workcenter Bus Stop tab.
2. Click MTConnect Channels.
A list of the existing MTConnect channels is shown.
3. Click Add.
A new window opens.
4. Enter a name for the channel.
The name of the channel must be unique within the entire ATS Bus configuration.
5. Enter the Agent address. This is the address at which the agent is running.
6. Enter the Agent port. This is the HTTP port on which the agent is running. The default is standard HTTP port 80.
7. Enter the Refresh rate. This defines how often a request is sent to the agent for data. The default is 2 seconds.
8. Enter the Max data items count. This is the maximum number of data items (events, conditions and samples) to get from agent per request.
Message Definitions must be created before channel messages can be created.
Channel messages can be created once an MTConnect channel has been defined.
1. While editing an MTConnect channel select the Channel Messages tab.
All existing channel messages contained in the channel are listed. The table shows the name of the channel message, the direction in which the message is going and whether or not the message is currently active.
Messages are Uploaded towards the Bus and Downloaded away from it.
2. Click Add.
3. Enter a name for the channel message.
The name of the channel message must be unique within the entire ATS Bus configuration.
4. Select a Message Definition. Message Definitions act as templates when adding messages to a Channel. They specify whether the message is being uploaded from equipment or downloaded to equipment and also list the different data fields that will be available in the message.
The Tags control opens. In the right-hand pane it lists the fields contained within the message. The left-hand pane lists tags that will be created that match those fields.
If the field has an Index value associated to it this will be added to the end of the tag name. For example, if the field name is _OperatorID and the field index is Extract then the tag name will be _OperatorID_Extract.
5. If you don't want tags to be created automatically disable Create remaining tags for message fields.
6. Use the arrows on the right-hand side to re-order the fields. To refresh the list of tags to match it disable and enable Create remaining tags.
7. If required, enable Generated tags include data source.
8. Click Save. You are returned to the New Channel Message window.
9. Enable the Active checkbox to ensure the tag is active.
10. If required, enable Mandatory. If a message is received and a mandatory tag doesn't have a value then the message won't be processed.
The tags provide the link to the location of the data on the server. The MTConnect tag is based on the general Acquisition tag with the addition of a Data Item id which is downloaded from MTConnect agent.
11. Click Add below the Tags pane (or Edit to modify an existing tag).
A new window opens.
12. Enter the name of the tag in the Description field.
13. Select a Data Type. This is the format in which the data will be received (e.g. Integer, Text, Char, etc.).
14. Enable the Active checkbox to ensure the tag is active.
The source and destination can now be selected.
15. Select the Data source and the additional information the data source requires. This can be one of the following:
Name |
Description |
Specific Information |
MTConnect |
The value is read from an MTConnect data source. |
Specify the MTConnect data item ID. |
Constant value |
The tag will always be the same value. |
Enter the value to be used. |
Translation table |
The value is read from an RFID data source and then translated using a data translation table. |
Select the translation table to use and the access path for the source value that will be translated. |
Function evaluation |
The value is read from an RFID data source and then modified using a function. |
Enter the function to use and the access path for the source value that will be modified by the function. |
16. If required, modify the Destination field. The destination of the data source is one of the message fields in the message definition. This value is preset to the choice made in the Linking and reordering tags and message fields dialog.
17. Click OK.
The tag is added to the channel message.
18. Click OK.
The channel message is added to the channel.
19. Click OK.
The channel is saved.