In this Topic Hide
An OPC Server channel acts as an OPC UA server. The channel messages and the tags in those channel messages act as an OPC UA node where the channel message acts as an OPC UA group.
For example, an OPC channel named OPCChanA having a channel message named Message23 which has a tag (ATS Bus tag) named GoodCount will have the following browse path: OPCChanA/Message23/GoodCount.
For more information on browse paths see this website.
Each Workcenter Bus Stop can only subscribe to a single OPC Server channel.
The OPC Server channel can be accessed by a Classic OPC Client using a COM Wrapper.
1. Select the Workcenter Bus Stop tab.
2. Click OPC Server Channels.
A list of the existing OPC Server channels is shown.
3. Click Add.
A new window opens.
4. Enter a name for the channel.
The name of the channel must be unique within the entire ATS Bus configuration.
5. Enter a length of time for Tag values backup (s). This is how frequently the tag values will be backed up in seconds.
In order for an OPC UA client to connect to an OPC UA server, the client needs to know the server location and security requirements.
6. Enter the TCP Port number.
The server address is based on the port number and the channel name. If the channel name contains any whitespace, they are replaced by an underscore (e.g. OPC Server Test Channel => OPC_Server_Test_Channel).
The server endpoints provided to clients are dependent upon security policies settings. The OPC Server channel allows for secured connections or connections without security.
If security is not required, select None and security policies are completely disabled. If security is required enable one or more security policies (Basic128Rsa15, Bsaci256). For secured connections then is possible to set security mode.
7. Select one of the following options:
o None: No security used (even if the other options are enabled).
o Basic128Rsa15: Specify the security mode from the drop-down list (Sign, Sign and Encrypt or Sign; Sign and Encrypt)
o Basic256: Specify the security mode from the drop-down list (Sign, Sign and Encrypt or Sign; Sign and Encrypt)
8. Enter a description in the default language and any other required languages.
9. Add channel messages as described below.
Message Definitions must be created before channel messages can be created.
Channel messages can be created once an OPC Server channel has been defined.
1. While editing an OPC Server channel select the Channel Messages tab.
All existing channel messages contained in the channel are shown. The table shows the name of the channel message, the direction in which the message is going and whether or not the message is currently active.
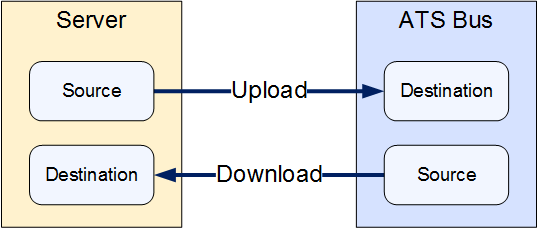
Messages are Uploaded towards the Bus and Downloaded away from it.
2. Click Add.
3. Enter a name for the channel message.
The name of the channel message must be unique within the entire ATS Bus configuration.
4. Select a Message definition. Message Definitions act as templates when adding messages to a Channel. They specify whether the message is being uploaded from equipment or downloaded to equipment and also list the different data fields that will be available in the message.
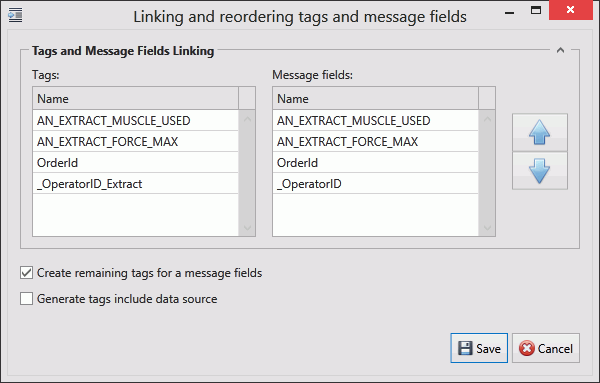
The Tags control opens. In the right-hand pane it lists the fields contained within the message. The left-hand pane lists tags that will be created that match those fields.

If the field has an Index value associated to it this will be added to the end of the tag name. For example, if the field name is _OperatorID and the field index is Extract then the tag name will be _OperatorID_Extract.
5. If you don't want tags to be created automatically disable Create remaining tags for message fields.
6. Use the arrows on the right-hand side to re-order the fields. To refresh the list of tags to match it disable and enable Create remaining tags.
7. If required, enable Generated tags include data source.
8. Click Save. You are returned to the New Channel Message window.
9. Select an Acquisition Type. This will define how frequently the channel message is read.
For Upload messages the following acquisition types are available:
o Interval Acquisition
o Trigger Tag Acquisition
o On Change Acquisition
For Download messages the following acquisition types are available:
o Trigger Tag Acquisition
10. Select the required Acquisition Settings.
For more information on acquisition settings see here.
11. If required, enable Handshake Only. This should be selected if the message is to be used for a heartbeat interface.
12. Enable Active so that the channel message can be used.
The tags provide the link to the location of the data on the server.
13. Click Add below the Tags pane (or Edit to modify an existing tag).
A new window opens.
14. Enter the name of the tag in the Description field.
15. Select a Data Type. This is the format in which the data will be received (e.g. Integer, Text, Char, etc.).
16. Enable the Active checkbox to ensure the tag is active.
17. If required, enable Mandatory. If a message is received and a mandatory tag doesn't have a value then the message won't be processed.
The source and destination can now be selected. The source and destination will depend on whether it is an Upload or Download message definition.

18. Select the Data source and the additional information the data source requires. This can be one of the following:
Name |
Description |
Required Information |
OPC server node (upload only) |
The value is read from an OPC server node. |
Enter the node identifier. This can be entered manually. |
Message Field (download only) |
The message field. |
Select the message field. |
Constant value |
The tag will always be the same value. |
Enter the value to be used. |
Translation table |
The value is read from an OPC data source and then translated using a data translation table. |
Select the translation table to use and the access path for the source value that will be translated. |
Function evaluation |
The value is read from an OPC data source and then modified using a function. |
Enter the function to use and the access path for the source value that will be modified by the function. |
19. Select the Destination. This will either be an OPC node identifier (for download) or a message field (for upload).
20. Click OK.
The tag is added to the channel message.
21. Click OK.
The channel message is added to the channel.
22. Click Save.
The channel is saved.
In order to be able connect from client to server several things must be set. The LDS (Local Discovery Server) has to be installed on the machine where the Workcenter bus stop is running. When the server starts it registers itself on the LDS and clients are able to browse for the server.
To connect to the server the Client certificate has to be present in the trusted certificate store on the machine where the Workcenter bus stop is running. The administrator can install the client certificate manually using mmc console (see below). If the client certificate is not present in the trusted certificate store and the client tries to connect to the server, the server will put the certificate in the rejected certificate store and reject the communication. The administrator can use the OPC Server Manager utility to trust or reject certificates that are contained in that store.
1. Open the Microsoft Management Console by entering mmc.exe in a dos console.
2. Select File > Add or remove Snap-in (or press Ctrl+M)
3. Select Certificates from the Available snap-ins and click Add.
4. Select Computer account and click Next.
5. Select Local Computer and click Finish.
6. Click Ok
7. Go to Console Root > Certificates (Local Computer) > UA Applications > Certificates.
8. Right-click on the certificate that has been issued to UA Local Discovery Server and select All Tasks > Export.
9. Click Next.
10. Click Next again.
11. Select DER encoded binary X.509 (.CER) and click Next.
12. Provide a file name and click Next.
13. Click Finish.
When the OPC Server channel is started a server address space is created. OPC Server channel creates an address space according to the Channel > Channel message > Tag configuration. The configuration is transformed to a tree structure that is available for OPC clients for browsing. The names of channels and channel messages are used to construct a folder tree structure. Tags are represented as nodes using the tag name and data type..
For example, if a server has a channel named OPC_SERVER_TEST and a channel message named Order Upload then we'll see following address space structure:

To be able to reconstruct address space values after restarting an OPC server, values are periodically stored in a configuration file. Values are stored when the service is stopped or periodically. Values are stored periodically based on the channel configuration parameter Tag values backup (s). If the value is set to 0 then values will not be stored periodically.
The OPC Server Manager utility allows you to trust rejected certificates.
1. Run the OPC Server Manager utility as Administrator.
2. Click Rejected certificates.
The rejected certificates are with the following information:
o Information if concrete certificate is trusted.
o Certificate file name
o Information loaded from certificate
3. You can carry out the following actions:
o Click Refresh to manually refresh the list of certificates.
o Click Load certificate info to load certificate information. Information will only be shown automatically for certificates that do not contain a private key. A password must be loaded for certificates that have a private key.
o Click Load to load a private key.
o Click Trust to trust a rejected certificate.
o Click Reject to reject a trusted certificate.