 next to the Reader settings (XML)
field and then Open XML to provide
an XML file containing the reader configuration. The XML file is specific
to the hardware.
next to the Reader settings (XML)
field and then Open XML to provide
an XML file containing the reader configuration. The XML file is specific
to the hardware.
In this Topic Hide
The RFID channel allows the user to read and write RFID tags using a network connected RFID reader.
Only Impinj Speedway readers can be used at present.
1. Select the Workcenter Bus Stop tab.
2. Click RFID Channels.
A list of the existing RFID channels is shown.
3. Click Add.
A new window opens.
4. Enter a name for the channel.
The name of the channel must be unique within the entire ATS Bus configuration.
5. Select a Driver.
6. Enter the Hostname. This is the host name of the computer that hosts the driver.
7. If required enable 'Out of antenna range' detection. After a given time-out this will trigger an event notification that will inform ATS Bus that a given tag is out of range. If it is enabled the time-out must be entered in seconds.
8. Click
next to the Reader settings (XML)
field and then Open XML to provide
an XML file containing the reader configuration. The XML file is specific
to the hardware.
The Use Default button attached to the Reader settings (XML) field will generate a template that can be used to configure the reader.
9. Enter a description in the default language and any other required languages.
Message Definitions must be created before channel messages can be created.
Channel messages can be created once an RFID channel has been defined.
1. While editing an RFID channel select the Channel Messages tab.
All existing channel messages contained in the channel are listed. The table shows the name of the channel message, the direction in which the message is going and whether or not the message is currently active.
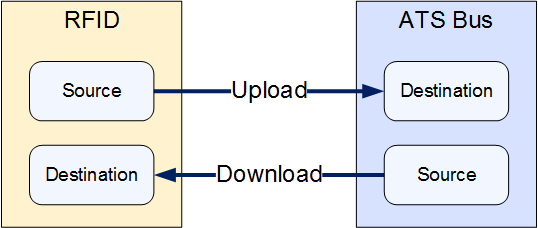
Messages are Uploaded towards the Bus and Downloaded away from it.
2. Click Add.
3. Enter a name for the channel message.
The name of the channel message must be unique within the entire ATS Bus configuration.
4. Select a Message Definition. Message Definitions act as templates when adding messages to a Channel. They specify whether the message is being uploaded from equipment or downloaded to equipment and also list the different data fields that will be available in the message.
The Tags control opens. In the right-hand pane it lists the fields contained within the message. The left-hand pane lists tags that will be created that match those fields.
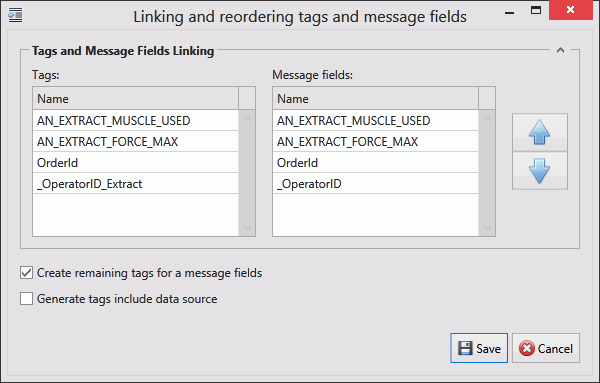
If the field has an Index value associated to it this will be added to the end of the tag name. For example, if the field name is _OperatorID and the field index is Extract then the tag name will be _OperatorID_Extract.
5. If you don't want tags to be created automatically disable Create remaining tags for message fields.
6. Use the arrows on the right-hand side to re-order the fields. To refresh the list of tags to match it disable and enable Create remaining tags.
7. If required, enable Generated tags include data source.
8. Click Save. You are returned to the New Channel Message window.
9. For Upload messages Trigger Types are available. A Trigger Type define when the channel message is read.
Name |
Description |
Extra Information Required |
On tag read event |
Trigger this message when a tag has been successfully read from the selected port. | Enter the Antenna port number. |
On tag successful write event |
Trigger this message when a tag has been successfully written. | No extra information required. |
On out of range event |
Trigger this message when a tag is out of range. |
No extra information required. |
10. For Upload messages select an Antenna port number.
11. Enable the Active checkbox to ensure the tag is active.
The tags provide the link to the location of the data on the server.
12. Click Add below the Tags pane (or Edit to modify an existing tag).
A new window opens.
13. Enter the name of the tag in the Description field.
14. Select a Data Type. This is the format in which the data will be received (e.g. Integer, Text, Char, etc.).
15. Enable the Active checkbox to ensure the tag is active.
16. If required, enable Mandatory. If a message is received and a mandatory tag doesn't have a value then the message won't be processed.
The source and destination can now be selected. The source and destination will depend on whether it is an Upload or Download message definition.
17. Select the Data source and the additional information the data source requires. This can be one of the following:
Name |
Description |
Specific Information |
RFID (upload only) |
The value is read from an RFID data source. |
Enter the RFID data source. |
Message Field (download only) |
The message field. |
Select the message field. |
Constant value |
The tag will always be the same value. |
Enter the value to be used. |
Translation table |
The value is read from an RFID data source and then translated using a data translation table. |
Select the translation table to use and the access path for the source value that will be translated. |
Function evaluation |
The value is read from an RFID data source and then modified using a function. |
Enter the function to use and the access path for the source value that will be modified by the function. |
18. Enter the Offset. This is the position in bits where the data is stored within the array.
19. Enter the Bit length. This is the length in bits of the data.
20. Select a Data Format. The data format specifies how the data is written to the memory of the RFID tag. The data format is preset by the tag dialog using the data type indicated in the tag details. Changing the data type results in a data format and bit length change too. The user is still able to modify these afterwards. When changing the data format, the bit length will reflect the number of bits required to store a value in the given data format. The following examples illustrate the usage of the user memory:
o Writing a 32-bit integer to the user memory at any given offset:
§ Offset = 13
§ Bit length = 32
§ Data Format = 32-bit signed integer
o Writing a 32-bit integer first and a 4 character string second
§ Offset = 0
§ Bit length = 32
§ Data Format = 32-bit signed integer
o Writing 4 ASCII characters at offset 32
§ Offset = 32
§ Bit length = 32 (=4 * 8)
§ Data Format = ASCII
o Compressing a 32-bit integer first into a 19 bits (sounds like compression).
§ Offset = 0
§ Bit length = 19 (discard higher 13 bit of data)
§ Data Format = 32-bit signed integer
o Writing a Boolean value
§ Offset = 0
§ Bit length = 1
§ Data Format = 1-bit boolean
21. If required, modify the Destination field. The destination of the data source is one of the message fields in the message definition. This value is preset to the choice made in the Linking and reordering tags and message fields dialog.
22. Click OK.
The tag is added to the channel message.
23. Click OK.
The channel message is added to the channel.
24. Click OK.
The channel is saved.