In this Topic Hide
Open Protocol Message Handling
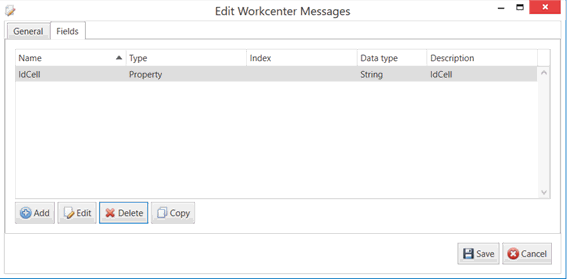
Channel for an Open Protocol command that has no parameters
Channel message for an Open Protocol command that has parameters
Channel message for an Open Protocol request
Channel message for an Open Protocol response
The Smart Tool channel allows users to connect to torque controllers from various vendors that support the Open Protocol specification. A wide variety of vendors already support the Open Protocol:
● Atlas Copco: PF4000/PF3000.
● Stanley: Alpha controller.
● ASG: EH2 Series.
● Desoutter Industrial Tools: CVI NET WEB 10 CONTROLLERS.
The Open Protocol has 3 ways of exchanging data:
● Commands messages.
● Request and Reply messages.
● Event messages.
The content of the message depends on the revision of the message being used. More information about this can be found in the Open Protocol specification of the vendor.
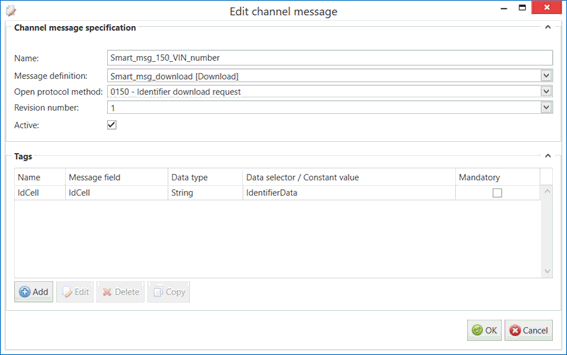
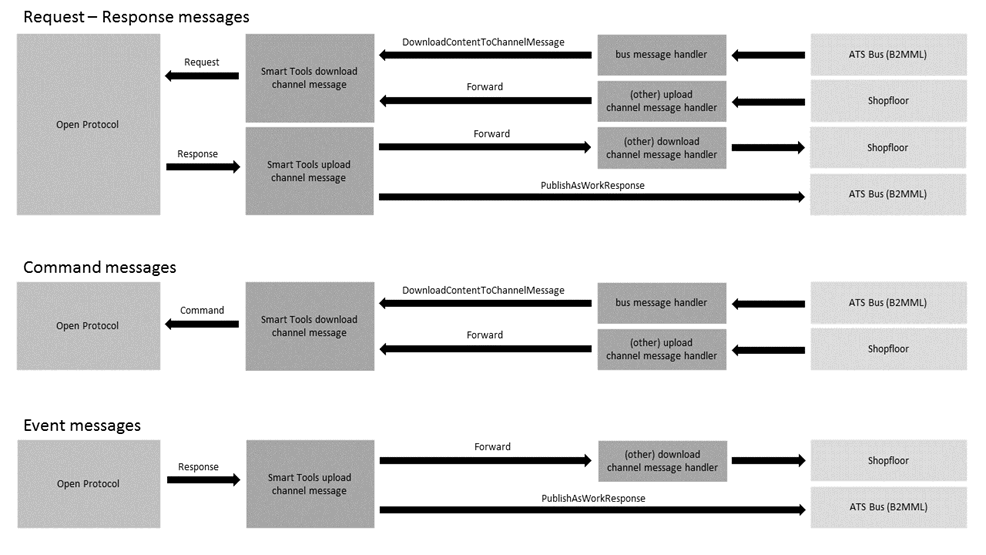
Sending a request to the torque controller requires a Smart Tools channel message and channel message definition with their direction set to download. The content of this channel message and the fields required in the message definition depend on the Open Protocol message ID being passed to the Open Protocol controller.
The download channel message (the message sending the request to the controller) can be triggered by a Forward action in another channel message or via a DownloadContentToChannelMessage action of a WorkResponse bus message.
Receiving a response from the controller requires a Smart Tools channel message and message definition with their direction set to upload. This message can then be published on the bus as a B2MML WorkResponse message using the PublishAsWorkResponse action or it can be forwarded to another download channel message using the Forward action.
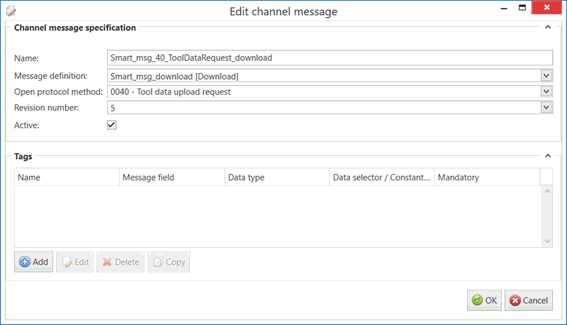
Sending a command to the Smart Tools channel requires a Smart Tools channel message and channel message definition with their direction set to download. The content of this channel message and the fields required in the message definition depend on the Open Protocol message ID being passed to the Open Protocol controller.
The download channel message (the message sending the command to the controller) can be triggered by a Forward action in another channel message or via a DownloadContentToChannelMessage action of a WorkResponse bus message.
The sender of the command is not
notified about a successful execution. Instead the user should subscribe
to a status event to receive information about the execution of commands.
0015 -Parameter set selected, 0022 - Lock at batch done upload, 0035
- Job info, 0052 - Vehicle ID number, 0076 - Alarm status, 0091 -
Multi-spindle status, 0101 - Multi-spindle result, 0121 - Job line
control started, etc.
Receiving an event from the controller requires a Smart Tools channel message and message definition with their direction set to upload. This message can then be published on the bus as a B2MML WorkResponse message using the PublishAsWorkResponse action or it can be forwarded to another download channel message using the Forward action.
Events can be received by explicitly subscribing to an Open Protocol message ID (MID) using a command message or by selecting the Auto subscribe checkbox in the Smart Tools channel message configuration.
1. Select the Workcenter Bus Stop tab.
2. Click Smart Tools Channels.
A list of the existing Smart Tools channels is shown.
3. Click Add.
A new window opens.
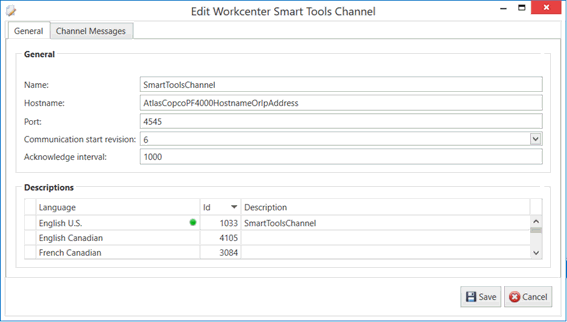
4. Enter a name for the channel.
The name of the channel must be unique within the entire ATS Bus configuration.
5. Enter the Hostname. This is the host name or IP address of the Open Protocol driver.
6. Enter the Port. This is the port number to connect to. The default for Open Protocol is 4545.
7. Select a Communication start revision. This is the revision number to use in the MID 0001 message to the controller. Review the Open Protocol specification for details.
8. Enter the Acknowledge interval. This is the maximum time to wait for acknowledge or response messages from the controller.
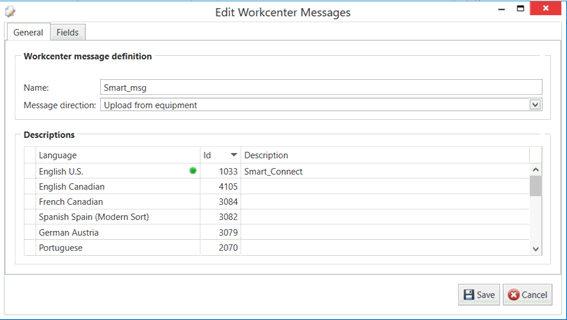
9. Enter a description in the default language and any other required languages.
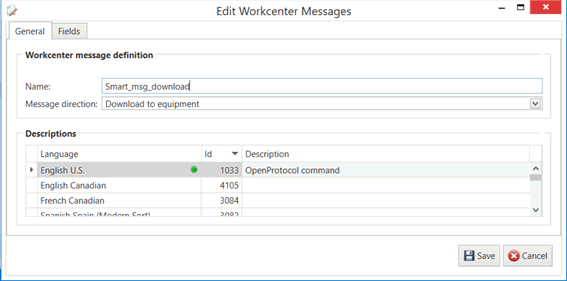
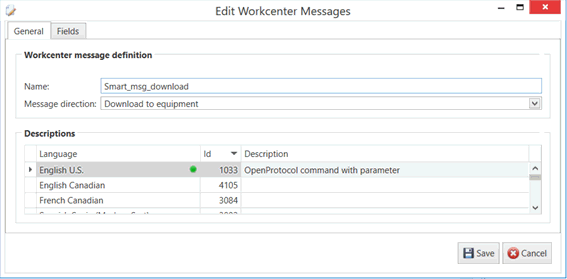
Message Definitions must be created before channel messages can be created.
Channel messages can be created once a Smart Tools channel has been defined.
1. While editing a Smart Tools channel select the Channel Messages tab.
All existing channel messages contained in the channel are listed. The table shows the name of the channel message, the direction in which the message is going and whether or not the message is currently active.
Messages are Uploaded towards the Bus and Downloaded away from it.
2. Click Add.
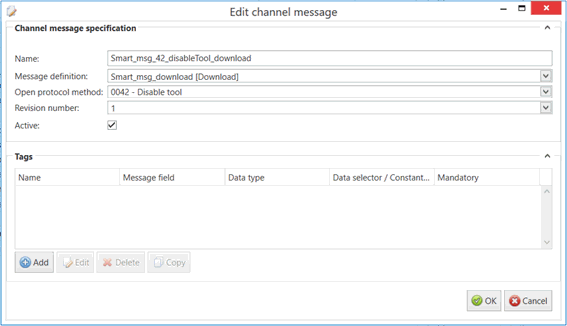
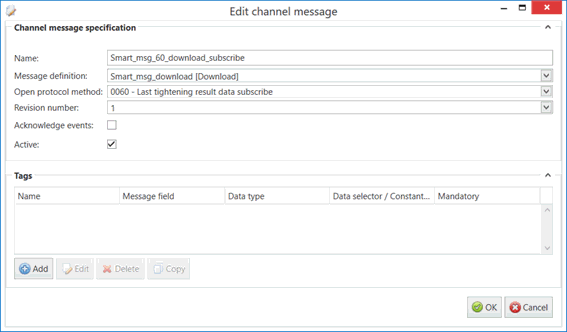
3. Enter a name for the channel message.
The name of the channel message must be unique within the entire ATS Bus configuration.
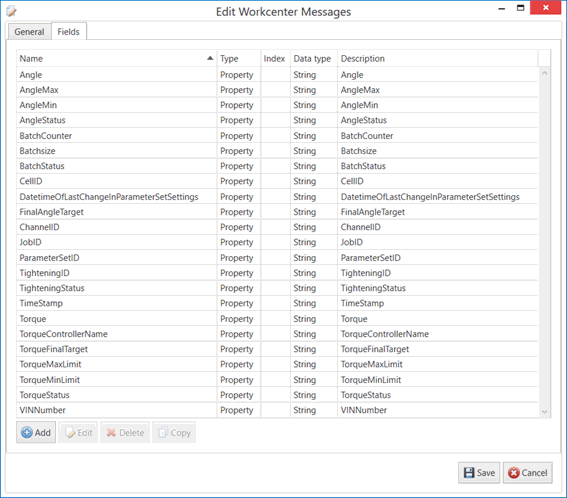
4. Select a Message Definition. Message Definitions act as templates when adding messages to a Channel. They specify whether the message is being uploaded from equipment or downloaded to equipment and also list the different data fields that will be available in the message.
The Tags control opens. In the right-hand pane it lists the fields contained within the message. The left-hand pane lists tags that will be created that match those fields.
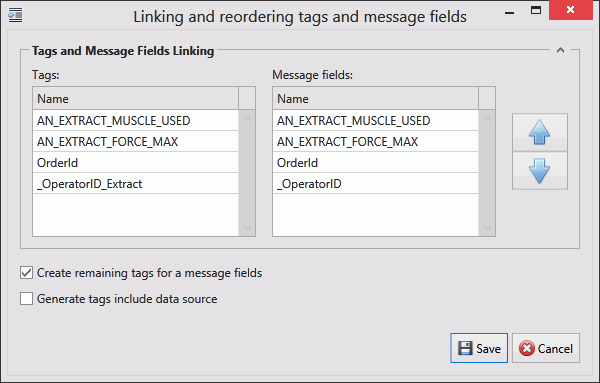
If the field has an Index value associated to it this will be added to the end of the tag name. For example, if the field name is _OperatorID and the field index is Extract then the tag name will be _OperatorID_Extract.
5. If you don't want tags to be created automatically disable Create remaining tags for message fields.
6. Use the arrows on the right-hand side to re-order the fields. To refresh the list of tags to match it disable and enable Create remaining tags.
7. If required, enable Generated tags include data source.
8. Click Save. You are returned to the New Channel Message window.
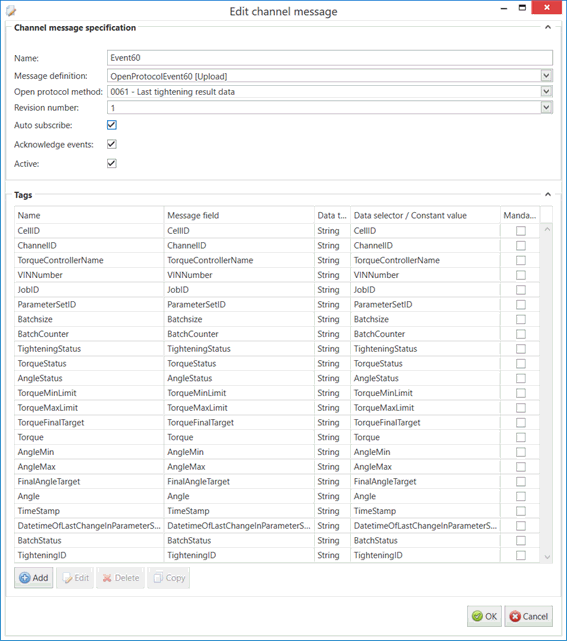
9. Select the Open protocol method ID (MID) that should be used with this channel message.
Each Open Protocol message ID should have its own message definition because some Open Protocol messages (commands for instance) don’t require message definition fields but others do. This means some channel messages require tags and others don’t.
10. Select the Revision number of the Open Protocol message.
11. Enable the Active checkbox to ensure the tag is active.
The tags provide the link to the location of the data on the server.
12. Click Add below the Tags pane (or Edit to modify an existing tag).
A new window opens.
13. Enter the name of the tag in the Description field.
14. Select a Data Type. This is the format in which the data will be received (e.g. Integer, Text, Char, etc.).
15. Enable the Active checkbox to ensure the tag is active.
16. If required, enable Mandatory. If a message is received and a mandatory tag doesn't have a value then the message won't be processed.
The source and destination can now be selected. The source and destination will depend on whether it is an Upload or Download message definition.
17. Select the Data source and the additional information the data source requires. This can be one of the following:
Name |
Description |
Specific Information |
From open protocol method parameter (upload only) |
Use open protocol method parameter | Enter the method parameter |
Message Field (download only) |
The message field. |
Select the message field. |
Constant value |
The tag will always be the same value. |
Enter the value to be used. |
Translation table |
The value is read from an open protocol data source and then translated using a data translation table. |
Select the translation table to use and the access path for the source value that will be translated. |
Function evaluation |
The value is read from an open protocol data source and then modified using a function. |
Enter the function to use and the access path for the source value that will be modified by the function. |
18. Select the Destination. This will either be a method parameter (for download) or a message field (for upload).
19. Click OK.
The tag is added to the channel message.
20. Click OK.
The channel message is added to the channel.
21. Click OK.
The channel is saved.