In this Topic Hide
Weihenstephaner Channels are used by the packaging industry. They're TCP/IP based and use pre-defined tags.
For more information on the Weihenstephaner protocol visit their website.
1. Select the Workcenter Bus Stop tab.
2. Click Weihenstephaner Channels.
A list of the existing Weihenstephaner channels is shown.
3. Click Add.
A new window opens.
4. Enter a name for the channel.
The name of the channel must be unique within the entire ATS Bus configuration.
5. Enter the Hostname (or IP address) and Port (default is 50000) where the channel can be found.
6. Enter a description in the default language and any other required languages.
Message Definitions must be created before channel messages can be created.
Channel messages can be created once a Weihenstephaner channel has been defined.
1. While editing a Weihenstephaner Channel select the Channel Messages tab.
All existing channel messages contained in the channel are listed. The table shows the name of the channel message, the direction in which the message is going and whether or not the message is currently active.
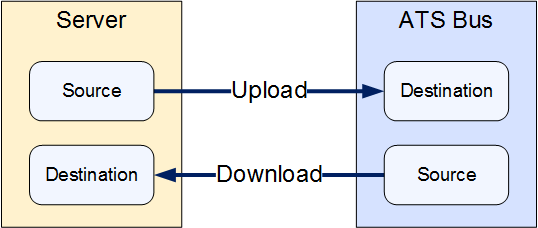
Messages are Uploaded towards the Bus and Downloaded away from it.
2. Click Add.
3. Enter a name for the channel message.
The name of the channel message must be unique within the entire ATS Bus configuration.
4. Select a Message Definition. Message Definitions act as templates when adding messages to a Channel. They specify whether the message is being uploaded from equipment or downloaded to equipment and also list the different data fields that will be available in the message.
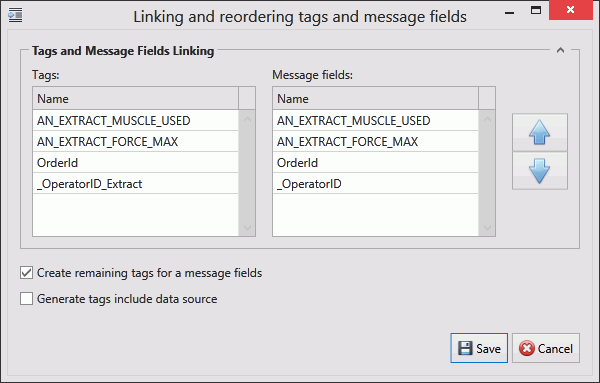
The Tags control opens. In the right-hand pane it lists the fields contained within the message. The left-hand pane lists tags that will be created that match those fields.

If the field has an Index value associated to it this will be added to the end of the tag name. For example, if the field name is _OperatorID and the field index is Extract then the tag name will be _OperatorID_Extract.
5. If you don't want tags to be created automatically disable Create remaining tags for message fields.
6. Use the arrows on the right-hand side to re-order the fields. To refresh the list of tags to match it disable and enable Create remaining tags.
7. If required, enable Generated tags include data source.
8. Click Save. You are returned to the New Channel Message window.
9. Select an Acquisition Interval. This will define how frequently the channel message is read in milliseconds.
The tags provide the link to the location of the data on the server.
10. Click Add below the Tags pane (or Edit to modify an existing tag).
A new window opens.
11. Enter the name of the tag in the Description field.
12. Select a Data Type. This is the format in which the data will be sent/received (e.g. Integer, Text, Char, etc.).
13. Enable the Active checkbox to ensure the tag is active.
14. If required, enable Mandatory. If a message is received and a mandatory tag doesn't have a value then the message won't be processed.
The source and destination can now be selected. The source and destination will depend on whether it is an Upload or Download message definition.

15. Select the Data source and the additional information the data source requires. This can be one of the following:
Name |
Description |
Required Information |
From tag (upload only) |
The value is read from a specific tag number. |
Select the tag number. |
Message Field (download only) |
The message field. |
Select the message field. |
Constant value |
The tag will always be the same value. |
Enter the value to be used. |
Translation table |
The value is read from a specific tag number and then translated using a data translation table. |
Select the translation table to use and the access path for the source value that will be translated. |
Function evaluation |
The value is read from from a specific tag number and then modified using a function. |
Enter the function to use and the access path for the source value that will be modified by the function. |
16. Select the Destination. This will either be a tag number (for download) or a message field (for upload).
For further information about tag numbers see the Weihenstephaner website here.
17. Click OK.
The tag is added to the channel message.
18. Click OK.
The channel message is added to the channel.
19. Click OK.
The channel is saved.