In this Topic Hide
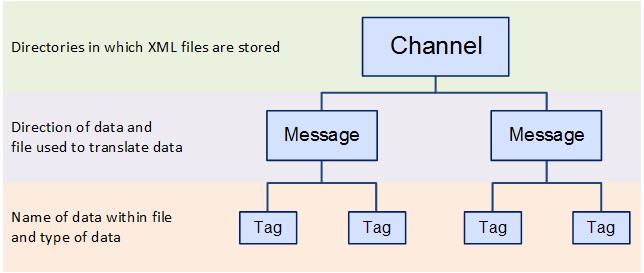
XML Channels are used to create named connections to the shop floor via an XML file. These connections are called tags. In order to create a tag you need to specify the server on which the data exists, the format of the data, when the data should be read and the address of the data.
This information is specified in different layers as shown below where the channel contains messages which contain the tags:
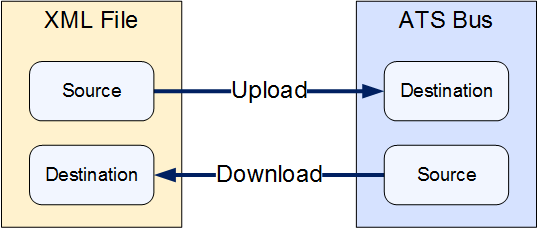
Each XML channel has an input and an output directory. The input directory is for channel messages with direction Upload. The output directory is for channel messages with direction Download.
1. Select the Workcenter Bus Stop tab.
2. Click XML Channels.
A list of the existing XML channels is shown.
3. Click Add.
A new window opens.
4. Enter a name for the channel.
The name of the channel must be unique within the entire ATS Bus configuration.
5. Enter a description in the default language and any other required languages.
6. Enter the Input Directory. This is the folder in which incoming (upload) files will be received.
7. Enter the Output Directory. This is the folder in which outgoing (download) files will be placed.
8. Enter a Scan Pattern. This is a file mask for incoming (upload) files. For example, if the file mask is *.xml then all files with an XML extension will be read. The wildcards '*' (representing 0 or more characters) and '?' (representing one character) are allowed. No other special characters are allowed.
9. Enable Backup original file to archive incoming files. You can then enter a Backup directory path to archive the files in.
10. Enter a Directory
for errors. This is the folder in which messages that could not
be processed are stored. This can be entered manually or you can click
the search button ( ) to locate it.
11. Enter a Processed
directory. This is the folder in which processed messages are stored.
This can be entered manually or you can click the search button ()
to locate it.
Message Definitions must be created before channel messages can be created.
Channel messages can be created once an XML channel has been defined.
1. While editing an XML Channel select the Channel Messages tab.
All existing channel messages contained in the channel are listed. The table shows the name of the channel message, the direction in which the message is going and whether or not the message is currently active.
Messages are Uploaded towards the Bus and Downloaded away from it.
2. Click Add.
3. Enter a name for the channel message.
The name of the channel message must be unique within the entire ATS Bus configuration.
4. Select a Message Definition. Message Definitions act as templates when adding messages to a Channel. They specify whether the message is being uploaded from equipment or downloaded to equipment and also list the different data fields that will be available in the message.
The Tags control opens. In the right-hand pane it lists the fields contained within the message. The left-hand pane lists acquisition tags that will be created that match those fields.
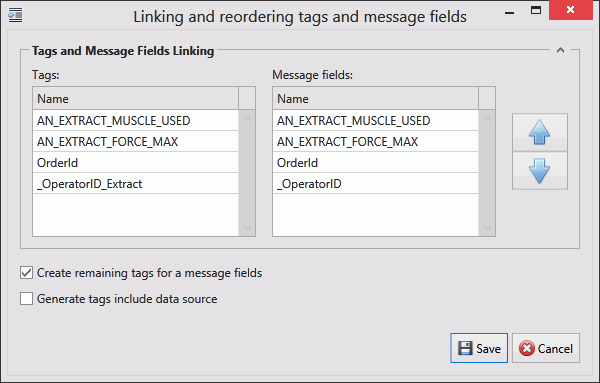
If the field has an Index value associated to it this will be added to the end of the tag name. For example, if the field name is _OperatorID and the field index is Extract then the tag name will be _OperatorID_Extract.
5. If you don't want tags to be created automatically disable Create remaining tags for message fields.
6. Use the arrows on the right-hand side to re-order the fields. To refresh the list of tags to match it disable and enable Create remaining tags.
7. If required, enable Generated tags include data source. This will populate the populate the XPath/Data Value column.
8. Click Save to close the Tag/Field window.
You can now specify the rest of the channel message details.
9. Enter an XPath filter. The XML channel runs XPaths from all channel messages against an incoming XML message. The XML messages that are matched are sent for processing. Incoming messages can be processed by zero, one or multiple channel messages depending on XPath matches.
10. Enter the XPath data selector (upload only). This node will be the root for processing. A separate message will be generated for every separate node beneath the root.
11. Enter a File Prefix.
o For upload: The XML files that will be associated with this specific message must have this prefix. The wildcards '*' (representing 0 or more characters) and '?' (representing one character) are allowed. No other special characters are allowed. For example:
§ ?test.?ip will find 1test.zip, btest.pip and so on
§ *test.*ip will find 1test.zip, 123abcxyztest.abc123ip
o For download: The file prefix is a string that is placed in front of the saved filename, it should not contain \, /, :, ", <, >, |, * or ?. The standard filename is a time stamp (year, month, day, hour, minute, second, millisecond) followed by the file extension. For example:
§ myXmlPrefix will result in a file named myXmlPrefix_<yyyyMMddHHmmssfff>.xml
12. If required, select a Message validation schema by clicking
the search button (). The validation schema is a separate
file that checks that the data in the file is correctly formatted.
13. If required, select a Message transformation document by
clicking the search button ().
This is an XSLT file that will transform the XML message into a format
that the Workcenter bus stop can read.
14. Enter a Processing order value. Channel messages are processed in ascending order according to this value.
The tags provide the link to the location of the data on the server. The XML tag is based on the general acquisition tag with the addition of an XPath.
15. Click Add below the Tags pane (or Edit to modify an existing tag).
A new window opens.
16. Enter the name of the tag in the Description field.
17. Select a Data Type. This is the format in which the data will be received (e.g. Integer, Text, Char, etc.).
18. Enable the Active checkbox to ensure the tag is active.
19. If required, enable Mandatory. If a message is received and a mandatory tag doesn't have a value then the message won't be processed.
The source and destination can now be selected. The source and destination will depend on whether it is an Upload or Download message definition.
20. Select the Data source. This can be one of the following:
Name |
Description |
Required Information |
From XPath (upload only) |
The value is read from an XPath source. |
Enter the XPath source. |
Message Field (download only) |
The message field. |
Select the message field. |
Constant value |
The tag will always be the same value. |
Enter the value to be used. |
Translation table |
The value is read from an XPath source and then translated using a data translation table. |
Select the translation table to use and the XPath for the source value that will be translated. |
Function evaluation |
The value is read from an XPath source and then modified using a function. |
Enter the function to use and the XPath for the source value that will be modified by the function. |
21. Select the Destination. This will either be an XPath (for download) or a message field (for upload).
22. Click OK.
The tag is added to the channel message.
23. Click OK.
The channel message is added to the channel.
24. Click OK.
The channel is saved.