In this Topic Hide
The IT Extension channel is required when the standard IT channels don’t have the functionality required to communicate with a customer’s software. It’s also required when a façade is needed to communicate with customer specific software.
This channel is very similar to the IT XML channel. The only difference is that instead of reading and writing to disk it reads and writes to a plug-in (.NET assembly) using a standard interface.
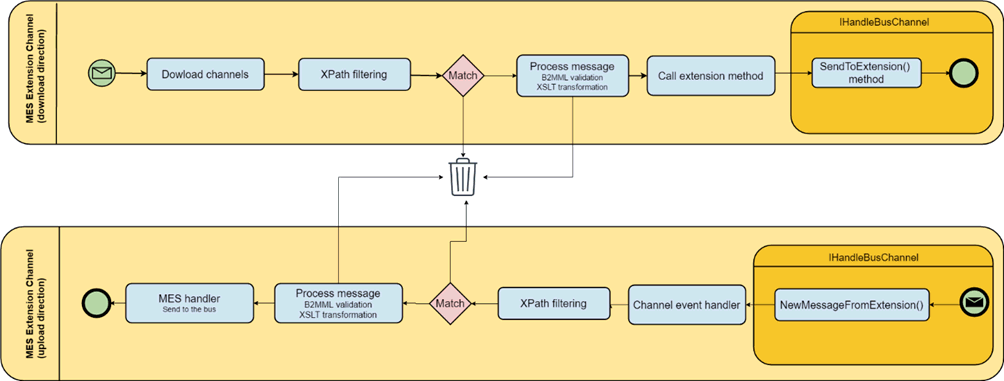
The following diagram shows the message flow to and from the extension:

When sending a message to the extension, the channel first makes sure that the message is a proper formatted B2MML message using internal validation. Then it uses an XPATH to select a portion of the B2MML message that should be downloaded. Next, the channel transforms that portion using an XML transformation and validates the outcome using a schema when required.
When receiving a message from the extension, the XPATH selects a portion of the incoming message. If the message from the extension is not a B2MML message, then the channel must transform it to B2MML using an XML transformation. The channel has a configuration item that can hold a schema to be used to validate the incoming message before transforming it to B2MML. The validation and transformation may be skipped if the incoming message is a B2MML message.
The extension is a .NET assembly and it should meet the following criteria:
● It should use the .NET Framework 4.5.
● The solution platform should be set to AnyCPU.
● There may only be one class implementing the IHandleBusChannel interface.
● ATS.Shared.Extensions.1.1.0.1.nupkg or higher is required.
1. Select the IT Bus Stop tab.
2. Click Extension Channels.
A list of the existing Extension channels is shown.
3. Click Add.
A new window opens.
4. Enter a name for the channel.
5. Enter a description in the default language.
6. Select the extension assembly
by clicking  in the Extension (DLL) item.
7. If required, enable Backup original file. and select a directory to store the backup file in.
8. Enter the Extension configstring. This is an extension specific configuration string that should be documented by the supplier of the extension. It’s used to initialize the extension.
9. Enter the Directory
for errors where files that could not be processed will be stored
or click  to search for the
directory to use.
10. Enter the Processed
directory where successfully processed files will be stored or
click  to search for the directory
to use.
1. While editing an Extension channel select the Channel Messages tab.
2. Click Add. (or Edit to modify an existing message).
3. Enter a name for the channel message.
The name of the channel message must be unique within the entire ATS Bus configuration.
4. Select a Message Definition. Message Definitions act as templates when adding messages to a Channel. They specify whether the message is being uploaded from equipment or downloaded to equipment and also list the different data fields that will be available in the message.
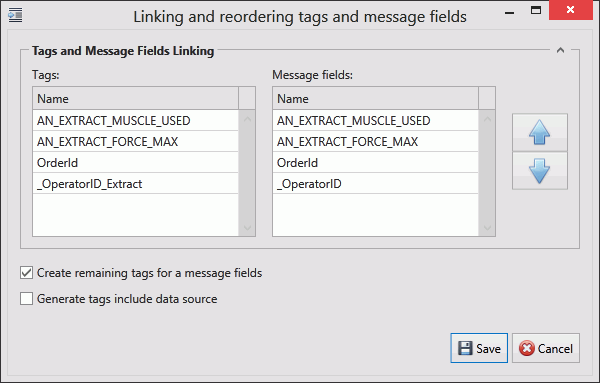
The Tags control opens. In the right-hand pane it lists the fields contained within the message. The left-hand pane lists acquisition tags that will be created that match those fields.

If the field has an Index value associated to it this will be added to the end of the tag name. For example, if the field name is _OperatorID and the field index is Extract then the tag name will be _OperatorID_Extract.
5. If you don't want tags to be created automatically disable Create remaining tags for message fields.
6. Use the arrows on the right-hand side to re-order the fields. To refresh the list of tags to match it disable and enable Create remaining tags.
7. If required, enable Generated tags include data source. This will populate the populate the XPath/Data Value column.
8. Click Save to close the Tag/Field window.
9. Enter an XPath filter. This is used in the following ways depending on the direction of the message.
o Upload: incoming messages are processed if they match the XPath filter.
o Download: Transformed outgoing messages are sent to the extension if they match the XPath filter.
10. Enter the XPath data selector (upload only). This property selects a portion of the incoming message that should be processed.
11. If required, select a Message Validation. This is used in the following ways depending on the direction of the message.
o Upload: Validate the incoming message against its own schema. This property is not used for B2MML validation that is an internal validation that does not require configuration by the user.
o Download: Validate the transformed message against a provided schema.
12. If required, select a Message transformation. This is used in the following ways depending on the direction of the message.
o Upload: This property contains an XML transformation that transforms the incoming message to B2MML.
o Download: This property contains an XML transformation that transforms the outgoing bus message to the format required by the extension.
The tags provide the link to the location of the data on the server.
13. Click Add below the Tags pane (or Edit to modify an existing tag).
A new window opens.
14. Enter the Name of the tag.
15. Select a Data Type. This is the format in which the data will be received (e.g. Integer, Text, Char, etc.).
16. Enable the Active checkbox to ensure the tag is active.
17. If required, enable Mandatory. If a message is received and a mandatory tag doesn't have a value then the message won't be processed.
The source and destination can now be selected. The source and destination will depend on whether it is an Upload or Download message definition.
18. Select the Data source. This can be one of the following:
Name |
Description |
Required Information |
From XPath (upload only) |
The value is read from an XPath source. |
Enter the XPath source. |
Message Field (download only) |
The message field. |
Select the message field. |
Constant value |
The tag will always be the same value. |
Enter the value to be used. |
Translation table |
The value is read from an XPath source and then translated using a data translation table. |
Select the translation table to use and the XPath for the source value that will be translated. |
Function evaluation |
The value is read from an XPath source and then modified using a function. |
Enter the function to use and the XPath for the source value that will be modified by the function. |
19. Select the Destination. This will either be an XPath (for download) or a message field (for upload).
20. Click OK.
The tag is added to the channel message.
21. Click OK.
The channel message is added to the channel.
22. Click Save.
The channel is saved.
There are a couple of requirements before you start working on a new extension channel. Let’s summarize them again:
o It should use the .NET Framework Version 4.5.
o The solution platform should be set to AnyCPU.
o There may only be one class implementing the IHandleBusChannel interface.
o ATS.Shared.Extensions.1.1.0.1.nupkg or higher is required.
1. Start Visual Studio and create a new assembly project and configure it to use the .NET Framework version 4.5.
2. Install ATS.Shared.Extensions.1.1.0.1.nupkg from the NuGet package manager.
The code below will instantiate a timer with a 10 second interval.
The event handler that is being called when the timer fires sends a message to IT Extension channel (upload direction).
All XML documents sent to the Extension channel (download direction) will be saved to disk.
The Configure member obtains a string holding a directory name where to save the XML to. The string argument of the Configure member is given by the Extension config string in the IT Extension channel configuration.
/// <summary>
/// Bus Channel extension demo project
/// </summary>
[Serializable]
public class ChannelExtensionSimple : MarshalByRefObject, IHandleBusChannel
{
private const string Message = "<root><ID>1</ID><Val1>1</Val1></root>";
private string _path;
private readonly Timer _timer;
[field: NonSerialized]
public event EventHandler<ExtensionEventArgs> NewMessageFromExtension;
public void Configure(string config) => _path = config;
public voidSendToExtension(string xmlText)
{
if (string.IsNullOrEmpty(_path))
throw new NullReferenceException("Call Config(\"file_path\") method first.");
var filename = DateTime.Now.ToString("yyyyMMddHHmmssfff");
File.WriteAllText(Path.Combine(_path, filename,".xml"),xmlText);
}
public ChannelExtensionSimple()
{
_timer = new Timer { AutoReset = true };
_timer.Elapsed += _timer_Elapsed;
_timer.Interval = 10 * 1000; //Send a message per 10sec
_timer.Enabled = true;
_timer.Start();
}
private void_timer_Elapsed(object sender, ElapsedEventArgs e) =>
NewMessageFromExtension?.Invoke(this, new ExtensionEventArgs(Message));
}
The following code fragment is the minimum amount of code required for an assembly to qualify for an ATS Bus Extension assembly.
[Serializable]
public class MinimalExtension : MarshalByRefObject, IHandleBusChannel
{
#region Interface implementation
[field: NonSerialized]
public event EventHandler<ExtensionEventArgs> NewMessageFromExtension;
public void Configure(string config) {}
public voidSendToExtension(string xmlText) {}
#endregion
#regionConstructor
publicChannelExtensionSimple()
{
}
#endregion
}
#ILMerge should be used to merge multiple assemblies into one assembly if the project contains more than one assembly. This can be the case when including third party assemblies.
For more information about ILMerge see here.
The NuGet package (ATS.Shared.Extensions.1.1.0.1.nupkg) includes an assembly named ATS.Shared.ExtensionHandlers.dll. This assembly is provided to be able to compile and test the assembly. Do not add this assembly in an ILMerged assembly.