In this Topic Hide
Select Operations Handled by Bus Stop
Select Equipment Handled by Bus Stop
Select Channels Used by Bus Stop
Define Actions for Messages Received from Shop Floor
1. Select the OT Bus Stop tab.
2. Click Bus Stops.
A list of the existing bus stops is shown.
3. Click Add.
A new window opens.
4. Enter the required information as listed below.
5. Click Save.
1. Select the OT Bus Stop tab.
2. Click Bus Stops.
A list of the existing bus stops is shown.
3. Select a bus stop and click
Edit.
Alternatively, you can double-click on a bus stop.
The bus stop opens.
4. Enter the required information as listed below.
5. Click Save.
1. Open the bus stop for editing as shown above.
2. Select the General tab.
3. Enter a name for the bus stop.
4. Enter a host name.
5. Enter a description in the default language.
The Operations tab allows you to select which operations will be handled by this bus stop.
1. Open the bus stop for editing as shown above.
2. Select the Operations tab.
3. Enable the operations that will be handled by this bus stop.
4. For each enabled operation select the Data Type Scope Description.
For information on operations see here.
The Equipments tab allows you to select which equipment this bus stop will communicate with.
1. Open the bus stop for editing as shown above.
2. Select the Equipment tab.
3. Enable the equipment that will be handled by this bus stop.
The selected equipment will appear in the right-hand column.
For information on creating the equipment hierarchy see here.
The Channels tab allows you to select the channels that will be used by this bus stop to communicate with the servers linked to the shopfloor equipment. The messages handled by the selected channels will be available in the OT Messages Handling tab.
1. Open the bus stop for editing as shown above.
2. Select the Channels tab.
3. Enable the channels that will be used.
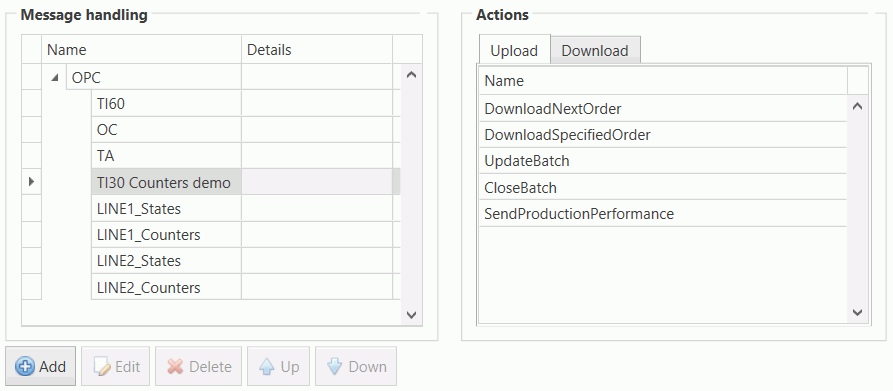
The OT Message Handling tab allows you to define the actions that will be taken when messages are received through the channels that were selected in the Channels tab.
For more information on the actions that can be used see here.
1. Open the bus stop for editing as shown above.
2. Select the OT Messages Handling tab.

The left-hand pane lists the channels and the messages they contain. The right-hand pane lists the actions that can be carried out.
3. In the right-hand pane select the Upload or Download tab to choose the type of action you want.
4. Drag and drop an action
onto a message on the left-hand pane.
Alternatively, you can select a message, click Add
and select an action from the drop-down list.
5. Enter the required message action parameters.
6. Click OK.
The action is added to the list.
This tab allows you to select the bus messages that will be handled by this bus stop. The messages selected in this tab will be available in the Bus Messages Handling tab.
1. Open the bus stop for editing as shown above.
2. Select the Subscribed Messages tab.
Every combination of operation and bus message type is listed.
For information on managing operations see here.
3. Enable the messages that will be handled by this bus stop.
For more information on the actions that can be used see here.
The Bus Message Handling tab allows you to define the actions that will be taken when messages are received from the Bus. These are messages that were selected in the Subscribed Messages tab.
1. Open the bus stop for editing as shown above.
2. Select the Bus Message Handling tab.

The left-hand pane lists the bus message type and the operations. The right-hand pane lists the actions that can be carried out.
3. In the right-hand pane select the Upload or Download tab to choose the type of action you want.
4. Drag and drop an action
onto an operation on the left-hand pane.
Alternatively, you can select an operation, click Add
and select an action from the drop-down list.
For information on managing operations see here.
5. Enter the required message action parameters.
6. Click OK.
The action is added to the list.