In this Topic Hide
This section describes the ATS Bus installation process.
Close any application that controls windows services like services.msc, computer management and the task manager before installing ATS Bus. They may interfere with the installation procedure.
When you run the installer the following screen will be displayed:

1. Click Next.

2. Select I accept the terms in the license agreement
3. Click Next.

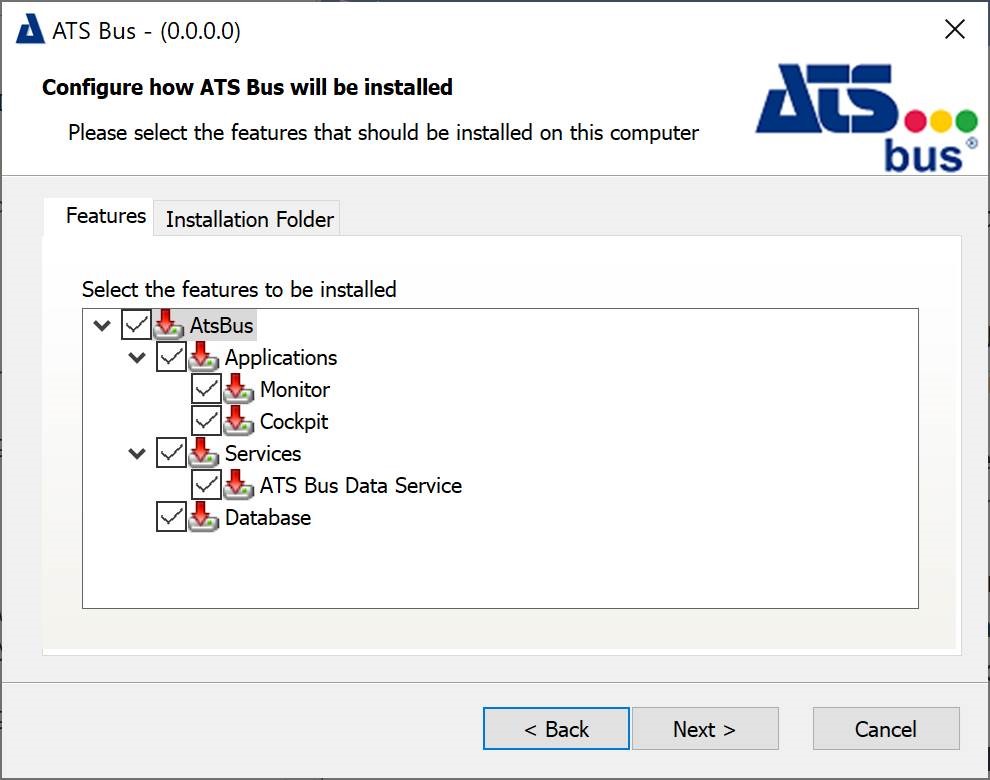
4. Select one or more features that should be installed. Items can be installed individually.
o Applications: ATS Bus Monitor and ATS Bus Cockpit.
o Monitor: ATS Bus Monitor.
o Cockpit: ATS Bus Cockpit.
o Services (ATS Bus Data Service): The data service that serves as a bridge between the ATS Bus configuration database and applications and bus stops.
o Database: Installs or overwrites the ATS Bus configuration database to an SQL Server. Do not enable this feature when upgrading ATS Bus, it will overwrite the existing database.
5. Click Next. The next dialog will depend on whether or not you're creating a new database.
The 3 dialogs below are shown when the Database feature is selected.

6. Fill in the required information to connect to the SQL Server to create the ATS Bus configuration database. The username and password must belong to an SQL Server user that has administrative privileges. These values can only be provided when the ‘Trusted Connection’ is not selected. The ‘Trusted Connection’ uses the Windows credentials of the user that executes the ATS Bus installer.
Clicking  next to the ‘Database’
drop down list will show which databases are already present on the SQL
Server.
7. Click Next.

8. Enter a Login ID and Password for the ATS Bus data service to logon to the ATS Bus configuration database. The Login ID and Password are not the same as the one used to logon to ATS Bus Cockpit.
9. Click Next.

This dialog configures the endpoint details for the licensing server.
10. Provide the Hostname and Port Number of the licensing server and click Next.
The following screen is shown if the database is not selected but the Data Service is as the Data Service needs to know how to access the database.

This dialog does not create a new ATS Bus configuration database but connects to an existing one using the SQL user Logon ID and Password.
11. Enter the required information and click Next.

The ATS Bus Data Service endpoint dialog configures 2 endpoints maintained by the ATS Bus Data Service. The first endpoint is the configuration endpoint that is used by ATS Bus Cockpit and the bus stops to set and get configuration data. The second endpoint is used by ATS Security to upload the user rights to the ATS Bus Data Service. The Hostname and User Rights ports are used to create the following endpoint:
http://<hostname>:8710/api/application/trigger
This URL is used as the Access Rights URL in ATS Security Manager when configuring the ATS Bus application.
The default ATS Bus Data Service port must be changed when the ATS Inspect CAD Conversion Service is installed on the same host as the ATS Bus Data Service.
12. Provide the port numbers and click Next.
ATS Bus uses ATS Security to authenticate users. Authentication happens through an authentication endpoint and this dialog is used to provide that endpoint to the ATS Bus Data Service. The Hostname, Port and Path should match the values provided during the ATS Security installation. Port should match the ‘Security Manager Port’ in the ATS Security installation and Hostname should match the ‘Server Hostname’. Path is currently not used and should be left empty. ‘http’ should be used as transport.

13. Enter the required information and click Next.

14. Click Install. This will create the database when the Database feature has been selected and create and start the ATS Bus Data Service when the Services feature has been selected. The installer also creates log sources, installs certificates and makes sure that the data service is started when Windows starts.
When the application has successfully installed the following screen will be shown.

15. Click Finish to close the installer.
You can now create user names and passwords within ATS Security Manager.