How Are Files Transferred?
ATS Bus is able to transfer file attachments between bus stops using the ProcessOperationsSchedule and ProcessOperationsPerformance bus messages. This is done by defining extensions in the B2MML schema named B2MML-V0600-Extensions.xsd. ATS Bus provides an extension named ‘Attachment’ that adds attachments to the SegmentRequirement and SegmentResponse nodes of OperationsSchedule and OperationsPerformance. More than one attachment per SegmentResponse and SegmentRequirement are allowed
In order to use the Attachment extension, the ‘Extended’ namespace needs to be declared as highlighted in yellow below:
<?xml version="1.0" encoding="utf-8"?>
<OperationsSchedule xmlns="http://www.mesa.org/xml/B2MML-V0600" xmlns:Extended="http://www.mesa.org/xml/B2MML-V0600-AllExtensions" >
…
<OperationsRequest>
…
<SegmentRequirement>
…
<Extended:Attachment>
<Extended:ID>File1</Extended:ID>
<Extended:Index>File1</Extended:Index>
<Extended:FileName>AtsBusContent.txt</Extended:FileName>
<Extended:Content>VGhpcyBpcyB0ZXN0IGNvbnRlbnQgdGhhdCBpcyB1c2VkIGZvciB0ZXN0aW5nIHRoZSBBVFMgQnVzIGRhdGFidXMgZnVuY3Rpb25hbGl0eQ==</Extended:Content>
<Extended:MimeType>File1MimeType</Extended:MimeType>
</Extended:Attachment>
<Extended:Attachment>
<Extended:ID>File2</Extended:ID>
<Extended:Index>File2</Extended:Index>
<Extended:Url>File2Url</Extended:Url>
<Extended:MimeType>File2MimeType</Extended:MimeType>
</Extended:Attachment>
<Extended:Attachment>
<Extended:ID>File3</Extended:ID>
<Extended:Index>File3</Extended:Index>
<Extended:FileName>AtsBusAttachment.txt</Extended:FileName>
<Extended:FilePath>c:\temp</Extended:FilePath>
<Extended:MimeType>File3MimeType</Extended:MimeType>
</Extended:Attachment>
</SegmentRequirement>
</OperationsRequest>
</OperationsSchedule>
The example above shows an OperationsSchedule message but the same principles apply to an OperationsPerformance message.
Setting up and enabling the NServiceBus DataBus
Attachment data, the actual payload or content, is not embedded in the bus message but travels via a separate bus, the NServiceBus DataBus. This bus can use different type of transport layers. It’s a user decision which one will be used.
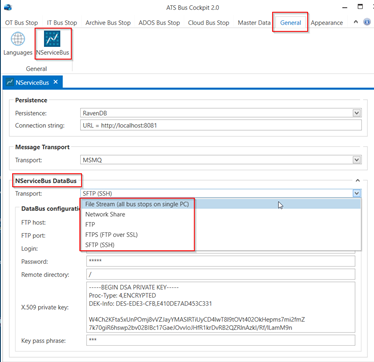
The following transports are available:
File stream – this option is designed for bus stop running on one computer. All bus stops share one (predefined) directory - c:\ProgramData\Applied Tech Systems\ATS Bus\DataBus\
Network share – all bus stops will used network shared directory.

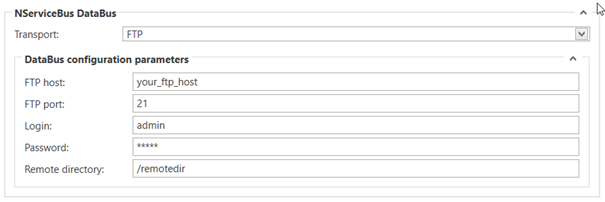
FTP – the attachments can be transferred via FTP server. User must configure FTP connection include host, port, login, password and remote directory.
FTPS (FTP over SSL) – this is the secured version of FTP protocol. FTPS (also known as FTPES, FTP-SSL, and FTP Secure) is an extension to the commonly used File Transfer Protocol (FTP) that adds support for the Transport Layer Security (TLS) and, formerly, the Secure Sockets Layer (SSL, which is now prohibited by RFC7568) cryptographic protocols.
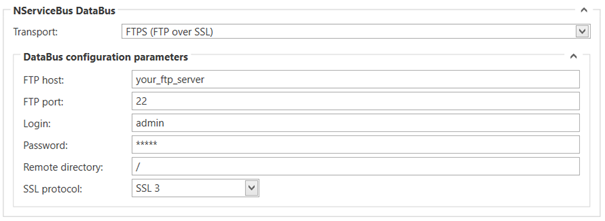
SSL protocol can be SSL 2, SSL 3, TLS, TLS 1.1, TLS 1.2.
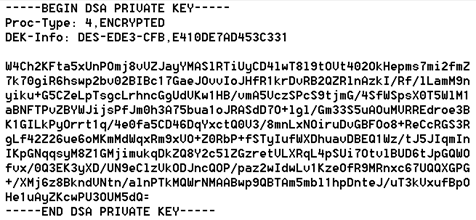
SFTP - SSH File Transfer Protocol (also Secure File Transfer Protocol, or SFTP) is a network protocol that provides file access, file transfer, and file management over any reliable data stream (SFTP is not a FTP). User can configure SFTP with or without X.509 certificate based on SFTP server configuration. If certificate is not required just leave the private key and pass phrase blank.
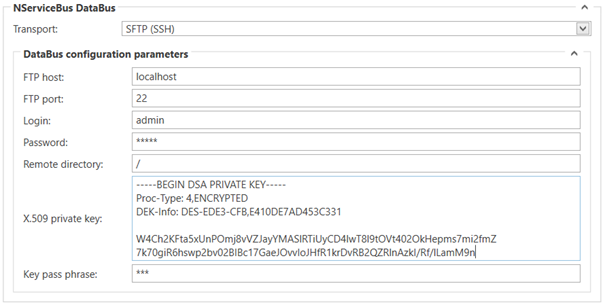
If X.509 private key is required, the complete file must be included. This means including the header, the key self and footer. See the example below.
Providing and Sharing a Location to Store Attachments
Each bus stop stores the attachments it receives in its program data directory. This directory is created when the bus stop starts. It can be found in the following location:
C:\ProgramData\Applied Tech Systems\<BUSSTOPNAME>
This directory must be shared because a windows drive name cannot be shared over the network and sharing it allows the bus stop to create a valid URL so that the attachment can be shared with peers listening on the other end of channel messages.
Create OT Message Definitions
The OT bus stop contains logic to convert between the B2MML attachment extension and shopfloor message field types. The following list shows the mapping between the B2MML Attachment extension and the Attachment shopfloor message field type:
B2MML Extended:Id --> AttachmentId
B2MML Extended:FileName --> FileName
B2MML Extended:FilePath --> FilePath
B2MML Extended:Url --> URL
B2MML Extended:MimeType --> MimeType
Extended:Index is used to index the shopfloor message fields of type Attachment because more than one attachment is allowed.
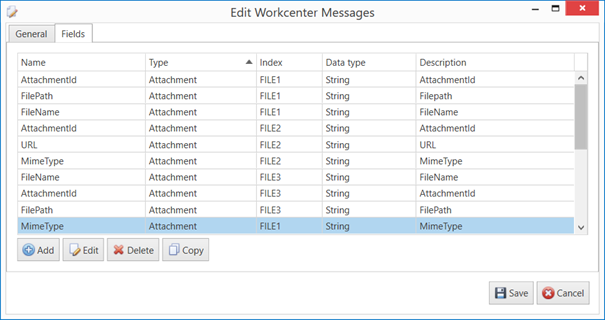
The image below shows a message definition for all attachments in the XML message given at the start of this topic.
For a full description of how to create OT message definitions see here.
Create an OT Message Definition containing attachments as follows:
Select the OT Bus Stop tab.
Click Messages.
A list of the existing message types is shown.
Click Add.
A new window opens.
Adding general Information
Enter a name for the message definition.
Select a message direction:
Upload from equipment.
Download to equipment.
Enter a description in the default language.
Adding Fields
Select the Fields tab.
Click Add.
A new window opens.
In the Class Type drop-down list select Attachment.
Select a Data Type. This specifies the data format.
Select a Name from the drop-down list. This could be one of the following:
Attachment ID (mandatory)
URL (only allowed when FilePath, FileName are absent)
FilePath
MimeType (mandatory)
FileName (if provided, either FilePath or Content must be provided, not both)
If required enter an Index for the message field. The index is required as more than one attachment can be included in the message. Alternatively, enable Index filled by tag. This will create an index value from the tag.
Enter a Description in the default language.
Click OK.
The field is added to the message definition.
Click Save.
The message definition is saved.