What is the Work Order Manager?
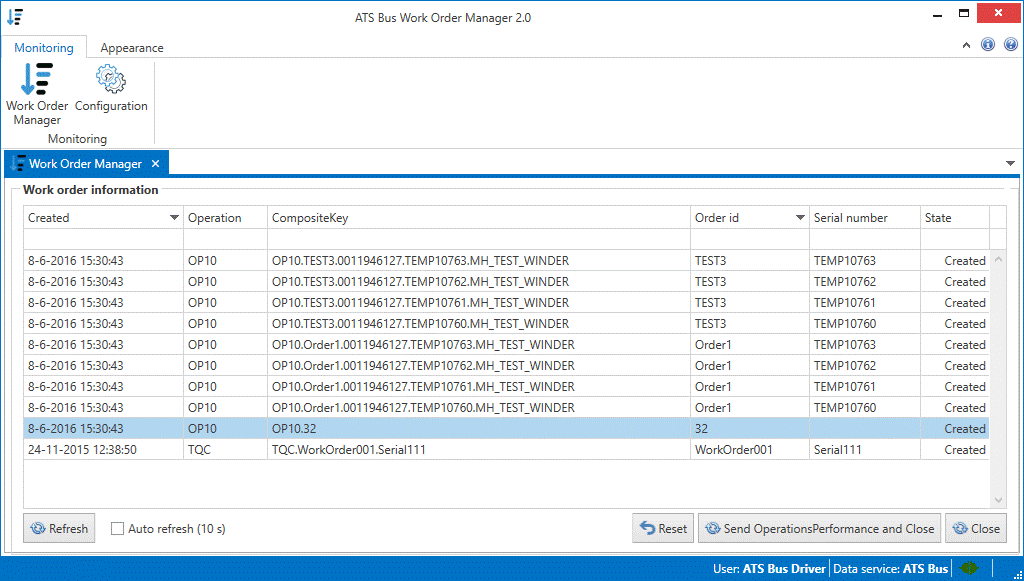
The work order manager is an application that allows the user to view, reset and close the work orders that are present in the work center bus stop.

Available Information
The following information is visible to the user:
The date the order was created.
The operation, composite key (a unique key to identify the work order), order ID and serial number.
The state of the work order:
Created: The work order has been queued in the work center bus stop, ready to be dispatched.
Dispatched: The work order has been dispatched to the equipment.
Running: The work order is being executed on the equipment.
Closed: The work order is closed.
OnHold: The work order has been created but it will not be dispatched to the equipment. The operations schedule must be updated and the ScheduleState should be set to Released.
Available Actions
The user can:
Automatically refresh the list of work orders by enabling the Auto refresh tick box.
Manually refresh the list of work orders by clicking Refresh.
Reset the work order back to the state Created by clicking Reset.
Close the work order and trigger an OperationsPerformance message by clicking Send OperationsPerformance and Close.
Close the work order and not trigger an OperationsPerformance message by clicking Close.
Configure the endpoint where the work order manager connects to by clicking on Configuration in the Monitoring ribbon.
REST API
ATS Bus OT Bus Stop version 2.7 comes with a REST API for the work order manager. It allows third parties to view, close and reset work orders. The REST API has the same functionality as the front-end application including encryption (https) and authentication.
Prerequisites
The REST API has the following prerequisites:
ATS Bus 2.7+
ATS Security Manager 1.1+
How to setup encryption
ATS Bus enforces encryption on the REST interfaces. Encryption requires a valid server certificate in the certificate store, one that is signed by a trusted CA (Certification Authority). The ATS BUS OT bus stop installer does not provide a temporary certificate and it does not bind existing certificates with the REST interfaces. The user should provide a valid certificate and bind the interfaces to it.
Binding a certificate to an endpoint
The following Windows commands can be used to bind a certificate to the REST endpoint:
netsh http add sslcert ipport=0.0.0.0:8820 appid={ED3CE4E1-E134-49FC-AA7F-E4E1D142B0D4} certhash=THUMBPRINT
Where THUMBPRINT is the thumbprint of the server certificate in the certificate store. The port 8820 is hard-coded and cannot be changed.
Releasing a certificate from an endpoint
The following windows commands can be used to release a certificate from an endpoint:
netsh http delete sslcert ipport=0.0.0.0:8820
How authentication works
ATS Bus uses the ATS Security Manager to allow users to use the front-end applications and REST API. Setting up a user is explained in the online ATS Security manual available here.
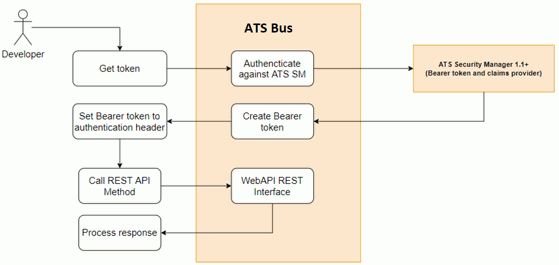
The illustration below shows the authentication workflow.

First, an authentication request is posted to the OAuth 2.0 endpoint of the REST interface:
REST: https://computername:8820/Token
The authentication request must contain the following parameters:
grant_type set to password
username (from the ATS Security Manager)
password (from the ATS Security Manager)
The OAuth 2.0 endpoint passes the information to the ATS Security Manager, which will authenticate the user. Once authenticated, the OAuth 2.0 endpoint responds to the client with a bearer token and an expiry date. The bearer token must then be used in the authentication header of the consecutive calls to the OData and REST interface. An example is provided below that shows how to authenticate a user and invoke a method on a REST resource.
REST API Resources and Methods
The ATS Intelligence REST API provides access to the following resource:
WorkOrders
These resources can be accessed via the following unique endpoint: https://host:8820/api/v1/workorders.
Each resource defines a set of methods that can perform an action on the resource:
GET: api/v1/workorders, Retrieve all resources
GET: api/v1/workorders/{compositeKey}, Retrieve a single work order by its composite key.
PUT: api/v1/workorders/{compositeKey}, Reset a work order to state Created.
DELETE: api/v1/workorders/{compositeKey}, Close a work order by its composite key.
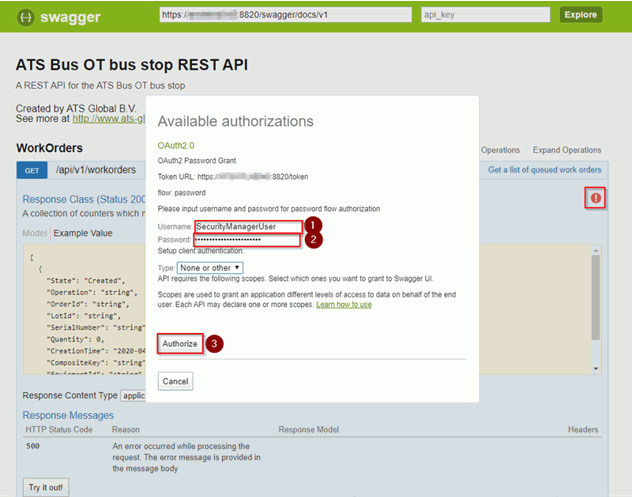
The Swagger UI (https://computername:8820/swagger) provides documentation for the resources and methods supported by the ATS Bus OT bus stop work order manager and it is also able to invoke these methods on the available resources.
Please note that the Swagger UI user must be authenticated before it can use the methods. Swagger will show a red exclamation mark (as indicated below) when the user is not authenticated, clicking it will show a dialog that can authenticate a user. A username and password should be filled in before clicking the Authorize button. Once authenticated, the exclamation mark changes to a blue i.

A C# REST client
The C# example in this chapter shows how to authenticate a user and get the work orders from the OT bus stop:
ServicePointManager.ServerCertificateValidationCallback += (sender, certificate, chain, errors) => true;
var client = new HttpClient {BaseAddress = new Uri(args[0])};
// Add an Accept header for JSON format.
client.DefaultRequestHeaders.Accept.Add(new MediaTypeWithQualityHeaderValue("application/xml"));
client.DefaultRequestHeaders.Accept.Clear();
client.DefaultRequestHeaders.AcceptLanguage.Add(newStringWithQualityHeaderValue("en-GB"));
client.DefaultRequestHeaders.Accept.Add(newMediaTypeWithQualityHeaderValue("application/json"));
// Form data
var form = new Dictionary<string, string>
{
{"grant_type", "password"},
{"username", "your ATS Security Manager username"}
{"password", "your ATS Security Manager password"}
};
var tokenResponse = client.PostAsync("Token", newFormUrlEncodedContent(form)).Result;
if(!tokenResponse.IsSuccessStatusCode)
throw new Exception($"Authentication failed. Token response : {tokenResponse.ReasonPhrase}");
var _token = tokenResponse.Content.ReadAsAsync<TokenOAuth>(new[] { newJsonMediaTypeFormatter() }).Result;
if (string.IsNullOrEmpty(_token.AccessToken))
throw new Exception($"Authentication failed.");
client.DefaultRequestHeaders.Authorization = new AuthenticationHeaderValue("Bearer", _token.AccessToken);
// List data response.
var response = client.GetAsync("api/v1/workorders" ).Result;
if (response.IsSuccessStatusCode)
{
//get the data from response Content
}
else
{
Console.WriteLine("{0} ({1})", (int)response.StatusCode, response.ReasonPhrase);
}
//Make any other calls using HttpClient here.
//Dispose once all HttpClient calls are complete. This is not necessary if the containing object will be disposed of; for example in this case the HttpClient instance will be disposed automatically when the application terminates so the following call is superfluous.
client.Dispose();