ATS Bus 2.5 introduced the IT and OT web service channels and these have been improved in ATS Bus 2.8 to support encryption and user authentication using the ATS Security Manager.
ATS Bus 2.7 introduced a REST API for the OT bus stop work order manager. It allows third parties to view, close and reset work orders. The RESTful API has the same functionality as the front-end application including encryption (https) and authentication. In version 2.8, the user authentication has been updated. When using the API, users should first obtain a token from the ATS Security Manager and then use that token in the authorisation header to invoke the methods on the work order manager RESTful API.
All ATS Bus RESTful API’s have 2 configuration items in common and these are explained here:
- Encryption using X509 certificates
- User authorisation using the ATS Security Manager (OAuth2)
How to setup encryption
ATS Bus enforces encryption on all RESTful API’s except for the IT and OT web service server channels where it is configurable. The following endpoints require a certificate:
- ATS Bus bus stop configuration interface at port 8704 (base port + 4)
- The ADOS, IT and OT bus stops print a welcome message when sending a HTTP GET request to the endpoint at th monitoring port. The default port numbers are:
- 8800 for the OT bus stop
- 8802 for the IT bus stop
- 8808 for the ADOS bus stop
- 8810 for the Cloud bus stop.
The medthod of registering a certificate with an endpoint depends on the type of endpoint:
Bus stops configure the certificate using the subject CN in the Kestrel->Certificates->Default section of their configuration file named appsettings.json. This section configures:
Certificate Subject CN
Certificate store
Certificate location
Whether or not an invalid (self-signed) certificate is allowed.
The ATS Bus data service must register the certificate with the REST endpoint using the netsh command:
netsh http add sslcert ipport=0.0.0.0:9704 appid={GUID_WITH_CAPS} certhash=THUMBPRINT
Where:
GUID_WITH_CAPS is a GUID representing the application ID. A GUID can be generated on the following website: https://guidgenerator.com/
THUMBPRINT is the thumbprint of the certificate used to encrypt the REST endpoint.
9704 is the default port used for the REST interface. The port number can be changed by changing the base port in the ATS Bus data service app.config file.
Check the expiry date of the certificate as the netsh command must be executed as soon as the certificate is updated. This will change the thumbprint.
Create a self-signed X509 certificate for ATS Bus bus stops (not recommended)
A temporary certificate can be created using the following PowerShell command:
New-SelfSignedCertificate -DnsName <FQDN>, <Hostname> -CertStoreLocation “cert:\LocalMachine\My” -NotAfter “2030-01-01” -Subject "CN=AtsBusSelfSignedCert"
Where:
<FQDN> is a string holding the computer name including domain name
<Hostname> is a string holding the computer name without domain name
This will create a certificate with the common name AtsBusSelfSignedCert in the Local Computer certificate store at the Personal location. Please copy this certificate to the Trusted Root Authority to ensure that the chain is trusted.
Create certificates for ATS Bus Stops (recommended)
Follow the steps below to create a certificate for the ADOS web API’s that require HTTPS and is the recommended approach. Self-signed certificates should not be used for ADOS web API’s.
Open the certificate manager for the local computer using the following command: certlm.msc
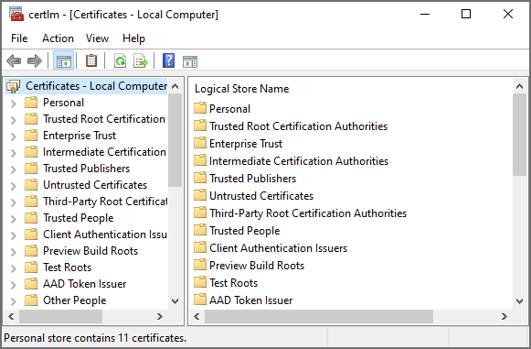
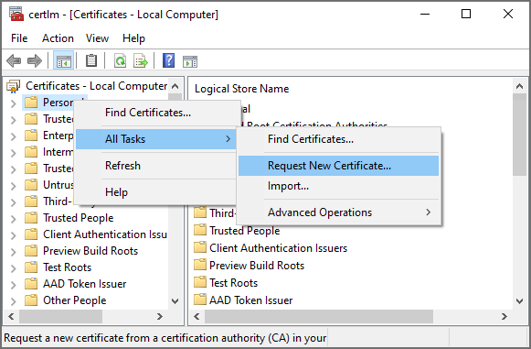
Right click on the Personal folder and select All Tasks > Request New Certificate.
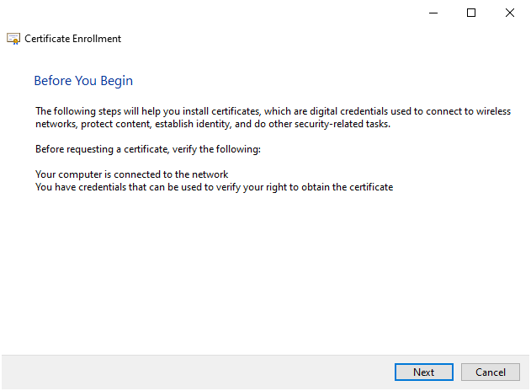
Click Next.
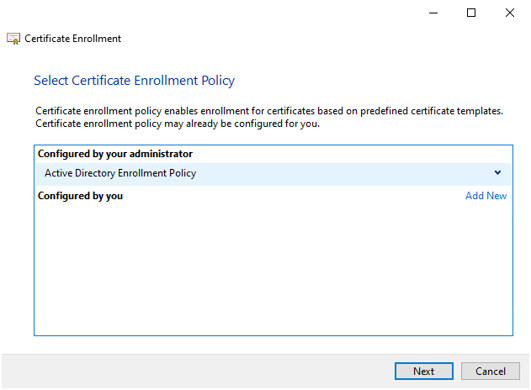
Select the Active Directory Enrollment Policy and press Next.
 #
#
Request a certificate of a specific type that is required for the web API and click Enroll.
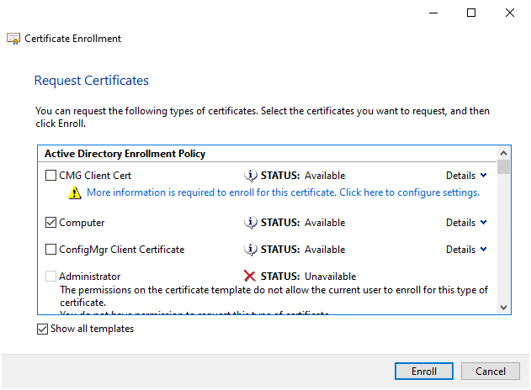
Review the certificate and press Finish.

The certificate uses a FQDN in the Subject Alternative Name and therefore the ADOS web API’s (Security Manager, Configuration Manager, License Manager, Bus services, Inspect services, CM4D services) should configure the FQDN everywhere the hostname is required. Clients should then invoke the services using the FQDN otherwise the server responds with HTTP Bad Request.
There may be multiple certificates in the personal store with the same ‘Issue to’ property. This causes an issue when the certificate that has the ‘Server authentication’ set expires earlier than the certificate that does not have that intended purpose set. The ADOS web API’s select the certificate by its subject CN and the longest validity. It does not check the intended purpose.

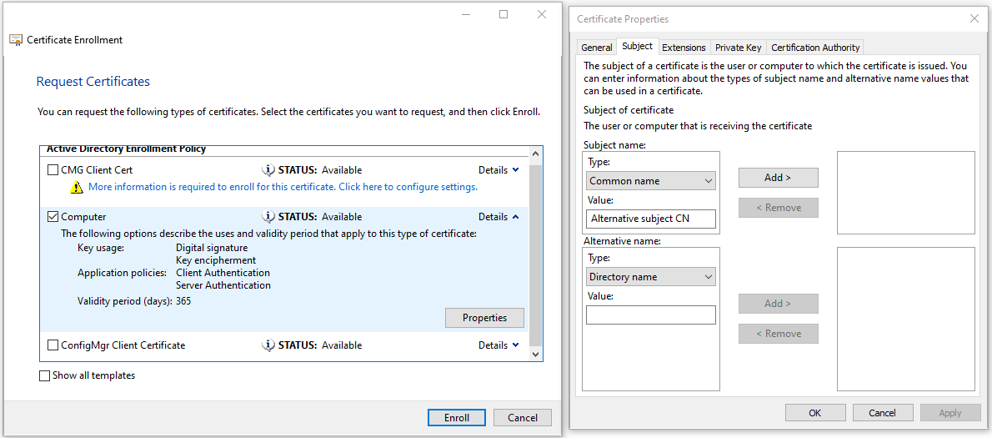
It is recommended to check if the subject common name can be changed in the certificate type selection window as indicated below:
There may be instances where a certificate is already bound to a port. The following command will show the certificate details:
netsh http show sslcert ipport=0.0.0.0:9704
which may return:
SSL Certificate bindings:
-------------------------
IP:port : 0.0.0.0:9704
Certificate Hash : 51935cdba9e27b1525ebc0b074d5775986299795
Application ID : {6f507742-193d-44ea-b369-dbf78f5e9b81}
Certificate Store Name : (null)
Verify Client Certificate Revocation : Enabled
Verify Revocation Using Cached Client Certificate Only : Disabled
...
...
Where Certificate hash represents the certificate thumbprint. This thumbprint can be used with the following PowerShell command to find the certificate details:
Get-ChildItem -path 'Cert:\*51935cdba9e27b1525ebc0b074d5775986299795' -Recurse
which may return:
PSParentPath: Microsoft.PowerShell.Security\Certificate::LocalMachine\My
Thumbprint Subject
---------- -------
51935CDBA9E27B1525EBC0B074D5775986299795 CN=ATSINTLNB128.ats-global.local
Where PSParentPath points to the certificate store and location and Subject points to the certificate common name, which identifies the certificate.
User and client authorization using the ATS Security Manager
ATS Bus uses the ATS Security Manager to allow users to use the front-end applications and RESTful API.
The process for configuring a user is explained in the online ATS Security manual available here.
The illustration below shows the authentication workflow:
The client reaches out to the ATS Security Manager to get a Token using the password flow. The client has to provide the following details:
Username (from the ATS Security Manager)
Password (from the ATS Security Manager)
Client ID (Depending on the API that is invoked)
Scope (Depending on the API that is invoked), the scope is used in the RESTful API to limit client application access.
The ATS Security Manager will authenticate the user and return a Bearer to the client once authorized.
The client then uses the Bearer token in the authentication header in the HTTP request to ATS Bus RESTful API.
The ATS Bus RESTful API checks with the ATS Security Manager if the token is valid.
The ATS Security Manager returns the claims to the ATS Bus RESTful API
The ATS Bus RESTful API executes if the client has sufficient claims and returns a response.
A C# example can be found here that demonstrates how to authenticate a user and invoke a method on a RESTful resource.
Obtaining a token using a username, password, client ID and scope
When connecting to a RESTful API, a token is required to identify the user and the client application that is invoking the RESTful API. The token is obtained from the ATS Security Manager that has users and client applications defined. Users are configured using the ATS Security Manager web interface and API clients, API resources and API scopes are configured by ATS Bus. The following list shows the flow, client ID and API scopes to use when connecting to the ATS Bus RESTful API:
Work order manager RESTful API:
Username: configured in ATS Security Manager
Password: configured in ATS Security Manager
Flow: password
Client id: 779917d9-5897-4742-87a6-94a745443bfb
Client secret: not required
Scopes:
e64a5309-fb1b-41c3-8dc1-fe39a14ebb04\workorders.read-only
e64a5309-fb1b-41c3-8dc1-fe39a14ebb04\ workorders.read-only
IT bus stop web service server channel:
Username: configured in ATS Security Manager
Password: configured in ATS Security Manager
Flow: password
Client id: 88bc7355-8bf6-42c6-8685-d3fb561888ed
Client secret: not required
Scopes:
d7d6f417-ca9d-4192-a035-303d383680df\itwebservice.read-write
OT bus stop web service server channel:
Username: configured in ATS Security Manager
Password: configured in ATS Security Manager
Flow: password
Client id: 7984e128-d408-4cbf-a3cb-38df8ac6e085
Client secret: not required
Scopes:
11aa08b7-703c-45d0-8af3-7e8ab7f548e3\otwebservice.read-write
RESTful API Resources and Methods accessible by the user
ATS Bus defines the following RESTful API resources that are accessible by the user:
Work order manager: https://<host>:<bus stop monitor port number>/api/v1/workorders (OT bus stops only)
IT and OT Web Service Server channel: http://<host>:<port>/Publish or https://<host>:<port>/Publish
Each resource defines a set of methods that can perform an action on the resource. The following methods are available:
OT bus stop:
GET: api/v1/workorders, Retrieve all resources (OT bus stops only)
GET: api/v1/workorders/{compositeKey}, Retrieve a single work order by its composite key (OT bus stops only)
PUT: api/v1/workorders/{compositeKey}, Reset a work order to state Created (OT bus stops only)
DELETE: api/v1/workorders/{compositeKey}, Close a work order by its composite key (OT bus stops only)
All bus stops:
IT and OT web service server channel:
GET: /Publish, Retrieve a message sent/published by the web service server channel
Swagger UI
Swagger UI (https:// <host>:<bus stop monitor port number>/swagger) provides documentation for the resources and methods supported by the bus stop RESTful API’s and it also allows to invoke these methods.
Swagger is not available for the IT and OT web service server channels
The Swagger UI user must be authenticated before it can invoke the methods. Swagger will show a red exclamation mark (as indicated below) when the user is not authorised, clicking it will show a dialog that can authenticate a user. A username, password, client ID and scope must be provided before clicking the Authorize button. Once authenticated, the exclamation mark changes to a blue i.
Click on the exclamation mark, an authentication dialog will appear.
Provide the user that is configured in the ATS Security Manager
Provide a valid password
Provide the client ID, use ‘6d34a158-fa74-4dbe-8338-caff2c9c643a’ for Swagger UI.
Select the API scopes, workorders.read-write will work for the work order manager. The scopes are used to limit client application access to the methods.
Press Authorize.
If authorized, Swagger will show a blue ‘I’
The bearer token will also show in the Authorization header.
Example: A C# REST client
The C# example in this chapter shows how to authenticate a user and post XML to an IT web service server channel:
using System;
using System.Collections.Generic;
using System.IO;
using System.Linq;
using System.Net;
using System.Net.Http;
using System.Net.Http.Formatting;
using System.Net.Http.Headers;
using Newtonsoft.Json;
namespace WebServiceClient
{
public class Class1
{
private static string jsonConfig = @"{
""token_endpoint"": ""http://SECURITY-MANAGER-HOST:5000/connect/token"",
""grant_type"": ""password"",
""username"": ""Admin"",
""password"": ""------YOUR-USER-PASSWORD-HERE------"",
""client_id"": ""88BC7355-8BF6-42C6-8685-D3FB561888ED"",
""client_secret"": """",
""device_code"": """",
""scope"": ""d7d6f417-ca9d-4192-a035-303d383680df\\itwebservice.read-write"",
""refresh_token"": """"
}";
private static string xmlString = @"<root><node1>1</node1></root>";
static void Main()
{
ServicePointManager.ServerCertificateValidationCallback += (sender, certificate, chain, errors) => true;
var serializer = new JsonSerializer();
var form = serializer.Deserialize<Dictionary<string, string>>(new JsonTextReader(new StringReader(jsonConfig)));
if (!form.ContainsKey("token_endpoint"))
{
Console.WriteLine("'token_endpoint' is missing in the JSON config file.");
Environment.Exit(0);
}
var tokenClient = new HttpClient {BaseAddress = new Uri(form["token_endpoint"])};
tokenClient.DefaultRequestHeaders.Accept.Clear();
tokenClient.DefaultRequestHeaders.AcceptLanguage.Add(new StringWithQualityHeaderValue("en-GB"));
tokenClient.DefaultRequestHeaders.Accept.Add(new MediaTypeWithQualityHeaderValue("application/json"));
// Remove empty values
form = form.Where(x => !string.IsNullOrEmpty(x.Value) && x.Key!="token_endpoint").ToDictionary(x => x.Key, x => x.Value);
var tokenResponse = tokenClient.PostAsync(string.Empty, new FormUrlEncodedContent(form)).Result;
if (!tokenResponse.IsSuccessStatusCode)
{
var details = tokenResponse.Content.ReadAsStringAsync().Result;
throw new Exception($"Authentication failed. Token response : {tokenResponse.ReasonPhrase}, details: {details}");
}
var token = tokenResponse.Content.ReadAsAsync<TokenOAuth>(new[] { new JsonMediaTypeFormatter() }).Result;
if (string.IsNullOrEmpty(token.AccessToken))
{
throw new Exception("Authentication failed.");
}
tokenClient.Dispose();
var client = new HttpClient { BaseAddress = new Uri("https://localhost:9999/MyApi1") };
client.DefaultRequestHeaders.Accept.Clear();
client.DefaultRequestHeaders.AcceptLanguage.Add(new StringWithQualityHeaderValue("en-GB"));
client.DefaultRequestHeaders.Accept.Add(new MediaTypeWithQualityHeaderValue("application/xml"));
client.DefaultRequestHeaders.Authorization = new AuthenticationHeaderValue("Bearer", token.AccessToken);
var response = client.PostAsync(string.Empty,new StringContent(xmlString)).Result;
if (!response.IsSuccessStatusCode)
{
Console.WriteLine("{0} ({1})", (int)response.StatusCode, response.ReasonPhrase);
}
// Make any other calls using HttpClient here.
// Dispose once all HttpClient calls are complete. This is not necessary if the containing
// object will be disposed of; for example in this case the HttpClient instance will be
// disposed automatically when the application terminates so the following call is superfluous.
client.Dispose();
}
}
internal class TokenOAuth
{
[JsonProperty("access_token")]
public string AccessToken { get; set; }
[JsonProperty("token_type")]
public string TokenType { get; set; }
[JsonProperty("expires_in")]
public int ExpiresIn { get; set; }
[JsonProperty("refresh_token")]
public string RefreshToken { get; set; }
}
}