Tables are versatile annotation which can be used to make a large amount of data comprehensible and easy to use. A table could show all of the features and samples in a DataSet, highlighting only those which are out of spec. Or, a table could show statistical values of a particular feature like PpK, CpK, Mean or Range. You can even use a table to show more than one characteristic of a particular feature. The instructions below describe how to create a series of tables like the ones shown.
1. In a CM4D document, create a query and load ten samples, then create a DataSet and select only the characteristics X, Y and Z in the Sift Rules. In order to successfully create this table, your data must be uniform and complete. There must not be missing data or mixed SMI Type features.
2. Create a SheetSet. On a blank sheet, create a table.
3. Right click the table and select Properties. On the DataSource tab of the Annot Properties dialog, select the DataSet you created. Select the check box next to Use Only Row #. Use the first to the third rows. There should be a 1 in the first row selector and a 3 in the second one.
4. On the Table tab of the Annot Properties dialog, type the word "Feature" in uppermost left field. In the second column of the first row type the abbreviation " Chr". In the third column of the first row add the variable ~sample~. In the first column of the second row add the variable ~label~. In the third column of the second row add the variable ~cell~. The Table tab should look similar to the one shown below. Don't worry of you seem to have more columns than are shown below, they will automatically be removed later.
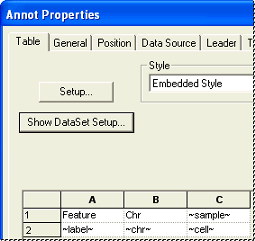
5. Click Setup and clear the check boxes next to Display Row Headers and Display Col Headers.
6. Click OK to save your changes and exit the Annot Properties dialog. Your table will look like the one below.
7. The table does not look quite like the finished product above yet. There is only one table. There is only one column of samples, and it looks like there are too many rows. A few more steps need to be completed before the table is finished. Double click the table to put it in edit mode.

8. Right click the Feature cell and select Cell Properties. In the Table Properties dialog, clear the check box next in the DataSource section, then click DataSource... In the DataSource dialog, select your query. Select All Features in the Feature section and Select All Samples in the Sample region.
9. In the Style section of the Table Properties dialog, clear the check box next to Use Table Style, then click Style...In the Style Properties dialog, select the Font tab and change the weight of the font to Bold.
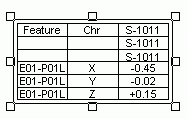
10. Click OK to save your changes and exit the Style Properties dialog. Click OK to exit the Table Properties dialog and return to the sheet. Notice that the weight of the text in the cell has changed from Normal to Bold, and that there is now only one feature label in the table.
11. If the table is no longer in edit mode, double click it again to place it in edit mode. Right click the ~sample~ cell and select Cell Properties. In the Table Properties dialog, clear the check box in the DataSource section and click DataSource... In the DataSource dialog, select your query, select All Features under Feature, select All Samples under Sample. In the Automatic Expansion section of the table select the check box next to Samples. The radio button next to Samples Across, Features Down should already be selected. Click OK to save your changes and exit the Table Properties dialog.
12. Right click the ~cell~ cell and select Cell Properties. In the Table Properties dialog, select the check boxes next to Feature and Sample. The radio button next to Samples Across, Features Down should already be selected. Click OK to save your changes and exit the Table Properties dialog. Your table should now look like the first table in the completed example shown above.
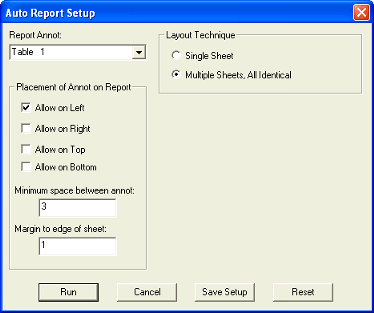
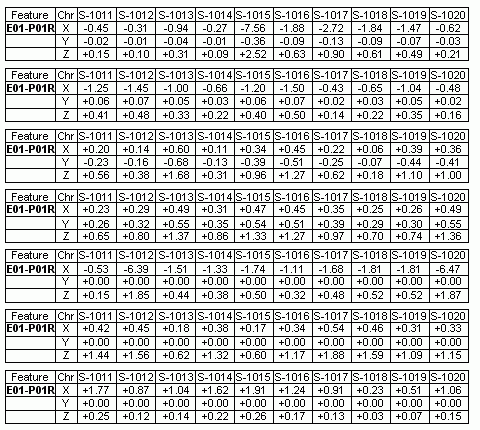
13. Now that the table is completed, it is time to propagate it using Auto Report. Before you can use Auto Report, you must save your document. Click Save. Click the Sheet menu in the menu bar. Select Auto Report. In the Auto Report dialog, select Table 1 from the Report Annot menu. In the Placement of Annot on Report section, select the check box next to Allow on Left and change the Minimum space between annot to three. In the Layout Technique section, select Multiple Sheets, All Identical. Click Run. Auto Report will propagate the table you created. Auto report may have added sheets to your SheetSet to accommodate the number of features in your DataSet. Each table will show the X, Y and Z samples of one feature.