In this topic: Hide
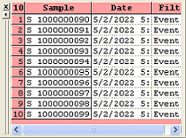
The Sample (Red) Grid displays all of the samples within the selected routine. There are several functions you can use that sort and remove the samples within the query.

Double clicking a column heading will sort the samples alphabetically or numerically by the information within that column.
There are a couple ways to remove unwanted samples from the grid. The first is to select the samples you want removed, then clicking the remove button ( ) on the view toolbar. The next way would be to select the samples you want to keep and clicking the keep selected button (
 ) on the view toolbar. Holding the Ctrl button allows selection of multiple samples, holding the shift button allows selection of a list of samples.
To return all of the samples within the query to the sample grid, click within the sample grid, then click the show all button ( ) on the view toolbar. All of the samples will be returned to the grid.
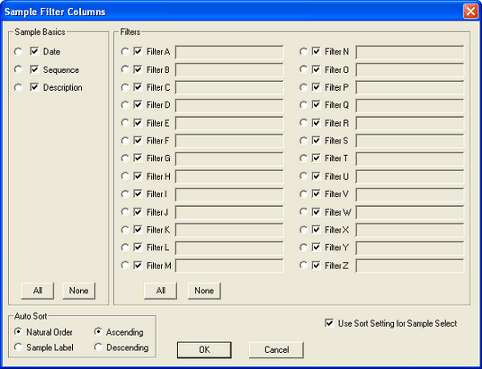
When CM4Di is started, the grids will be empty. After loading data and selecting a report type, the columns of the grids will display data. You can choose which columns you would like displayed with the Sample Filter Columns dialog. To open the Sample Filter Columns dialog, right click the double bar on the left side of the Sample Grid, then select Choose Columns from the menu or click the Choose Columns button  on the iView toolbar. To display individual columns, select the check box next to the column. To select all of the columns in a section click All. To clear all of the check boxes in a section, click the None button.
Under Auto Sort, selecting Natural Order will display the rows of the Sample Grid as they exist in the database. Selecting Sample Label will sort the contents alphabetically by the feature label. Additionally, the rows of the Sample Grid can be sorted in ascending or descending order. Selecting a radio button next to one of the columns will sort the rows of the grid by the contents of that column.

The Sample Grid can be sorted by default according to the settings defined in the Cm4d.ini file:
1. If you set the Cm4d.ini file to "SampleSortUse4Select=1", the Use Sort Setting for Sample Select check box will be enabled, and the Sample Sort options set in the Cm4d.ini file will be used to sort the Sample Grid.
2. If you set the Cm4d.ini file to "SampleSortUse4Select=0", the Use Sort Setting for Sample Select check box will be disabled, and the Sample Sort options selected in the Sample Filter Columns dialog will be used to sort the Sample Grid.
If the Cm4d.ini file was set up with the settings as shown below, then when CM4Di is opened, the Sample Grid would be sorted in Ascending Order by Filter L. In such a case, with the Cm4d.ini default selected (SampleSortUse4Select=1), anything selected in the Sample Filter Dialog will be considered irrelevant.
SampleSortCol = "SampleColOrd"
#SampleSortCol = "SampleColSample"
#SampleSortCol = "SampleColDate"
#SampleSortCol = "SampleColDesc"
#SampleSortCol = "SampleColSeq"
#SampleSortCol = "SampleColFilterA"
#SampleSortCol = "SampleColFilterB"
#SampleSortCol = "SampleColFilterC"
#SampleSortCol = "SampleColFilterD"
#SampleSortCol = "SampleColFilterE"
#SampleSortCol = "SampleColFilterF"
#SampleSortCol = "SampleColFilterG"
#SampleSortCol = "SampleColFilterH"
#SampleSortCol = "SampleColFilterI"
#SampleSortCol = "SampleColFilterJ"
#SampleSortCol = "SampleColFilterK"
SampleSortCol = "SampleColFilterL"
#SampleSortCol = "SampleColFilterM"
#SampleSortCol = "SampleColFilterN"
#SampleSortCol = "SampleColFilterO"
#SampleSortCol = "SampleColFilterP"
#SampleSortCol = "SampleColFilterQ"
#SampleSortCol = "SampleColFilterR"
#SampleSortCol = "SampleColFilterS"
#SampleSortCol = "SampleColFilterT"
#SampleSortCol = "SampleColFilterU"
#SampleSortCol = "SampleColFilterV"
#SampleSortCol = "SampleColFilterW"
#SampleSortCol = "SampleColFilterX"
#SampleSortCol = "SampleColFilterY"
#SampleSortCol = "SampleColFilterZ"
SampleSortUse4Select = 1
SampleSortDirection = "Ascending"
#SampleSortDirection = "Descending"
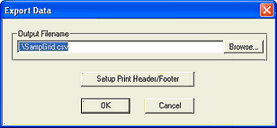
To export one of the grids to CSV (Comma Separated Value), right click the side bar of the grid, then select Export to CSV. The Export Data dialog will appear. Browse to a location where you would like to save the file. Click Setup Print Header/Footer to open the Print Grid Setup dialog.
