Topic Contents: Hide
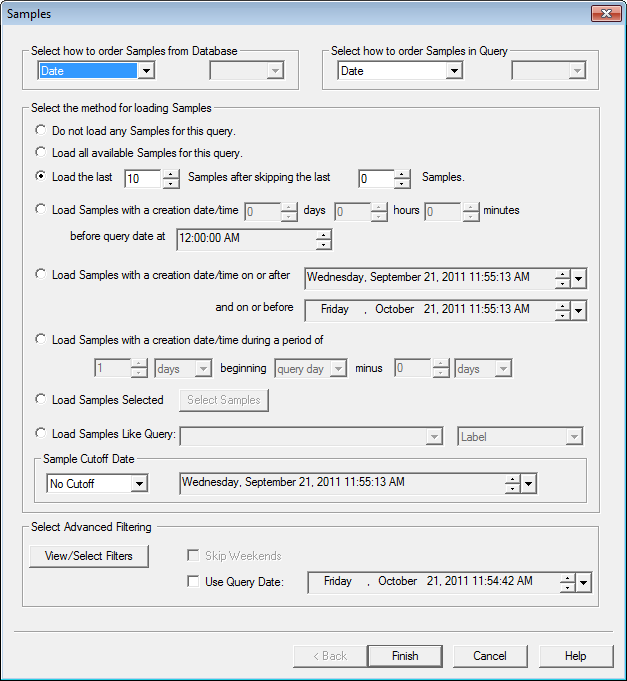
The Samples dialog is used for loading samples into a query. The options for loading samples are very flexible and many methods of choosing samples are provided. The Samples dialog can also be used to edit or update the sample load options for a query. To open the samples dialog, expand a query in the Tree bar, right click on the Samples folder, and select Properties from the menu. After selecting the desired load options, click the View/Select Filters button in the Select Advanced Filtering region to filter you samples to get only the samples you desire to see.

When samples are loaded from the database, they can be ordered by:
· Date - Sample Creation Date
· Label
· Description
· Sequence - the order in which the samples entered the database
· Serial # - Sample Serial Number
· Filter - Select a filter from the Filter dropdown menu to the right
When Samples are loaded into the Query, they can be ordered by:
· Date - Sample Creation Date
· Label
· Description
· Sequence - the order in which the samples entered the database
· Serial # - Sample Serial Number
· Filter - Select a filter from the Filter dropdown menu to the right
· No Sync - the Sample values will be loaded in the order they exist in the database, and will be synchronized by the last value for each sample, or the right-most cell in the dataset. This is useful when the Samples loaded are from different Routines and may not share Features (or other information) that is normally used to align them in the dataset. For example, say you loaded the following two Samples: Sample 1 (Feat3, Feat4, Feat5) and Sample 2 (Feat 21, Feat22).
§ If attempting to Synchronize, common information cannot be found and the data would be loaded as the following:
| Sample 1 | Feat3 | Feat4 | Feat5 | ||
| Sample 2 | Feat21 | Feat22 |
§ Using the No Sync Sample Load option, the data would be loaded as the following:
| Sample 1 | Feat3 | Feat4 | Feat5 |
| Sample 2 | Feat21 | Feat22 |
No samples will be loaded in the query.
All existing samples in the query will be loaded.
The set amount of samples will be loaded after skipping the last amount of samples selected. This is the only method of loading samples that enables the Use Cutoff Date option.
For example: If there are 20 samples, and Load the last 10 samples after skipping the first 10 samples is entered, samples 1-10 would be skipped and samples 11-20 would be loaded.
The samples for the designated time period will be loaded according to the date and time set the boxes. Entering a time in the "before today at" box will load all samples created prior to the current date and the time set in the box.
The samples that were created between the selected dates will be loaded.
All of the samples that were created during the designated period of time will be loaded. To set this up, first enter the number of days, weeks, months, or years you want to load. Next, enter your starting point, i.e. today, this week (counting from Sunday), this month (counting from the 1st of the month), or this year (counting from January 1st). Finally, enter the number of days, weeks, months, or years to where you would like to begin counting forward for the duration you selected in the "period of" field.
If you want to load the last weeks worth of samples, you would enter the following: Load Samples with a creation date/time during a period of 7 days beginning today minus 7 days. This means you would have a time period of one week selected prior to the current date.
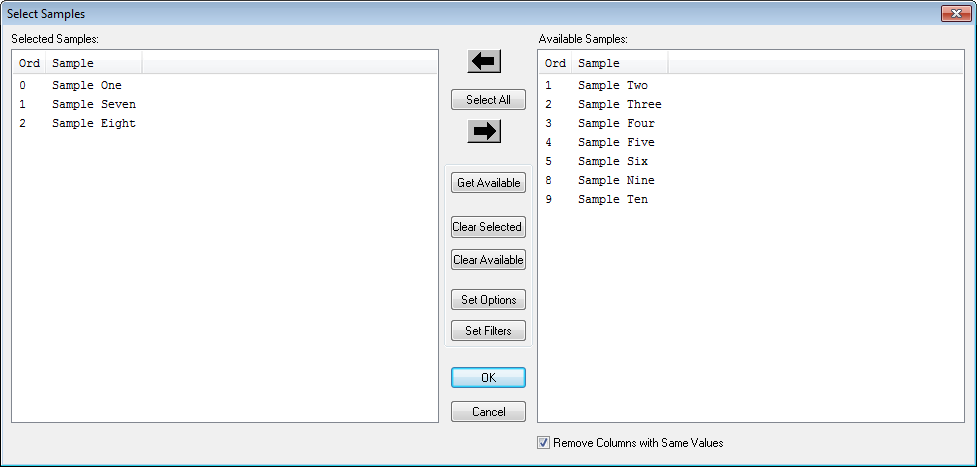
The samples that are selected in the Select Samples dialog will be loaded. To open the Select Samples dialog, select the radio button next to Load Samples Selected, the click Select Samples.

To select samples from the list, click on them. To select multiple samples, hold down the Shift key and select a range of samples or hold down the Ctrl key and click on individual samples. Sample columns can be sorted (ascending or descending) by header labels by clicking on a header once, or twice to reverse the order.
· Left Arrow - moves highlighted Selected Samples to the Available Samples list
· Select All - moves all Available Samples over to the Selected Samples area
· Right Arrow - moves the highlighted Available Samples to the Selected Samples list
· Get Available - displays all of the samples that are available from the loaded routine in the Available Samples list
· Clear Selected - removes any highlighting from the samples list
· Clear Available - empties the Available Samples list
· Set Options - opens a dialog similar to the Sample dialog which can be used to reduce the number of samples in the Available Samples list, in order to make it easier to find the exact samples you want
· Set Filters - opens the Query Sample Filters dialog to apply a sample filter
· Remove Columns with Same Values - when enabled, sample columns with identical values will not be displayed; to restore all sample columns, unselect the check box
Samples are loaded in the same manner as they were loaded in the selected query.
· Query Select - Select the query that will be used as a model.
· Sort Type - Select the type of sorting that you want to use.
Samples with a creation date newer than (i.e. after) the Cutoff Date are available for loading. The samples that are available for loading are loaded using the Load the last __ samples method (the ONLY method of loading samples that relates to the Use Cutoff Date option).
· Cutoff Type - All the samples are divided into categories based on the Cutoff Type
§ No Cutoff - No Cutoff date is used.
§ Absolute - uses a specific date entered in the field provided in the Sample Cutoff section of the Load Samples dialog; Samples with a creation date older than (i.e. before) the Cutoff Date are not loaded
§ Relative - uses a specific number of days in relation to the current date; Samples with a creation date older than (i.e. before) the Cutoff Date are not loaded
· Cutoff Date - select the large down arrow to open a calendar; to set portions of the date or time, select the area within the field and either type in the desired information, or use the spin controls to set the values
Samples can be filtered using pre-defined sample filters or user-defined values. The pre-defined sample filters are created in DB Utility or with the Query Sample Filters dialog in CM4D. Only filters with a defined type will be displayed in the Sample Filters dialog. Please refer to the Help Documentation for more information on creating sample filters in each respective application.
· Label Filter - When entering a definition for a sample filter, wildcards such as the asterisk (*) can be used. For example, entering 5A* would return all samples starting with the characters '5A'. If wildcards are used to filter your samples, refer to your DBMS (Database Management System) Documentation for rules regarding wildcard usage in either Oracle or SQL Server.
Keep in mind that the underscore is a wildcard for a single character in both Oracle and SQL Server, and should not be used in the label of your samples.
· Filters - The available sample filters will be listed in the Sample Filters dialog. To apply available filters, select the check box next to the filter name. Restricted filters will also have a menu next to the filter name containing further filter parameters. Filter types are indicated by the filter letter enclosed with braces {Restricted filter} or parenthesis (Unrestricted filter). After selecting the desired sample filters, you must also select how to apply the filters you have chosen. You can choose to include or exclude filters according to the following definitions:
§ Include - All samples with the selected filter assigned will be loaded.
§ Exclude - All samples with the selected filter assigned will not be loaded.
Key filters are not used with Samples.
The skip weekends option is available for use in conjunction with the Load Samples Before Today or Load Samples During load methods.
· Load Samples Before Today - skip weekends will ignore weekend days when counting and selecting the sample dates for the load
· Load Samples During - skip weekends will ignore weekend days when counting and selecting the sample dates for both the minus days and period days; skip weekends is only available when the “days” option is selected for both the minus and period counts (period days are limited to 100 days or less)
The Use Query Date option allows you to set a specific date to use as the Query date, rather than using the default current date when loading samples.
For example, if you wanted to review data as shown in a report generated by CM4D on a previous date, you can set the Query date to that previous date, and then CM4D would show the report in that state (the state of the data can differ depending on any changes made to the database in the interim).