Topic Contents: Hide
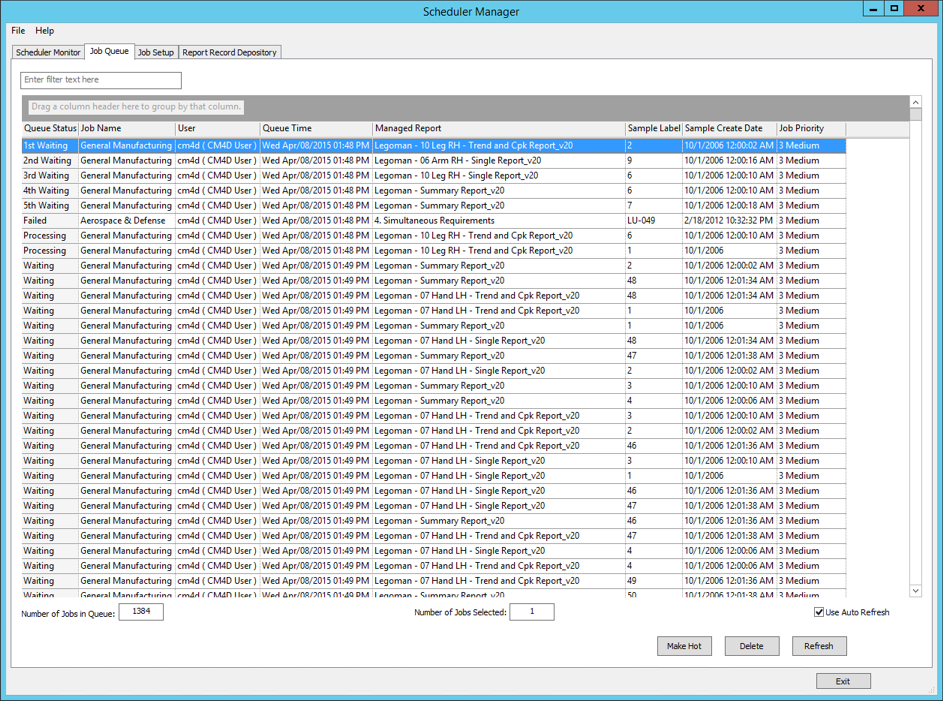
The Job Queue tab contains the status of all pending jobs and allows you to view the status of any current jobs or remove any waiting or failed jobs.
This information may also be retrieved directly from the database. See the topic Metrics and Monitoring for more details.
Click on the image below to learn more about the various sections of this dialog.

· Enter filter text here - Enter a string to filter down the entire grid to only rows containing text matching the string entered. This filtering is dynamic and will update the grid as you type.
· Drag a column header here to group by that column - See the topic Grid Controls for information on how to use the grouping and sorting options available in the Grid area.
· Columns - The available columns can be used to sort and group the results of a search.
§ Field Chooser - To access any additional or removed columns, right click in the column header area and select Field Chooser. Drag the column names into position in the column header area and close the Field Chooser dialog.
Displays the Job Name assigned when the job was created in the Job Properties tab.
When more than one job is waiting to be processed at the same time, the job with the highest priority will be processed first. If all the Priority settings are the same (default is Medium), then jobs will be processed in the order they are entered into the Queue.
The Managed Report(s) used by the job to generate a report.
The Status of the Job currently in the Job Queue. The status may be any of the following:
· Waiting - Job is currently waiting to be processed.
· 1st-5th Waiting - Indicates which waiting job will be next in line to be processed.
· Processing - Job is currently being processed.
· Failed - Job failed to process. See the log file for more information on why the job failed.
· Disabled - Job was already in the queue waiting to be processed when the Job was Suspended. To re-enable the Disabled jobs in the queue, set the job back to Active.
The date and time stamp of when the job was placed into the Job Queue for processing.
The Create Date of the sample that triggered the job.
The Label of the sample that triggered the job.
Displays the user that is running the job.
If you do not have the Scheduler Manager privilege, but only the Scheduler User privilege, the User cell will be read-only with your user name, and you will only be able to view jobs being run by you.
The Number of Jobs in Queue indicates how many jobs are currently in the Job Queue.
The Number of Jobs Selected field is a read-only field indicating how many (if any) jobs are highlighted. When deleting any jobs from the Job Queue, check the number of jobs selected to ensure that you are only deleting the jobs you want to delete.
When Use Auto Refresh is selected, the Job Queue automatically checks for any new jobs every 30 seconds.
The Make Hot button allows you to for a job to the top of the Job Queue. To push a job to the front of the line, select the job row in the Job Queue grid and then click the Make Hot button on the bottom of the interface.
For example, selecting Make
Hot changed a job with a Status of 5th
Waiting to 00001, Hot Job.
Show/Hide
To delete jobs that are waiting in the Job Queue by selecting one or more rows, then clicking the Delete button. If you are not using Auto Refresh, clicking Refresh will manually reload the contents of the Job Queue.
The Refresh button causes the Job Queue to check for any new jobs.
The Exit button will close the Scheduler Manager without saving any changes.