The following steps will guide you through adding an Image to a Routine in DataUtility.
1. After Searching for Data, you will have a list of available Routines listed in the Display Region.
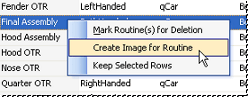
2. Right click on the Routine you would like to add the image to, and select Create Image for Routine from the context menu.
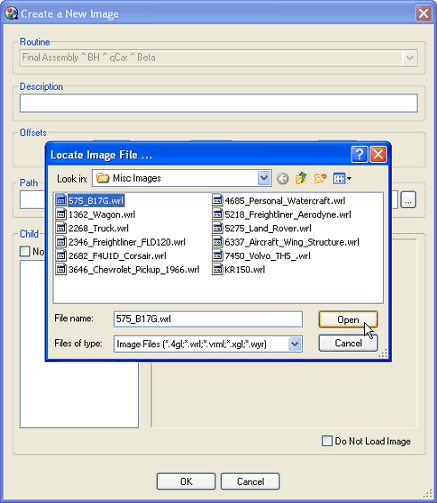
3. In the Image dialog, enter a Description of the image. If you do not, the Routine label will be used by default. If you would like to be able to select a Routine from the Routine menu (grayed in the image below), you must add an Image in the Image Search results rather than the Routine Search results.
4. Browse to the image by clicking the browse ( ) button next to the Path field.
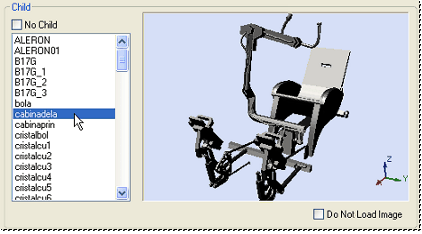
a. Once your image is loaded, it will appear within the preview window in the bottom right corner of the dialog.
b. If you do not want to load the image into the preview window, enable the Do Not Load Image check box before browsing to an image (or selecting a Child node).
5. If you would like to set the Offsets (in millimeters) for this image, do so by entering a numeric value in one of the three edit boxes. See the CM4D Help Documentation for more information on Offsets.

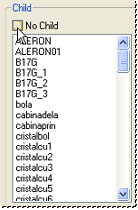
6. If you are adding a VRML file, you may be able to select a Child node. To do this, disable the No Child check box in the Child region of the dialog. A list will be populated if Child nodes are available for the selected image.
7. Double click the label from the list to load the Child node into the preview window. You may spin, rotate, translate, or zoom the image within this pane the same way as within the Image Preview window on the Data Viewing pane.
8. Once you have the image (or Child node of an image) that you would like to add to your Routine, click OK.
9. Your image will now be associated to the selected Routine.
10. Once you have added images as desired, save your changes to the Database by clicking the Commit ( ) button in the toolbar.