 Notice
 These instructions are intended for use by local CM4D Administrators, DBA's, or other IT personnel that are familiar with CM4D installations.
Topic Contents: Hide
This document is a general guide that will help get you started if you are upgrading an existing CM4D installation up to version 20. While major version upgrades always require Database Schema updates, upgrading to v20 will require several additional migration steps, as outlined below.
Notice
These
instructions are intended for use by local CM4D Administrators, DBA's,
or other IT personnel that are familiar with CM4D installations.
Beginning in v20, ATS Licensing Server 2.0 will handle the licensing of all ATS CM4D modules. This will require that you convert all existing CrypKey or FlexLM licenses to the new ATS Licensing.
· If you are a current customer with an active SMA, please send your existing license to [email protected] for conversion to an upgraded v20 ATS License.
· If you are a new customer, or a current customer without an active SMA, you can request a new ATS CM4D license by contacting ATS Technical Support.
ATS Licensing Server is its own entity and does not rely on, connect to, or utilize any CM4D component, including any Site or CM4D Databases. Its only function is to authorize license use.
Before installing ATS CM4D, you must install the ATS Licensing Server.
If you have not already done so, register for an account on the ATS Client Portal in order to access the downloads section.
Depending on the type of License you will be using, the ATS Licensing Server will be installed to different locations. If you are not sure what type of license you will be issued, please contact either your CM4D Administrator or ATS Support.
· Concurrent (Floating) Licenses - the ATS Licensing Server must be installed centrally on the network as a Floating License Server.
· Named (Node Locked) Licenses - the ATS Licensing Server must be installed locally, on the same machine that will be using the Node-Locked CM4D license.
· You will need to indicate whether you will be using Oracle or SQL Server for your Licensing database, which you will create in the next step.
· Enter a Username and Password that you will set when you create the Licensing database. This is typically the 'sa' user.
· ATS Licensing Server requires a .NET Framework of 4.0, or higher.
Once the ATS Licensing Server is installed, you will need to create the Licensing Database. The ATS Licensing database is not the same as the databases used by ATS CM4D.
The ATS Licensing Server requires a database, completely separate from the CM4D Databases. This database is not set up by the ATS Licensing Server installer, so it will need to be created using the scripts found in the Connectivity Kit directory. By default, this can be found here: C:\Program Files (x86)\Applied Tech Systems\ATS Licensing Server\Connectivity Kit\Build
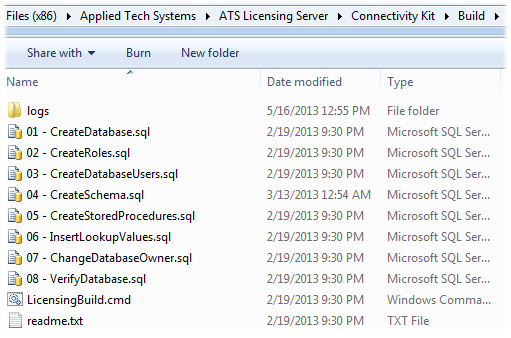
Check readme.txt for more detail about using the scripts in this folder.
See the ATS Licensing 2.0 Help Documentation for instructions on how to create the licensing Database. Once you have installed the ATS Licensing Server, the help file can be found (by default) in the following directory: C:\Program Files (x86)\Applied Tech Systems\ATS Licensing Server\Documentation
The instructions for creating the ATS Licensing database in SQL Server is covered by the ATS Licensing 2.0 Help Documentation.
1. Create a User (e.g., 'sa') using the same login information as entered during the installation of the ATS Licensing Server.
a. The login information entered during installation can be found in the ManagementConsole.exe.config file, located here by default: C:\Program Files (x86)\Applied Tech Systems\ATS Licensing Server\Applications
2. Create a TABLESPACE (e.g., 'ATSLICENSING').
a. Give the user created in step 1 an unlimited tablespace size.
b. Set the new tablespace as the default tablespace for that user.
3. Once the User and Tablespace are created, login as that user.
4. From the Connectivity Kit/Build folder, run the following scripts, in order, against the Licensing database:
a. 04 - CreateSchema.sql
b. 05 - CreateStoredProcedures.sql
c. 06 - InsertLookupValues.sql
d. 07 - ChangeDatabaseOwner.sql
e. 08 - VerifyDatabase.sql
Once the Licensing database has been created, start the ATS Licensing Server Service.

If you have not already done so, send your request for a license to: [email protected]
When you receive your ATS License, it will be a "Demo" license that will expire between 30 and 90 days from issue. You will need to use the ATS Licensing Server Management Console to unlock this demo license to convert it from a "Demo" to a "Full" license.
Once ATS License Server is running, you will save the license file(s) attached to the e-mail you received from ATS in the C:\License directory. Then use the Import feature of the Management Console to continue with the unlocking process. Once the license is installed to your license server (or node-locked machine), you will also need to identify any machines you want to designate as using Named Licenses.
Refer to the topic "Update Licenses" in the ATS Licensing 2.0 Help Documentation for more information on using the Licensing Server Management Console.
If you are using JT image files, you will not need to request a "JT Enabled License" as you did for past license types. The ability to use JT image file types in CM4D is now solely controlled by entering your JT code in the CM4D.ini file.
Only v7 JT license codes are supported in v20 of ATS CM4D.
For best results for upgrading to a new major version:
Uninstall your current version of CM4D.
Clean out the install directory.
Install version 20.
Refer to the Installation topics for more information on Upgrading or Installing ATS CM4D.
Major version upgrades require Database Schema updates. In order to upgrade your Site and/or CM4D Databases, you must run the Update scripts provided either by your installation or downloaded from the ATS Client Portal.
You may have databases from one or more schema versions back that you want to upgrade to v20. To do this, you will need to migrate the databases to the latest schema version using the upgrade path(s) in the tables below. This schema migration may include versions you may not have known about, but you will still be required to run all intermediate update scripts on your database(s) consecutively.
 Example
You
cannot run a Schema 20a update script on a Schema 16a database, so you
would run the intermediate 17a, 18a, 19a, and then 20a.
 Tip
Tip
v17
was a very limited distribution, and v18 was ATS CM4D Reporter only. However,
you will still need to run the v17 and v18 database update scripts in
order to migrate your databases up to v20 for ATS CM4D.
If you are currently running... |
v11 Site Schema 11a |
v12 (Site Schema 12a) |
v13 (Site Schema 13a) |
v14 (Site Schema 14a) |
run these 'Update Site' scripts in this order... |
UpdateSite12a.sql |
|||
UpdateSite13a.sql |
UpdateSite13a.sql |
|||
UpdateSite14a.sql |
UpdateSite14a.sql |
UpdateSite14a.sql |
||
UpdateSite15a.sql |
UpdateSite15a.sql |
UpdateSite15a.sql |
UpdateSite15a.sql |
|
UpdateSite16a.sql |
UpdateSite16a.sql |
UpdateSite16a.sql |
UpdateSite16a.sql |
|
UpdateSite17a.sql |
UpdateSite17a.sql |
UpdateSite17a.sql |
UpdateSite17a.sql |
|
UpdateSite18a.sql |
UpdateSite18a.sql |
UpdateSite18a.sql |
UpdateSite18a.sql |
|
UpdateSite19a.sql |
UpdateSite19a.sql |
UpdateSite19a.sql |
UpdateSite19a.sql |
|
UpdateSite20a.sql |
UpdateSite20a.sql |
UpdateSite20a.sql |
UpdateSite20a.sql |
If you are currently running... |
v15 (Site Schema 15a) |
v16 (Site Schema 16a) |
v17 (Site Schema 17a) |
v19 (Site Schema 19a) |
v20.2 (Site Schema 20a) |
run these 'Update Site' scripts in this order... |
UpdateSite16a.sql |
||||
UpdateSite17a.sql |
UpdateSite17a.sql |
||||
UpdateSite18a.sql |
UpdateSite18a.sql |
UpdateSite18a.sql |
|||
UpdateSite19a.sql |
UpdateSite19a.sql |
UpdateSite19a.sql |
|||
UpdateSite20a.sql |
UpdateSite20a.sql |
UpdateSite20a.sql |
UpdateSite20a.sql |
||
UpdateSite20b.sql |
UpdateSite20b.sql |
UpdateSite20b.sql |
UpdateSite20b.sql |
UpdateSite20b.sql |
If you are currently running... |
v11 (Schema 11a) |
v12 (Schema 12a) |
v13 (Schema 13a) |
v14 (Schema 14a) |
run these 'Update' scripts in this order... |
Update12a.sql |
|||
Update13a.sql |
Update13a.sql |
|||
Update14a.sql |
Update14a.sql |
Update4a.sql |
||
Update15a.sql |
Update15a.sql |
Update15a.sql |
Update15a.sql |
|
Update16a.sql |
Update16a.sql |
Update16a.sql |
Update16a.sql |
|
Update17a.sql |
Update17a.sql |
Update17a.sql |
Update17a.sql |
|
Update18a.sql |
Update18a.sql |
Update18a.sql |
Update18a.sql |
|
Update19a.sql |
Update19a.sql |
Update19a.sql |
Update19a.sql |
|
Update20a.sql |
Update20a.sql |
Update20a.sql |
Update20a.sql |
If you are currently running... |
v15 (Schema 15a) |
v16 (Schema 16a) |
v17 (Schema 17a) |
v19 (Schema 19a) |
20.0 (Schema 20a) |
run these 'Update' scripts in this order... |
Update16a.sql |
||||
Update17a.sql |
Update17a.sql |
||||
Update18a.sql |
Update18a.sql |
Update18a.sql |
|||
Update19a.sql |
Update19a.sql |
Update19a.sql |
|||
Update20a.sql |
Update20a.sql |
Update20a.sql |
Update20a.sql |
||
Update20b.sql |
Update20b.sql |
Update20b.sql |
Update20b.sql |
Update20b.sql |
If you are upgrading from a version prior to v16, you will have to start with the update script immediately after the version you are currently running and then update them in ascending order. See the ReadMe.txt file in your CM4D Install folder to see which Schema versions correspond to each version of CM4D.
Do not use the Drop.sql script, unless your intention is to delete the database.
Typically, the Grant scripts will only need to be run if you are transferring CM4D databases between servers or restoring a backup.
If you are upgrading from a version prior to v19, you will need to migrate the following files:
· Database connections and passwords: CM4D.4ds
· DataSmith translators: *.4jr or *.4jx
· DataSmith Batch settings: DataSmithSettings.batch
This is a one-time migration process. If you are already running v19, you do not need to re-run the Migration Tools in order to upgrade to v20.
The migration tools can be found in the CM4D install directory. Please refer to the ATS CM4D Help Documentation for more information on running the Migration Tools.
Use the v19Migrator to upgrade your database connections and passwords to use a new type of encryption that was introduced in v19 of CM4D. You must have a database Server Role that allows you to create tables in the Database in order for the v19Migrator to successfully migrate your CM4D.4ds files.
You should back up your current databases before running v19Migrator, as there is no way to revert the encryption. Once you are certain everything was migrated correctly, you can delete or archive any backups you made.
1. Run v19Migrator.exe.
2. Click Start.
3. Browse to the CM4D.4ds file that you want to upgrade.
4. Click Convert.
5. Your next step will be one of the following choices:
a. If your CM4D.4ds file is connecting to an unmanaged database (no Site), click Exit. Skip ahead to Step 6.
b. If your CM4D.4ds file is connecting to a Site database, click Next.
i. To encrypt all passwords that are saved in your Site database, click Convert Passwords.
(1) If your password encryption was successful, you will see the same message as the one pictured below.
(2) If the file has already been converted, you will see the message: File appears to be encrypted with new encryption algorithm.
ii. Click Exit.
6. The following screen will appear when your migration was successful.
a. If you have more files to convert, click Start and repeat this process starting back at Step 3.
b. If you are done converting your CM4D.4ds files, click Exit.
Use the 4JMigrator to upgrade your DataSmith translators (*.4jr or *.4jx) and DataSmith Batch settings (DataSmithSettings.batch) to new formats that were introduced in v19 of CM4D. The original files will not be deleted during migration, so you can either archive them or delete them after the upgrade is complete.
As of v19, the DataSmith Batch settings file (DataSmithSettings.batch) has been changed to DataSmithBatch.settings. All existing DataSmithSettings.batch files must be upgraded to the new format before they can be used in v20.
We highly recommend migrating all of your Batch settings files BEFORE migrating the DataSmith translators, especially if your Batch files contain numerous jobs. The migration of the Batch settings file will automatically migrate all translator files that are used by jobs in that settings file. The translators will be converted to new files with the *.4Datasmith extension and saved to the same folder as the original translators. All of the Batch jobs included in that migrated settings file will also be updated to use the newly created *.4Datasmith files in the DataSmith Document column.
1. Run 4JMigrator.exe.
2. Select DataSmithBatch Settings (*.batch) from the file type menu.
3. Browse to the DataSmithSettings.batch file that you want to migrate to v20.
4. Click Open.
5. A new file named DataSmithBatch.settings will be saved to the same folder as the original file.
6. Click OK.
7. Repeat these steps for all DataSmith Batch settings files that you want to migrate to v20.
Once your Batch settings are migrated, you can migrate any additional DataSmith translators that are not used by DataSmith Batch.
As of v19, DataSmith translator files have a new file extension, *.4Datasmith. All existing *.4jr or *.4jx files must be migrated to the new extension before they can be opened in v20.
1. Run 4JMigrator.exe.
2. Browse to and select the *.4jr or *.4jx file that you want to migrate to v20.
3. Click Open.
4. A new DataSmith file with the same name as the original file and the new extension *.4Datasmith will be created.
a. The new *.4Datasmith files will be saved to the same folder as the original translator file.
b. If a file already exists, a dialog will ask you if you want to overwrite the file.
5. Repeat these steps for all DataSmith files that you want to migrate to v20.
1. Browse to the *.4jr or *.4jx file that you want to migrate to v20.
2. Right-click on the file and select Send to > 4JMigrator.
3. A new DataSmith file with the same name as the original file and the new extension *.4Datasmith will be created.
a. The new *.4Datasmith files will be saved to the same folder as the original translator file.
b. If a file already exists, or a folder contains a *.4jr and a *.4jx with the same name, the migration will not complete.
4. Repeat Steps 1 and 2 for all DataSmith files you want to migrate for v20.
Starting in v20.0, Managed Documents (Templates) will be opened using a newly designed interface with new search and sorting functionality. An interface has been added to allow for advanced drilldown and filtering of Managed Documents according to Site, DataSource, Label, Filters, and more.
The first time you select Open Managed Document in v20, you will be prompted to configure the Document Selector:
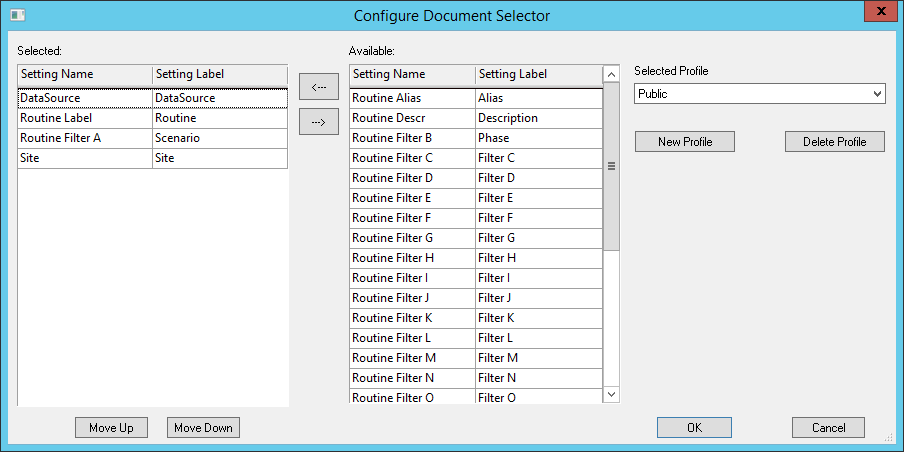
1. Select the Routine properties that you want to use to filter your Managed Documents.
a. Hold the ctrl key and select, for example, Site, DataSource, Routine Filter A, Routine Filter B, Routine Filter C, and Routine Filter D.
b. Click the arrow button that points to the left.
c. The highlighted properties will be moved from the Available region to Selected.
2. Select the scope of who will be using the selected settings by selecting one of the following three radio buttons:
a. Public - Settings are applied to all users in the database. Any user can make changes and save the new settings.
b. Group - Settings are applied to all users that belong to a selected group in the Site database. Any user that is a member of that group can make changes and save new settings.
c. User - Settings are applied to the current user profile only.
3. Once you have selected your scope, click Save.
4. Click Close to exit the dialog.
5. The Managed Document Selector dialog will now open, and you can search for and select the Managed Document that you want to open.
Refer to the topic Managed Document Selector in the ATS CM4D Help Documentation for more information.
Once the Document Selector is configured, all users who have a configuration that applies to their user profile will only see the Managed Document Selector dialog when they go to open a Managed Document.
However, the Configuration dialog can be access at any time by opening the File menu and selecting Document Selection Settings.
If you require further assistance, please contact ATS Technical Support.