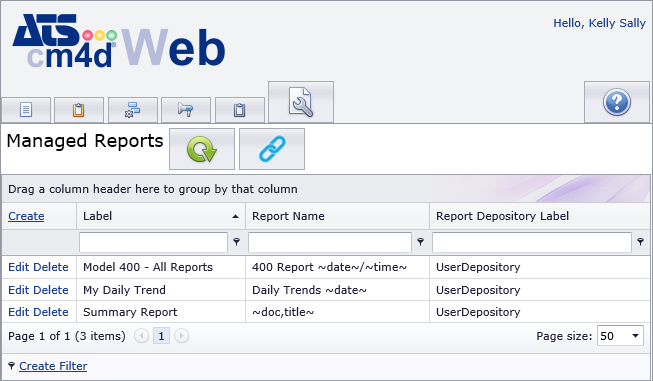
![]() The Managed Reports tab is where you can create and manage your personal Managed Reports.
The Managed Reports tab is where you can create and manage your personal Managed Reports.
Click Create to make a new managed report.
Click the Edit to modify the properties and contents a managed report.
Click Delete to remove the managed report from the database.
If you are a Document Manager and will be creating or modifying Managed Reports for all users, see the topic Managed Report Administration.
Default Columns
Label - the name of the Managed Report.
Report Name - the name of the generated Report (PDF).
Report Depository Label - all user-created managed reports are automatically assigned to the 'UserDepository' Report Depository. This cannot be altered for user managed reports.
Create Managed Reports
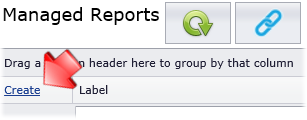
To make a new Managed Report, click Create.
Enter the information in the mandatory fields and select one or more SheetSets.
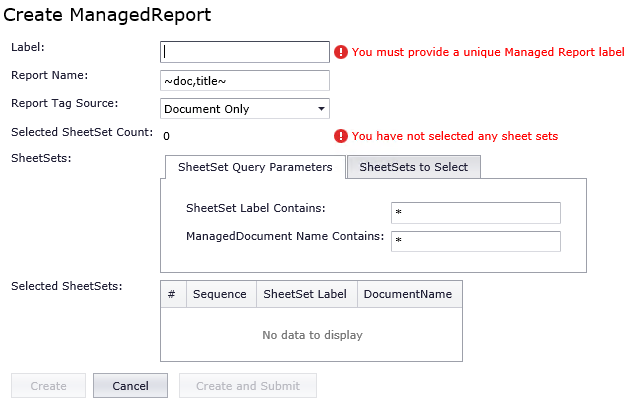
Enter a Label.
Enter a Report Name. This can be a string, CM4D variables, or a combination of both. See here for more on report names.
For reports that will be generated with CM4D Scheduler, this required. Managed Reports with blank Report Names will not appear in the list of Managed Reports in Scheduler.
For reports that will only be generated in CM4D Web, this is optional. If you leave this blank, Web Report will be created with a default name in this format: 'username_date_time'.
Select a Report Tag Source. Click here for Source definitions.Click here for Source definitions.
- Document Only - Tag information is obtained from tags that are set in the Managed SheetSet(s) within the Managed Report.
- None - No tags will be assigned to the report, even if tags are available on either document or global levels.
- Global Only - Tag information is obtained from the Report Tag Defaults set in SiteManager.
- Global if No Document - Tags are assigned from the document level. If no tags are found in any of the documents in the report, then the Global level tags are assigned.
- Both - Tags from the Managed Document SheetSet(s) and the Report Tag Defaults set in SiteManager will be assigned to the Managed Report.
In the SheetSet Query Parameters tab, enter text strings to search for specific SheetSets or Managed Documents.
Click the SheetSets to Select tab.
Select the SheetSet(s) that you want to include in the Managed Report.
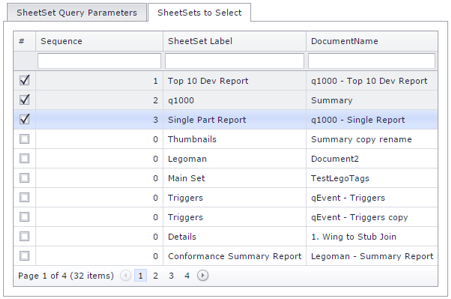
Optionally, you can adjust the Sequence to change the print order of the SheetSets as they will appear in the final PDF report.
The Thumbnail used for the Managed Report is taken from the first SheetSet (Sequence 1) in the Managed Report.
In the Selected SheetSets region, click on the SheetSet that you want to move, then drag and drop it to the location you want it to appear.
|
|
|
|
|
|
Click Create to finish creating the new Managed Report.
Edit Managed Reports
To modify an existing Managed Report, click Edit in the row of the report that you want to change.
Modify the areas that you want to change. See the section above on creating a Managed Report for more information on the various fields.
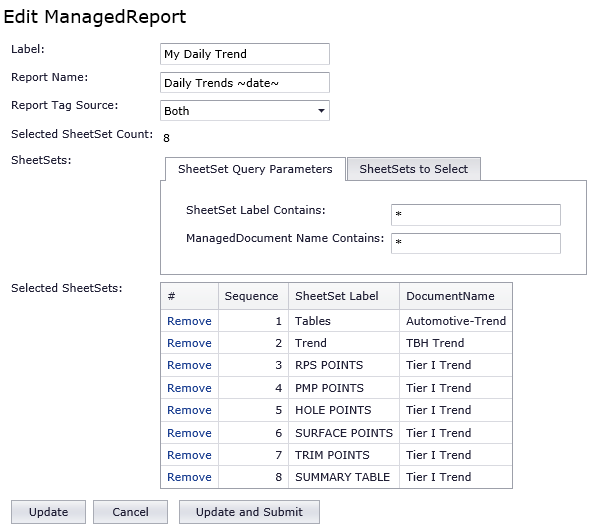
Remove SheetSets.
Add SheetSets.
Change the Order of the SheetSets.
Click Update or Update and Submit.
Update - saves and changes made to the managed report and returns you to the Managed Reports list.
Update and Submit - saves any changes made to the managed report and sends the report to be generated before returning you to the Managed Reports list.
Delete Managed Reports
To remove a Managed Report from the database, click Delete in the row of the report that you want to remove. That Managed Report will no longer appear on the Templates page, but any existing PDFs creating using that Managed Report will remain on the file server until manually deleted by an Administrator.


