Managed Report Administration
A Managed Report is a collection of one or more SheetSets from one or more Managed Documents. All SheetSets in a Managed Report are printed as a single PDF using either Scheduler or CM4D Web. These reports are created by Document Managers using either CM4D Classic or CM4D Web. See here for CM4D Web Managed Report Administration.
A Managed Document does not have to be currently open in CM4D in order to select SheetSets from it to add to a Managed Report. Any other Managed Documents that belong to the Site database can be selected to load SheetSets directly into the Managed Report dialog.
Access Managed Reports
In CM4D Classic, Managed Reports can be administrated via the following menus and/or actions:
|
State |
Menu/Action |
Description |
|
No Document Open |
Admin > Managed Reports |
Manage reports without opening any documents or connecting to a specific CM4D database. Run CM4D Classic and select 'No Document' from the Startup options, or close all open documents without exiting CM4D Classic. Select Managed Reports from the Admin menu. If you do not see this menu, you do not have Document Manager privileges in the Site. |
|
Document Open |
Save New Managed Document |
Manage a report at the time a new managed document is saved. Make a document a Managed Document via Document > Management Settings... menu, then save the new managed Document. The Managed Reports dialog appears automatically to allow you to easily create a new Managed Report with the new Managed Document. While this dialog is open, you also have the option to add Managed SheetSets from other Managed Documents. You can also exit without saving if you choose not to create a Managed Report at that time. |
|
Managed Document Open |
Document > Managed Reports |
Manage reports from the Document menu. To enable this menu option, have any Managed Document open or make a saved document a Managed Document. This opens the Managed Reports dialog where you can create or modify any Managed Report. |
See here for detailed instructions.
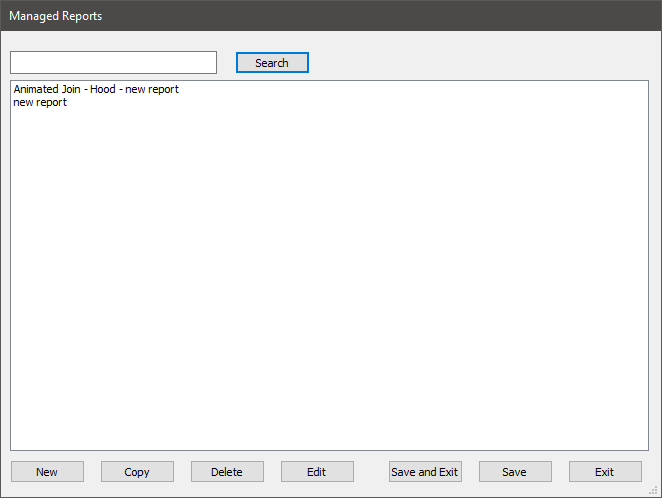
Managed Reports Dialog
This dialog is accessed two ways:
No Document Open - Admin menu
Open Managed Document - Document > Report Manager menu
 |
|
|
Copy |
Duplicate the selected Managed Report. |
|
Delete |
Removes the selected Managed Report from the list. |
|
Edit |
Open the Managed Report properties to set or modify the report definition. |
|
Exit |
Closes the dialog without saving any changes to the database. |
|
New |
Create a new Managed Report. |
|
Save |
Saves any changes to the database. |
|
Save and Exit |
Saves any changes to the database and closes the dialog. |
Search for a Managed Report
Retrieve existing Managed Reports:
Click Search to retrieve all managed reports.
Enter a string in the text field and then click Search to retrieve a list of reports that match the entered text.
Select a Managed Report from the list and click Copy, Delete or Edit.
See also, Configure Managed Reports.
Deleting a Managed Report
Deleting a Managed Report removes the report definition from the database. The deleted Managed Report will no longer be available to generate reports from Scheduler or CM4D Web. Deleting the Managed Report does not delete any existing PDFs created using that Managed Report. All PDFs remain on the file server until manually deleted by an Administrator.
Managed Report Dialog
This dialog is accessed two ways:
Clicking New or Edit in the Managed Report dialog
Saving a new Managed Document
The Managed Report dialog contains everything that defines a Managed Report. To open this dialog, double-click a label in the list or select a Managed Report from the list and click Edit. This is the dialog that appears when you save a new Managed Document for the first time. See also, Configure Managed Reports.
|
|
|
|
|
Adds the selected SheetSet(s) from the Managed Document to the report. |
|
|
Removes the selected SheetSet(s) from the report. |
|
Cancel |
Closes the dialog without saving any changes. |
|
Clear Selected |
Deselects the highlighted SheetSet(s) in the report; does not remove the SheetSet(s) from the report. |
|
Move Up |
Moves the selected SheetSet(s) up in order for the report. |
|
Move Down |
Moves the selected SheetSet(s) down in order for the report. |
|
OK |
Saves any changes and closes the dialog. |
|
Revert |
Discards any changes made since the last save. |
|
Select All |
Highlights all SheetSets from the currently selected Managed Document. This can be used to quickly add all available SheetSet(s) to the report list. |
|
Select Document(s) |
Opens the Select Managed Document dialog to load the SheetSet(s) from a Managed Document. Loading a different Managed Document does not discard any previously selected SheetSet(s) in the report list. |
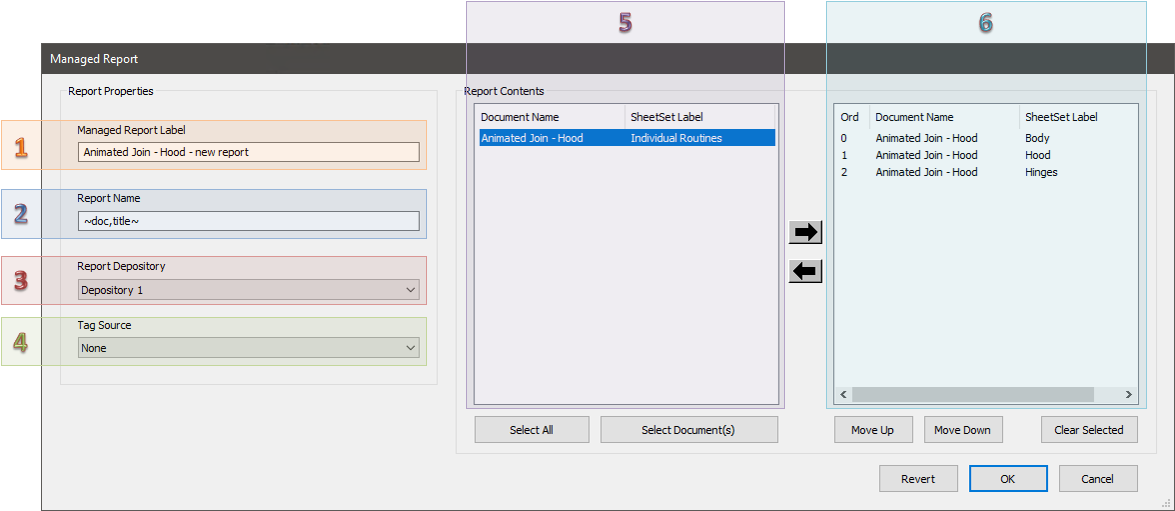
Report Properties
The Managed Report Label plus the Report Depository Label are required to make the report unique, but thumbnails and tags can be added to allow your CM4D Web users to find and organize reports.
1. Managed Report Label
Enter a unique label to identify the managed report.
2. Report Name
Enter a name for the report. This value determines the filename of the generated PDF report. You can use variables as part of the label that will be resolved for a value when the PDF is generated.
Report Name Variables
Using variables in the Report Name creates unique file names and helps to eliminate accidentally overwriting existing reports. However, not all CM4D variables are valid for use as a Report Name. Variables that resolve dates, times, or Managed Document names are commonly used, but variables used in Report Names cannot be guaranteed to resolve.
The following are some common variables that can be used in Report Names:
- ~date~ - resolves the date the report was generated.
- ~doc,title~- resolves the name of the first managed document used in the managed report.
- ~time~ - resolves the time the report was generated.
- ~rout~ - resolves the label of the Routine that was used to generate the report.
- ~job,date~ - resolves the date the report was triggered to print (Scheduler only).
- ~job,samp~ - resolves the label of the sample that triggered the job to print (Scheduler only).
- ~job,time~ - resolves the time the report was triggered to print (Scheduler only).
3. Report Depository
The Report Depository is the labeled storage area (network folder) where generated Reports (and Thumbnail images, if defined) are stored once the report is successfully printed. Report Depositories are managed using CM4D Scheduler. All available Depositories appear in the dropdown list. The User Depository defined for CM4D Web users cannot be used for Managed Reports. See here for more details about Report Depositories in CM4D Scheduler.
4. Tag Source
A Report Tag is Routine/Feature/Sample Filter information that is assigned to a Managed Report to help identify and organize reports in web applications such as CM4D Web. The Report Tag Source setting determines where the Managed Report will look for tags.
- Document Only - Tag information is obtained from tags that are set in the Managed SheetSet(s) within the Managed Report.
- None - No tags will be assigned to the report, even if tags are available on either document or global levels.
- Global Only - Tag information is obtained from the Report Tag Defaults set in SiteManager.
- Global if No Document - Tags are assigned from the document level. If no tags are found in any of the documents in the report, then the Global level tags are assigned.
- Both - Tags from the Managed Document SheetSet(s) and the Report Tag Defaults set in SiteManager will be assigned to the Managed Report.
Report Contents
The SheetSets assigned to the Managed Report define the contents of the final generated report. A Managed Report may contain one or more SheetSets from one or more Managed Documents. The order in which the SheetSets are printed is part of the Managed Report definition.
5. Document SheetSet List
The list on the left contains all Managed SheetSets that exist in the selected Managed Document. Use the Select Document(s) button to load the Managed Document Selection dialog to choose a different Managed Document. Click on a SheetSet label to highlight it, then click the right arrow to add it to the report. Multiple SheetSets can be selected by range or individually using the Shift or Ctrl keys respectively, when clicking on a label. Click the Select All button to add all SheetSets to the report list.
6. Report List
The list on the right contains all Managed SheetSets that are assigned to the Managed Report. Click on a SheetSet label to highlight it, then click the left arrow to remove it from the report. Multiple SheetSets can be selected by range or individually using the Shift or Ctrl keys respectively, when clicking on a label. Click the Clear All button to deselect any highlighted SheetSets in the report list.
Can we improve this topic?