To see how this item is associated to other items refer to the Item Relationship section here.
Repairs are the actions that can be taken to fix a defect on a part. Example repair types might be Add Fluid, Reapply Coating or Manual Refinish.
Note: It can be useful to have a repair called No defect or something similar. This is for situations where the operator carrying out the repair doesn't think that a repair is required. It means that the defect doesn't have to be deleted.
1. Click Defects > Repair > Repair Types.
2. Click Add.
3. In the first field, type the unique repair type name.
4. In the Code field, type the unique repair type code – this field is optional.
5. Use the Part Replaced? checkbox to indicate if this repair type involves replacing the part – this information is used in Inspect Costing, if applicable.
6. Click OK – the dialog box stays open so you can continue entering repair types.
7. When finished adding repair types, click Done.
A multi-step repair, as its name implies, is used to set up repairs that take more than one step. Setting up a multi-step repair type involves naming the multi-step repair and then assigning single step repairs to it. A multi-step repair simply displays all the steps necessary for the repair – it does not actually 'require' that all steps are completed. The repair technician can skip a repair step if it is not necessary for a specific repair on a unit.
1. Click Defects > Repair > Multi-Step Repair Types.
2. Click Add.
3. In the first field, type the unique multi-step repair type name.
4. In the Code field, type a unique multi-step repair type code. (This field is optional.)
5. Click OK – the dialog box stays open so you can continue entering repair types.
6. When finished adding repair types, click Done.
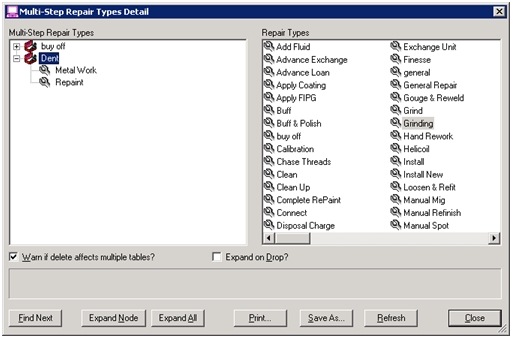
1. Click Defects > Repair > Multi-Step Repair Types Detail.
2. In the Repair Types list on the right side, select a single repair type.
3. Drag and drop the single repair type onto the multi-step repair type on the left side – the following dialog appears.
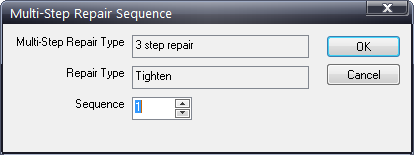
4. Use the Sequence field to indicate the order in which this single repair type should take place.
For example, if Grinding is the first repair step that should be performed, specify "1" as the sequence number.
5. Continue adding single repair types to the multi-repair type until all have been added.
6. Right click on a single repair on the left side at any time to access the sequence dialog.
7. If you need to delete a single repair at any time, highlight it on the left side and click the Delete button.
8. When finished adding repairs, click Close.
You can organize repairs into repair folders to minimize having to scroll through long lists of repairs. Folders also make it easy to assign repairs to a part + concern combination.
1. Click Defects > Repair > Repair Folders.
2. Click the Add button to add a new repair folder.
3. In the Description field, type the new unique folder name.
4. In the Comments field, type any comments you would like to add about the folder. (Use of this field is optional.)
5. Click OK.
6. Repeat as necessary to add other repair folders.
7. To add repairs to a repair folder, use the Repair Folder field to select the folder to which you want to assign repairs.
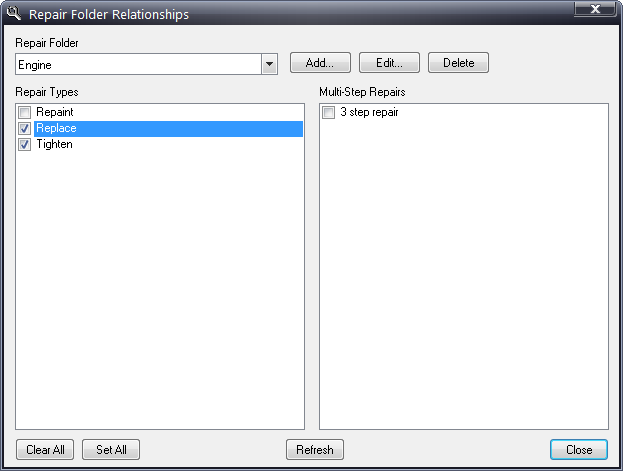
8. Use the Repair checkboxes to select the single repairs to add to that folder.
9. Use the Multi-Step Repair checkboxes to select the multi-step repairs to add to that folder.
10. Repeat as necessary to assign repairs to other folders.