Scheduled Events are executed on a specific schedule determined by the administrator. These are commonly used to send updates to recipients. This might be used for example to send a list of the top ten defects to a marquee on a fifteen minute interval.
Scheduled events have no filters except for the interval on which they are run. All of the logic about what is to be output and the content for the output is contained in the script that is associated with a specific scheduled event.
After you have created scripts you can specify when you want the script to run.
When a scheduled event is created it will immediately run the scripts and send the results to the specified recipients. This is a test feature to ensure it has been created correctly. It will then run as specified in the schedule.
1. Click the Scheduled Events link in the navigation bar.
2. Click New.
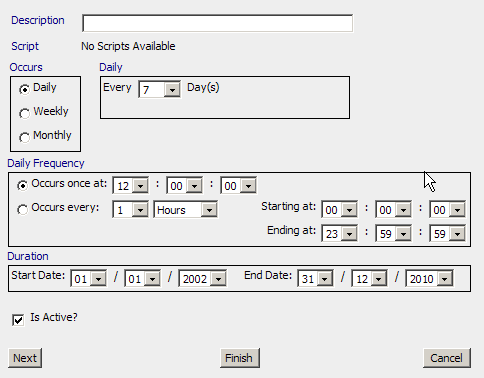
3. In the Description box, type the description or name of the scheduled event.
4. Click the Script arrow, and then choose from the list of scripts.
5. In the Occurs area, click the option button to indicate whether this event is being scheduled to run Daily, Weekly, or Monthly.
The box updates to reflect your selection:


● Daily:
a. From the drop-down list choose the increment in days.
● Weekly:
a. From the drop-down list choose the increment in weeks.
b. Click the checkboxes for the days on which you want the event to run.
● Monthly:
a. Click the first option button.
b. From the Day drop-down list, specify the day of month.
c. From the Every…month drop-down list, specify choose the increment in months.
- Or -
a. Click the second option button.
b. From the first drop-down list, specify the sequence.
c. From the next drop-down list, specify the day name.
d. From the next drop-down list, specify the month increment.
6. In Daily Frequency area, specify the frequency with which the event will run on its scheduled day.
a. Click the first option button to run the event once on its scheduled day. Enter the run time in the hours/minutes/seconds fields.
b. Click the second option button to schedule the event to run at regular intervals throughout the day.
Specify the frequency, then specify the interval (in hours/minutes/ seconds.)
7. In the Duration area, specify the start and end times for the scheduled event.
8. Use the Is Active? checkbox to define whether the scheduled event is active or not.
9. Click Next to continue.
10. Select the recipients and/or groups to receive notification of this event, then click the <<< to move the names or groups to the Send To list.