Now that you have created the forms, you can assign them to templates. When designing a template, you have control over the type of template it is, the screen resolution at which it will display, the layouts it contains and so on. You can create as many templates as you need based on the different types of data collection or different types of stations and devices on which data will be collected.
There are several reasons why you would want to create different templates for different stations:
● Most Inspect stations have different functions and therefore require different forms. For example, an inspection station requires different functions to a repair or audit station.
● Technical experience of inspectors varies. Therefore, you might consider creating templates with different levels of complexity.
● Screen resolutions are different from station to station. For example, one department may be using a 17-inch touch-screen monitor with a resolution of 1024 x 768. Another department might use a portable (hand-held) unit that is capable of a maximum resolution of only 800 x 600. You would need to create templates to support these different monitors.
● Inspector preferences regarding the placement of buttons and images on the screen may be different from station to station.
● Aesthetics and color/font preferences may need to be different based upon lighting and indoor/outdoor use of the stations.
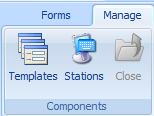
1. Select the Manage tab.
2. Click Station Templates.
The Templates screen will be displayed.
3. Click New.
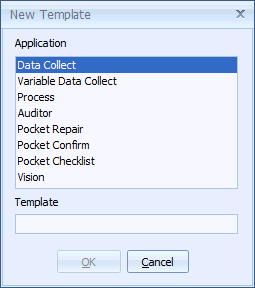
4. Select the required application and click OK.
5. Enter the template name in the text field.
The new template is added to the Templates list and the Assigned Forms list shows the forms types that are required.
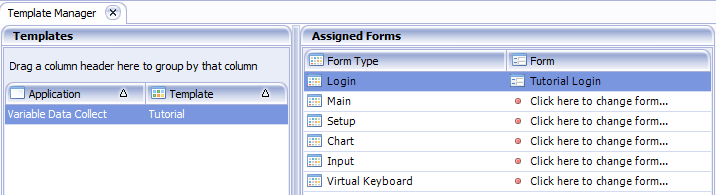
6. Click Click here to change form for one of the form types.
A list of the available forms of that type are shown.
7. Select the required form. It's assigned to the template.
8. Repeat for the other form types.