In this Topic Hide
Specify Default Repair Types and Details
Specify Default Responsible Area and Cell for a Concern
There are a few different ways you can save time configuring the defects in your system. These steps should be carried out before specifying part/concern/repair relationships.
Default repair types and details are automatically assigned to concerns when the concern is added to a part.
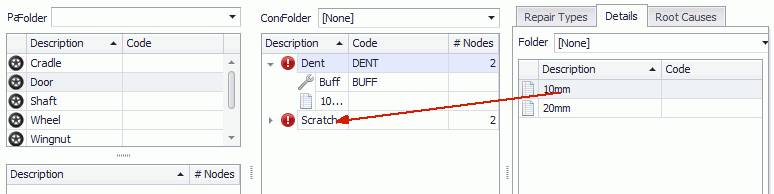
1. Select the Attribute tab.
2. Click Parts/Concerns.
3. Select the required tab (Repair Type or Details) in the right-hand pane.
4. Drag and drop the repair type or detail from the right-hand pane onto a concern in the middle pane.
The repair type or detail will now be associated to the concern by default when the concern is associated to a part.
Concerns that are already associated to parts will have the repair/detail associated to them.
This is the default area/cell that is responsible for the defect occurring. When a concern is associated to a part the default responsible area and cell will automatically be assigned to it.
1. Select the Attribute tab.
2. Click Parts/Concerns.
3. Right-click on a concern in the middle pane.
The Concern Default Properties window opens.
4. Select a default Area and Cell for the concern.
5. Click OK.
The default properties are saved.
This is the default rank for the concern. When a concern is associated to a part the default rank group and rank will automatically be assigned to it.
1. Select the Attribute tab.
2. Click Parts/Concerns.
3. Right-click on a concern in the middle pane.
The Concern Default Properties window opens.
4. Select a Rank Group and Rank for the concern.
5. Click OK.
The default properties are saved.
It's possible to copy all of the concerns, repairs, details and root causes from one part to another.
1. Right-click on the part containing the items to be copied.
A new window opens listing the selected part as the source.
2. Select the Target Part from the drop-down list.
To select a part in a different part folder enable Ignore Part Folder.
3. Click OK.
The items are copied from the source part to the target part.
Alternatively you can drag one part onto another part to copy the contained items.