 ).
).
In this Topic Hide
1. While viewing an image
of the product click the Repair
button ( ).
).
The mouse icon changes to a spanner ( ).
).

2. Click on a defect. The defect will turn yellow.
Multiple defects can be selected and repaired simultaneously (if common repairs exist). Depending on the station property Keep resp area/cell on multiple defect repair the Responsible Areas/Cells can either be left as they originally were or they can all be changed to the same Responsible Area/Cell.
3. Click  to confirm.
You can now select the repair information.
If defaults have been set for any items, they will be highlighted in the screen. You can, of course, select items other than the defaults.
4. Enter repair details using the following items:
Item |
Description |
Repair Type |
Select one. If there are documents associated
to a repair then the document icon ( |
Responsible Area |
Select one. This is the production area responsible for the defect. |
Responsible Cell |
Select one. This is the production zone or cell responsible for the defect. |
Comments |
This might be an explanation, question
or clarification about this repair. You can enter comments at
any point by clicking |
Photo or image |
This might be a photo of the defect. You
can add a photo or image at any time by clicking |
5. Click  to save and close the Repair
screen. The Status of the defect is updated to Repaired.
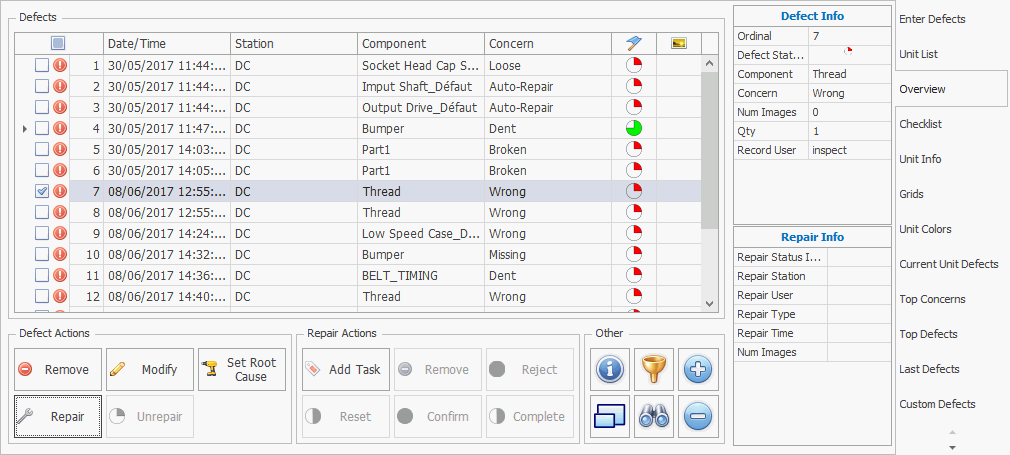
Defects can be repaired in the Overview screen, which can be accessed by clicking the Overview button, or using the Overview control that may be incorporated in one of your other screens. The image below shows an example of the Overview control.

1. Select a defect from the list.
Multiple defects can be selected and repaired simultaneously (if common repairs exist). Depending on the station property Keep resp area/cell on multiple defect repair the Responsible Areas/Cells can either be left as they originally were or they can all be changed to the same Responsible Area/Cell.
2. Click Repair.
You can now select the repair information.
If defaults have been set for any items, they will be highlighted in the screen. You can, of course, select items other than the defaults.
3. Enter repair details using the following items:
Item |
Description |
Repair Type |
Select one. If there are documents associated
to a repair then the document icon ( |
Responsible Area |
Select one. This is the production area responsible for the defect. |
Responsible Cell |
Select one. This is the production zone or cell responsible for the defect. |
Comments |
This might be an explanation, question
or clarification about this repair. You can enter comments at
any point by clicking |
Photo or image |
This might be a photo of the defect. You
can add a photo or image at any time by clicking |
4. Click  to save and close the Repair
screen. The Status of the defect is updated to Repaired.