Repairing Defects on Image of Product
While viewing an image of the product click the Repair button (![]() ).
).
The mouse icon changes to a spanner (![]() ).
).

Click on a defect. The defect will turn yellow.
Multiple defects can be selected and repaired simultaneously (if common repairs exist). Depending on the station property Keep resp area/cell on multiple defect repair the Responsible Areas/Cells can either be left as they originally were or they can all be changed to the same Responsible Area/Cell.
Click ![]() to confirm.
to confirm.
You can now select the repair information.
If defaults have been set for any items, they will be highlighted in the screen. You can, of course, select items other than the defaults.
Enter repair details using the following items:
Item |
Description |
Repair Type |
Select one. If there are documents associated
to a repair then the document icon ( |
Responsible Area |
Select one. This is the production area responsible for the defect. |
Responsible Cell |
Select one. This is the production zone or cell responsible for the defect. |
Comments |
This might be an explanation, question
or clarification about this repair. You can enter comments at
any point by clicking |
Photo or image |
This might be a photo of the defect. You
can add a photo or image at any time by clicking |
Click ![]() to save and close the Repair
screen. The Status of the defect is updated to Repaired.
to save and close the Repair
screen. The Status of the defect is updated to Repaired.
Repairing Defects in Overview Control
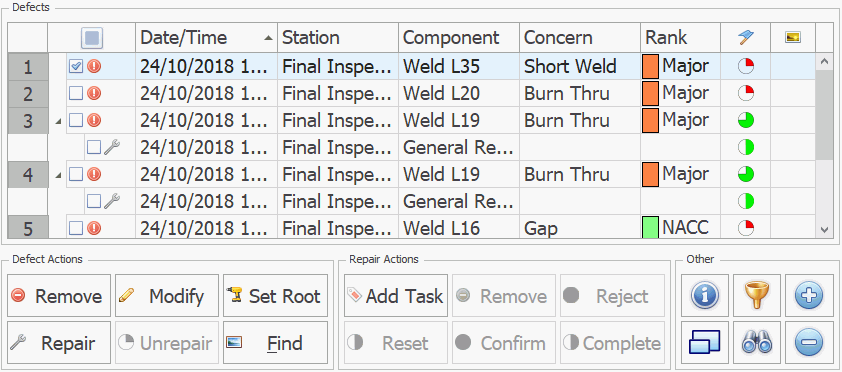
Defects can be repaired in the Overview control that may be incorporated in one of your screens. The image below shows an example of the Overview control.

Enable the check box of one or more defect in the list.
Multiple defects can be selected and repaired simultaneously (if common repairs exist). Depending on the station property Keep resp area/cell on multiple defect repair the Responsible Areas/Cells can either be left as they originally were or they can all be changed to the same Responsible Area/Cell.
Click Repair.
You can now select the repair information.
If defaults have been set for any items, they will be highlighted in the screen. You can, of course, select items other than the defaults.
Enter repair details using the following items:
Item |
Description |
Repair Type |
Select one. If there are documents associated
to a repair then the document icon ( |
Responsible Area |
Select one. This is the production area responsible for the defect. |
Responsible Cell |
Select one. This is the production zone or cell responsible for the defect. |
Comments |
This might be an explanation, question
or clarification about this repair. You can enter comments at
any point by clicking |
Photo or image |
This might be a photo of the defect. You
can add a photo or image at any time by clicking |
Click ![]() to save and close the Repair
screen. The Status of the defect is updated to Repaired.
to save and close the Repair
screen. The Status of the defect is updated to Repaired.
Enhanced Repair Process - Related Parts
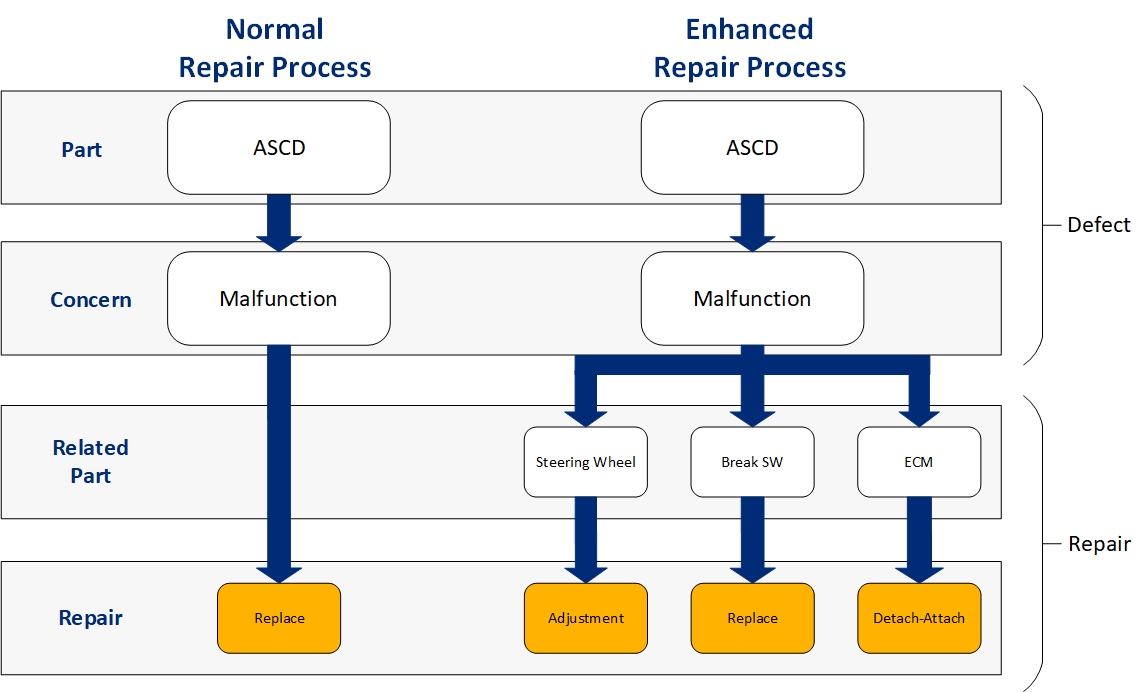
There may be instances during the repair process where the defect can be repaired by repairing a related part. The process for repairing the defect on the related part may differ from the process for the original part to which the defect was assigned.
Both the normal repair process and the enhanced repair process are outlined in the chart below:

This functionality needs to be enabled in the Repair form. For further information, please click here.
To carry out an enhanced repair:
Select a single defect from the Overview Control.
A Do you wish to override defect part? message box will be displayed. Press Yes.
If No is selected, the normal repair process will follow.
The Add Repair window loads and displays a Related Parts tab. If any related parts have been assigned previously, they will be displayed here. If there are no existing related parts listed, or the operator wishes to assign a new related part, press Add Related Part.
A list of applicable parts will be displayed. Select the desired related part.
Only parts with repair types matching the concern of the defect and have not already been added as a related part will be displayed.
The operator will be prompted to select the location if it has been configured.
The normal repair process is followed until the repair is completed. The operator is returned to the Related Parts tab. Press Close.
 .
. .
.