Logging In
When you run the app the first screen you see is the login screen. You will either need to enter a Username and password or a User code.
Enter the required details and tap LOG IN.
Selecting a Station
After logging in, the next step is to select which station the app is representing. The stations are shown in a list.
The last selected station is always highlighted in the list.
You can scroll down the list if it goes beyond the bottom of the screen. If needed you can filter the list by the area the station is associated to. You can also search for a station by tapping ![]() .
.
Tap the required station to select it.
Voice Commands
Station {index: letter,number}: Load the selected station by its index.
Load station {index: letter,number}: Load the selected station by its index.
Select station {Station code}: Load the selected station by its code.
Show me the previous activity: Go to the previous activity.
Go back: Go to the previous activity.
Once a station has been selected the unit list opens.
Selecting a Unit
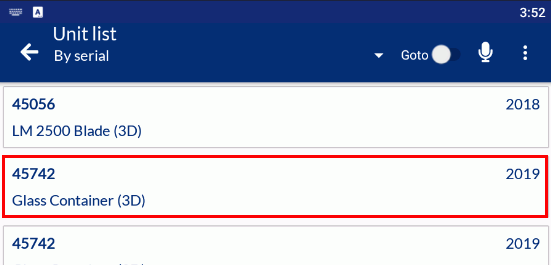
The unit list displays units in the order in which they passed the tracking point associated to the station. The most recent unit is shown at the top. There are different ways to select a unit:
Tap on unit
Tap on the unit shown in the list. The list can be scrolled if it goes beyond the bottom of the screen.

Search by identifier
Tap By serial and select the required identification type.

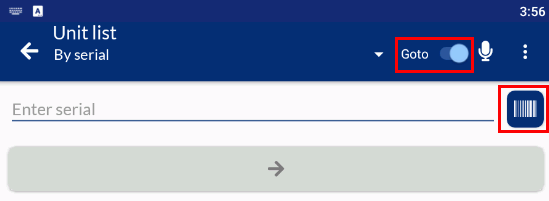
Tap Goto for additional options and enter the identifier code for the required unit in the text box.

Tap the arrow bar to go to the selected unit.
Scan
Tap By serial and select the required identification type.

Tap Goto for additional options and then click ![]() to take a picture of the barcode or QR code for the unit.
to take a picture of the barcode or QR code for the unit.

If Auto load unit after scan is enabled in the settings then the unit will be loaded as soon as its barcode is scanned. If it's disabled then the ID will be shown and you'll need to tap the arrow bar to open it.
Voice commands
Unit {index: letter,number}: Load the selected unit by its index.
Load unit {index: letter,number}: Load the selected unit by its index.
Select unit {Unit serial number}: Load the selected unit by its Serial number.
Show me the previous activity: Go to the previous activity.
Go back: Go to the previous activity.
Viewing Unit Details
Once a unit has been selected its details are displayed. The details cannot be modified and are for reference only.
The CHECKLIST button shows how many questions are assigned to the unit at this station and how many questions have been answered.
Answering Checklist Questions
Once a unit has been selected the checklist questions associated to it can be answered by clicking CHECKLIST.
Answering Checklist Questions.
Create New Unit
Mobile Checklist can create new units on the fly. To do so, follow the steps below:
An Android Checklist form must be created, added to a template and assigned to a station to enable this functionality. For further details, please review the Create Unit document for Android Checklists.
Load a station.
Click the ellipses in the top right hand corner.
Select Create New Unit.
Fill in the fields required.
Press OK.
The new unit is automatically loaded and data can be collected immediately.