 ).
).
In this Topic Hide
Scheduled Events are executed on a specific schedule determined by the administrator. They are commonly used to send updates to recipients. For example, they could send a list of the top ten defects to an overhead display every five minutes.
All of the logic about the content of the output is contained in the script that is associated with the scheduled event. After you have created the script you can specify when you want the script to run.
1. Select the Services tab.
2. Click Scheduled Events.
The Scheduled Events window opens.
3. Click the Add
button ().
The Create Scheduled Events popup opens.
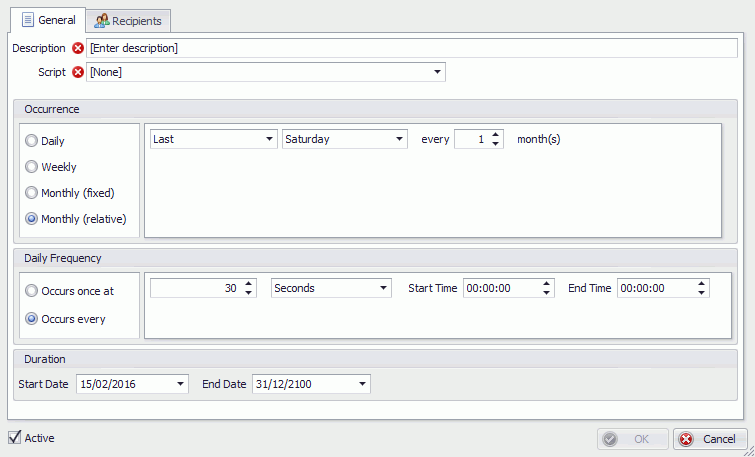
4. In the Description field, enter the description or name of the scheduled event.
5. Select a Script from the drop-down list.
Only Scheduled Event scripts will be shown.
6. In the Occurrence area select whether this event is being scheduled to run Daily, Weekly, Monthly (fixed) or Monthly (relative).
The box updates to reflect your selection:
● Daily:
a. Choose the gap in days between each event.
● Weekly:
a. Choose the gap in weeks between each event.
b. Enable the checkboxes for the days on which you want the event to run.
● Monthly (fixed):
a. Choose which day of the month to run the event.
b. Choose the gap in months between each event.
● Monthly (relative):
This option allows you to select a specific weekday in the month (e.g. every 3rd Friday every 2 months).
a. Choose the occurrence of the day of the week in each month (1st, 2nd,...).
b. Choose which day of the week to use.
c. Choose the gap in months between each event.
7. In the Daily Frequency area select the frequency with which the event will run on its scheduled day.
● Occurs once at:
a. Enter the time of day the event will run in hours/minutes/seconds.
● Occurs every:
b. Specify the interval in seconds.
c. Specify the start and end time for the scheduled event.
8. Enter a Start Date and End Date. The event will only run between these dates.
9. Enable the Active checkbox so that the scheduled event is active.
10. Select the Recipients tab.
The upper-pane contains the recipients and groups that are already assigned to the event. The lower-pane contains the recipients and groups that can be assigned to the event.
11. In the lower-pane enable the checkboxes next to the recipients and groups that will be sent notifications when this event is triggered.
12. Click
the Move In button ( ).
).
The recipients and groups are assigned to the event.
13. Click OK.
The event is saved.