In this Topic Hide
A security group defines security rights that you can assign to users or groups of users at your facility.
1. Click Manage Security Groups and Rights.
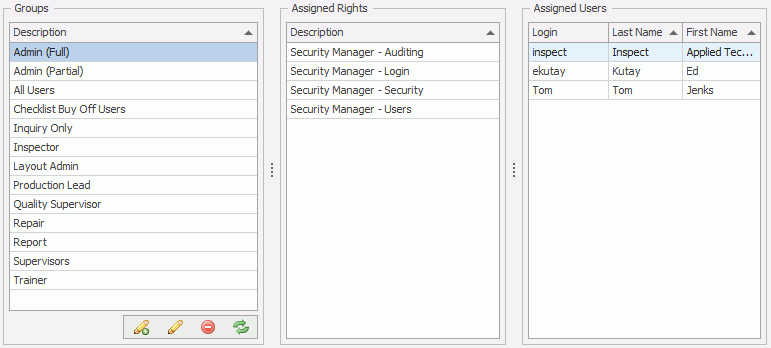
Security Groups are displayed in the left-hand pane. When you select a security group the rights assigned to it are displayed in the middle pane and the users that are part of the group are displayed in the right-hand pane.

1. Click
the Add icon ( ) in the lower-left
corner of the screen.
The Security Group window opens. Assigned rights are displayed in the left-hand pane and available rights are displayed in the right-hand pane.
2. Enter a name for the security group.
3. Select one or more rights in the right-hand pane and click the left-arrow below it.
The rights are assigned to the security group and are displayed in the left-hand pane.
4. Click
the Save icon ( ) to save the
group.
1. Select the desired group.
2. Click
on the Delete icon ( )
)
A confirmation dialog will be displayed asking “Are you sure?”.
3. Select Yes. The Security Group is deleted.
In Inspect, users are those individuals who use any of the Inspect applications. There are security rights and security groups that are then assigned to the users.
Each user has customized settings in ATS ARS. For this reason, it is important that each user be given unique user names and passwords.
1. Click User management. All users will be displayed.

2. Click
the Add icon ( ) in the lower-right
corner of the screen.

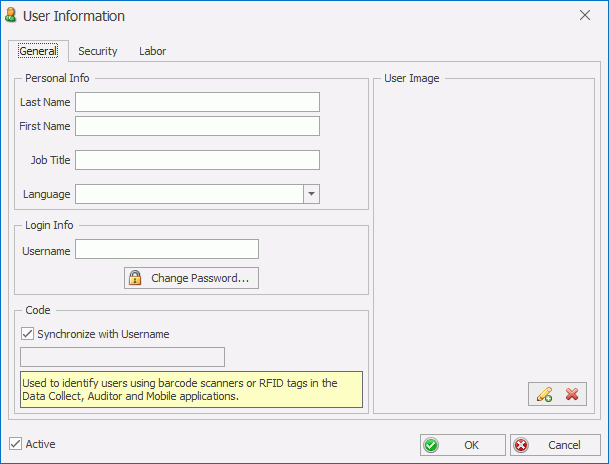
3. Enter the new user's Last Name and First Name.
4. Enter the Job Title. This should not be confused with the Job Classification that is specified in the Labor tab.
5. Use the Language field to choose a language from the list. Languages other than English (US) must be set up and maintained by the Inspect administrator.
6. Enter the unique Inspect Username (Maximum length is 20 characters).
7. Click Change Password and enter the password.
The password must be unique as it acts as a user identifier in the data collection applications.
8. Use the Synchronize with Username? checkbox if you want the inspector to be logged in automatically when using a magnetic card reader.
9. To
add a User Image click the Add ( ) button
in the bottom-right corner and select an image.
10. Use the Active? checkbox to indicate whether or not this user is active.
Click the Delete ( ) icon in
the lower-right corner of the screen to delete users.
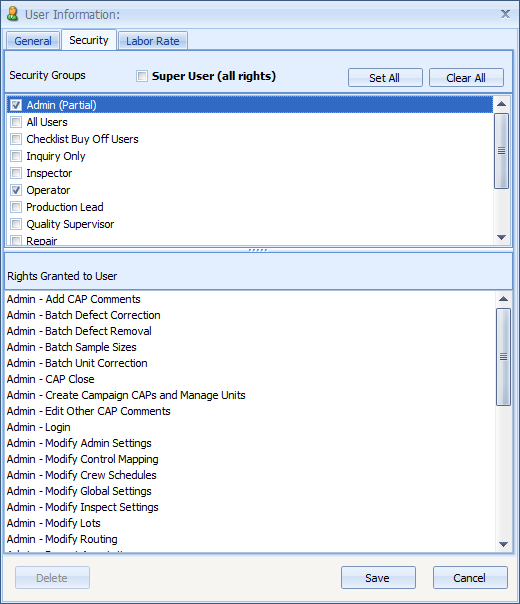
The security tab specifies what the user will be able to do within ATS Inspect.
11. Select the Security tab.
12. Select the Security Groups that the user will belong to. The associated rights will be displayed under Rights Granted to User.
The Super User checkbox can be enabled to give total Administrative rights to the selected user.
The Super User checkbox must be used carefully. Users with this privilege will have the ability to make any changes to the system configuration, so it must be assigned only to the System Administrators.
13. Select the Labor tab.
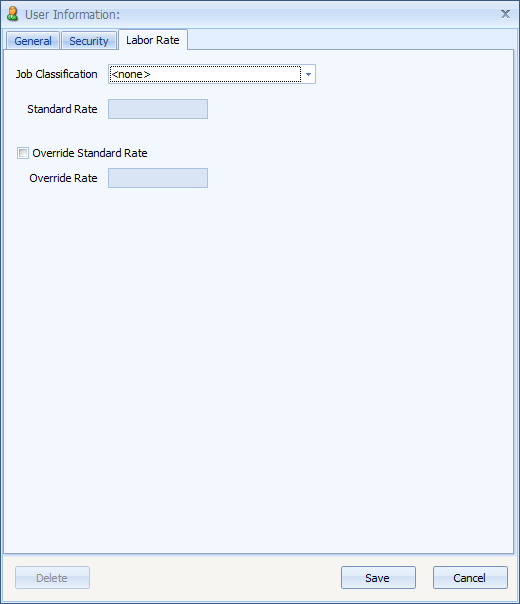
14. Select the Job Classification to which the user belongs.
The Standard Rate is automatically displayed in the default currency for the selected Job Classification.
For information on how to change the standard rate or to create a new job classification see here.
The Override Standard Rate checkbox allows you to set a different rate for this particular user, even though they belong to the selected Job Classification. To use this function check the box and enter the Override Rate.
15. Click Save.
The relationship between users and security groups determines what each user is allowed to do in the Inspect system.
1. Click the Manage Users button. All users will be displayed.
2. Double-click the desired user.
3. Select the Security tab.
4. Select the Security Groups that the user will belong to. The associated rights will be displayed under Rights Granted to User.
The Super User checkbox can be enabled to give total Administrative rights to the selected user.
The Super User checkbox must be used carefully. Users with this privilege will have the ability to make any changes to the system configuration, so it must be assigned only to the System Administrators.

The Labor Rate is only available when the Costing application is enabled.
1. Click the Manage Users button. All users will be displayed.
2. Double-click the desired user.
3. Select the Labor tab.
4. Select the Job Classification to which the user belongs.
The Standard Rate is automatically displayed in the default currency for the selected Job Classification.
For information on how to change the standard rate or to create a new job classification refer to the Costing section.
The Override Standard Rate checkbox allows you to set a different rate for this particular user, even though they belong to the selected Job Classification. To use this function check the box and enter the Override Rate.

5. Click Save.