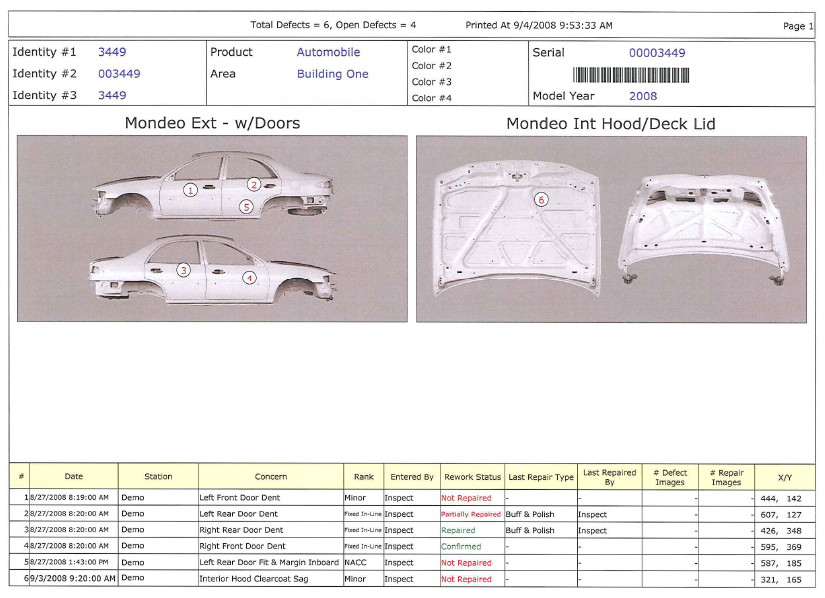
What Are Travel Tickets?
If a repair area does not have a Data Collect repair terminal, travel tickets may be printed so the technician will receive all the quality information needed to perform the repairs. Travel tickets can be printed from any Data Collect station.
Travel tickets can be printed locally or to any networked printer. If a system has network printers installed on it, the Travel Service will have to be set to log onto the system using a local system administrator account that is also a domain user. Otherwise, the network printers will not be available when the Travel Service is started.
If images are being printed, a maximum of 10 defects will print on one page. If an image has more than 10 defects on it, the image will be displayed on the first page with 10 defects corresponding to defects shown in the table at the bottom of the page. The following page(s) will re-display the same image and will contain the remaining defects both on the image and in the table at the bottom of the page.
Travel tickets are configured in Cockpit.
How to Print a Travel Ticket
To print a travel ticket for the current view, use the Print Travel Ticket button that is found on the Main screen.
Information displayed on a travel ticket
Travel tickets contain defect and repair information related to one specific product or unit. The travel ticket header and main body will display the following information:
Product Name – Name or model of product.
Serial Number or Lot Number – Identifying number. Inspect can track the serial number or lot number.
Identity 1, 2, 3 – Secondary identifiers for the product, such as rotation number or build number.
Total Defects – Number of defects entered against this specific unit.
Open Defects – Number of open or un-repaired defects.
Date/Time – Time and date when the travel ticket was printed.
Views – Images will be displayed on the ticket, if desired.
The repair table at the bottom of the ticket displays the following information:
# (Number) – Defect number. This number will correspond to the same number on the view. Note that if the defect was entered via text buttons and not a view, it will not be visually displayed.
Date – Date and time when the defect was entered.
Station – Station where the defect was entered.
Component – Part and location where the defect is located.
Concern – Quality concern.
Rank – Severity of the defect.
Entered By – Name of the inspector who entered the defect. Note that if the station where the defect is entered does not require a login, the name will be displayed as "default."
Repair Status – Will display "Repaired" or "Not Repaired."
Repair Type – Process performed to repair and close the defect.
Repaired By – Name of the technician performing the repair. Note that if the station where the repair is made does not require a login, the name will be displayed as "default."
Example
The following screen shows the first page of a travel ticket. Depending on the number of defects and the information included, a travel ticket might be several pages long.
