In this Topic Hide
When you first purchase ATS Intelligence, or carry out an upgrade, you will need to add the ATS Intelligence reports to the system so that they can be viewed in ATS ARS. This can be done as follows.
1. Open Internet Explorer.
2. Go to the reports management page for ARS.
http://<ReportServer>/Reports/Pages/Folder.aspx
You'll be presented with a screen similar to the following one, displaying the available Root Folders.

3. If required, click New Folder.
4. Enter a name and description for the folder.
5. Click OK.
The root folder is added to the list.
6. Select the root folder.
The list of contained items is displayed.
7. Create folders into which you will add the reports.
8. If required, modify the Folder Settings to ensure that reports can be created and accessed in the folder.
Ensure that the reports are stored at a level below the root folder. Reports uploaded in the root folder will not be accessible in ATS ARS.
9. Enter the folder where you wish to add the reports.
10. Click Upload File.

11. Click Browse.
12. Navigate to the report files that were included with the ATS Intelligence installation. By default they can be found here:
C:\Program Files\Applied Tech Systems\Intelligence\Reports
13. Select the report file (*.rdl) to be uploaded and click Open.
14. Enter a name for the report. This will be seen by the ARS user at runtime.
15. Click OK.
The report is added to the list.
Repeat for every required ATS Intelligence report.
A data source is used by a report to locate the database information to be analyzed. Instead of pointing each report to a database individually, each report can point at the data source which will direct them all to the same location.
16. Click New Data Source.
17. Enter a name and description.
18. Ensure Enable this data source is enabled.
19. Select a data source type. For ATS Intelligence this will be Microsoft SQL Server.
20. Enter a connection string. This will be in the following form:
Data Source=<DatabaseServer>;Initial Catalog=<DatabaseName>
21. Enter the credentials required to access the database server.
22. Click Apply.
The data source is now available in the folder.
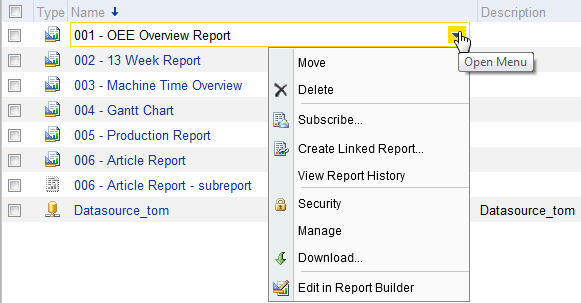
23. Open the menu for the first report by clicking the down arrow as shown below:

24. Select Manage.
The properties for the report will be displayed.
25. Click Data Sources in the menu on the left side of the screen.
26. Select A shared data source.
27. Click Browse.
28. Navigate to the data source you created and select it.
29. Click OK.
30. Click Apply.
The report is now linked to the datasource.
31. Click on the folder name in the top left corner of the screen to return to the reports folder.

32. Repeat the same steps for each report.
Modify the connection settings as follows:
33. Go to the following directory:
c:\inetpub\wwwroot\ATSAdvancedReporting\
34. Open web.config in a text editor.
35. Find the <reportServerInfo> section. Below is an example.
<reportServerInfo>
<servers>
<clear />
<add name="<recognisable server name>" reportServer="http://<hostname>:80/ReportServer" rootFolder="<name of folder containing reports>" />
<add name="<recognisable server name>" reportServer="http://<hostname>:80/ReportServer" rootFolder="<name of folder containing reports>" />
<add name="<recognisable server name>" reportServer="http://<hostname>:80/ReportServer" rootFolder="<name of folder containing reports>" />
</servers>
</reportServerInfo>
36. Change the server and root folder as required.
37. Save the file.
The reports can now be viewed at the following address:
http://ServerName/ATSAdvancedReporting