View identity providers in the Identity providers grid
The Identity providers - all providers grid shows information for all configured providers in three columns: Display name, Type and Status. Each row has a context menu which you can open by clicking on the context menu icon (...). There is one context menu option available in view mode: Open.
To load the Identity providers - all providers grid, click on the Identity providers menu option in the main ATS Security menu.
Identity provider statuses
Each identity provider can be enabled or disabled. For each enabled provider a button appears in the login dialog, which enables users to login using their external account in the selected provider. The button shows the Display name of the enabled identity provider.
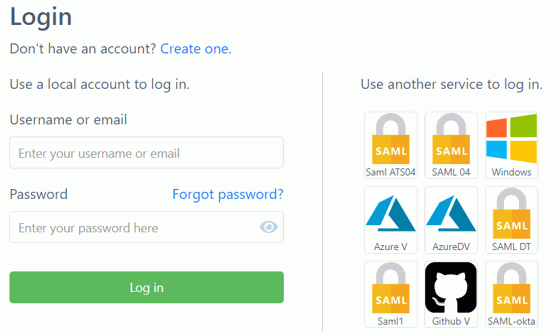
Multiple identity providers of the same type can be enabled simultaneously. In this case all buttons for providers of the same type appear in the same color on the login page.
The exception of this rule is the Windows type of identity provider. There can only be one identity provider of type Windows in ATS Security.
Changes related to identity provider settings, enabling and disabling, also adding and removing providers will be applied only after application restart (restarting the respective application pool on the host).
When the user logs in using an external provider account for the first time a matching user is created in the ATS Security database. The source property of this user is set to the external provider type. This user is used for configuring roles and rights for the registered applications.
View identity provider details in the Identity provider details blade
The Open option from the context menu loads the Identity provider details blade on the right and displays details about the provider such as Type, Display name, status info and other properties depending on the provider type. These details are all read-only when in view mode.
Edit identity providers in the Identity providers grid
Each row in the Identity providers - all providers grid has a context menu which you can open by clicking on the context menu icon (...). The context menu options available in edit mode are:
Open
Delete
Disable (for enabled identity providers)
Enable (for disabled identity providers)
Delete an external identity provider
To delete an identity provider:
Select the Delete option from the provider's context menu.
Click on the Yes button in the confirmation pop-up window.
A success notification appears once the delete operation is successfully completed. The deleted identity provider is no longer visible in the grid.
Deleting a disabled provider is effective immediately. For the deletion of an enabled provider to be effective the ATS Security application (application pool) needs to be restarted on the host machine.
Enable/Disable Identity provider
Only enabled identity providers appear as login option on the login page.
To disable an enabled identity provider:
Select the Disable option from the provider's context menu.
Click on the Yes button in the confirmation pop-up window.
A success notification appears for the successfully updated provider. The status of the provider in the Identity providers - all providers grid is set to disabled. This change will become effective only after application pool restart on the host machine.
To enable a disabled identity provider:
Select the Enable option from the provider's context menu.
Click on the Yes button in the confirmation pop-up window.
A success notification appears for the successfully updated provider. The status of the provider in the Identity providers - all providers grid is set to enabled. This change will become effective only after application pool restart on the host machine.
Edit provider from Identity provider details blade
The Open option from the context menu loads the Identity provider details blade on the right and displays details about the provider such as Type, Display name, status info and other properties depending on the provider type.
Two options, Save and Discard, are disabled until the contents of the fields are modified. The Save option commits the changes made to the provider, while the Discard option restores the original values in the modified fields. The Discard option disables the Save and Discard options.
In addition, if the form fields in a details blade remain unchanged it is possible to work with the "parent" grid (the users grid). Once modifications are made in the Identify Providers details blade the Identify Providers grid becomes "disabled" and grid interactions are no longer possible until the changes are saved or the details blade is closed.
Navigating to another tab in the blade without explicitly saving any changes made in the previous tab will cause the changes to be lost. Clicking on the X button in the blade header closes the Identify Providers details blade, with any changes which were not saved being lost.
To edit an identity provider:
Make the desired changes in details blade.
The Save option becomes enabled.
Click on Save.
In case some of the mandatory fields are empty or fields with custom validation have "invalid" values the Save action will not be executed.
First fix all invalid form fields and then click Save.
A pop-up is displayed indicating that a restart will be required before the changes are applied.
Click the OK button in the pop-up
The Identity provider details blade closes and an appropriate push notification will appear depending on the outcome.
Enable/Disable identity provider
In the details blade for each identity provider there is an Enable check box which is checked for enabled identity providers or blank for disabled providers.
To enable a disabled provider:
Check the Enabled check-box.
Click the Save option in the details blade.
Click on the OK button in the confirmation pop-up window.
The details blade is closed and an appropriate notification appears depending on the outcome.
To disable an enabled provider:
Remove the check from the Enabled check-box.
Click the Save option in the details blade.
Click on the OK button in the confirmation pop-up window.
The details blade is closed and an appropriate notification appears depending on the outcome.
Add New Identity Provider
ATS Security supports the following types of external identity providers:
Windows
OpenIDConnect
AzureAD
GitHub
SAML
For each provider type different properties need to be specified when adding new identity providers such as: Client Id and Client secret. These values are provided when registering an account for the provider. Each provider provides instructions how to complete the registration and get these properties.
To be able to support multiple identity providers of the same type in ATS Security it is important to specify a unique Return URL when ATS Security is registered as client at the external provider. To generate the unique URL simply append the client id assigned to ATS Security upon registration at the external party to the Return URL.
For example: If the return URL for ATS Security is http://ats-security.test:5000/ and the assigned client ID upon registration of ATS Security at the external party is 08e8f803-8c57-47b6-b618-71db8075d7c9 then the Return URL for ATS security should be: http://ats-security.test:5000/08e8f803-8c57-47b6-b618-71db8075d7c9.
Identity providers are added through the Add provider form blade.
To open the Add provider blade, click on the Add button in the top right corner above the Identity providers - All providers grid. This button is only visible when in "edit" mode i.e. logged in with a user that has the EditProviders right.
To add a new provider from the Add provider blade:
Select Type for the provider.
Provide Display name (mandatory).
Provide other required properties depending on selected type.
By default the Enabled check box is ticked for new providers. Remove the tick if you want to add a disabled identity provider.
By default the Auto Register check-box is unchecked. Check Auto Register check box if you trust the identity provider and this will result with saving all provided user data bypassing self-registration settings and checks.
Click on the Save button.
When adding a disabled provider, the Add provider blade is closed and an appropriate push notification will appear depending on the outcome.
When adding an enabled provider, a pop-up confirmation appears informing you that the changes will take effect after application restart. Click Ok in the pop-up. The pop-up closes and also the Add provider blade is closed and an appropriate push notification will appear depending on the outcome.
A successfully created provider appears in the top position of the Identity providers - All providers grid.
SAML Provider
Create SAML application in Okta
To use the SAML identity provider in ATS Security Manager first a SAML application is required to be created. For the purpose of this example, Okta will be used.
First go to https://developer.okta.com/ and sign up. The Okta account can be used to and register applications later.
Check the provided link for how to create a SAML application in Okta :
https://help.okta.com/en/prod/Content/Topics/Access-Gateway/add-app-saml-pass-thru-add-okta.htm
Signed in to Okta as admin.
Create a Saml application
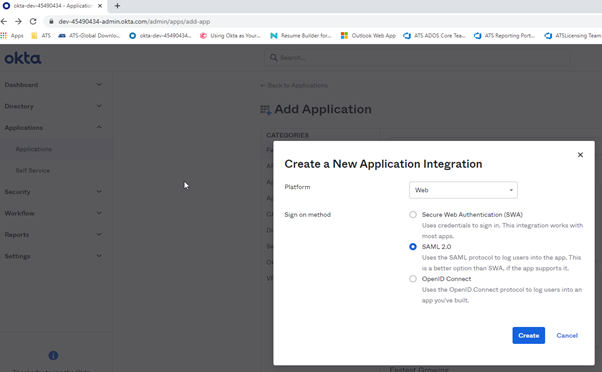
After clicking Create button you should insert first the general settings for the application.
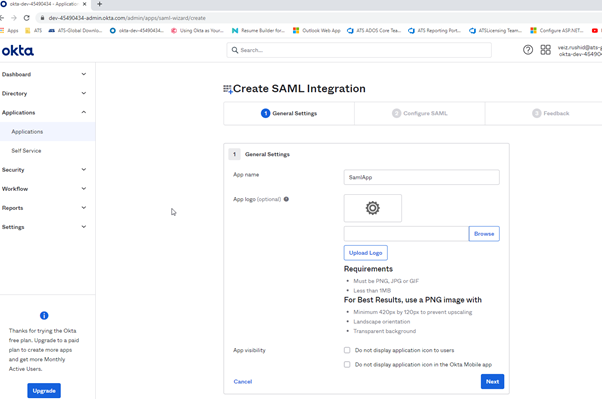
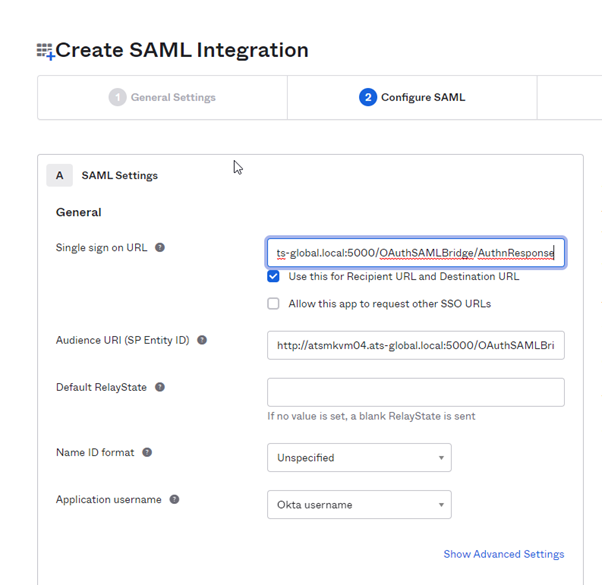
Once the general settings have been completed, the single sign on URL needs to be specified. The URL should be similar to the below example.
https://securitymanagerurl/OAuthSAMLBridge/AuthnResponse where https://securitymanagerurl/ is your ATS Security Manager application
This is the endpoint of the security manager application that handles the saml responses.
After the Configure SAML section specify that this is the internal app and click Finish.

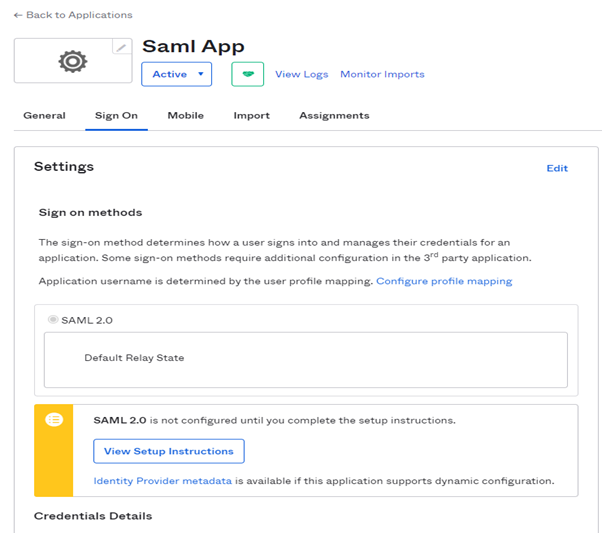
After successful configuration of the SAML application, view the setup Instructions of the application.
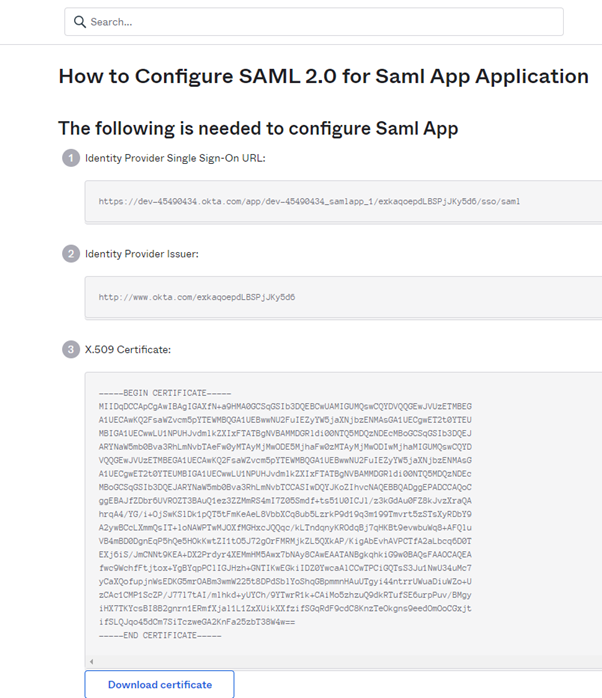
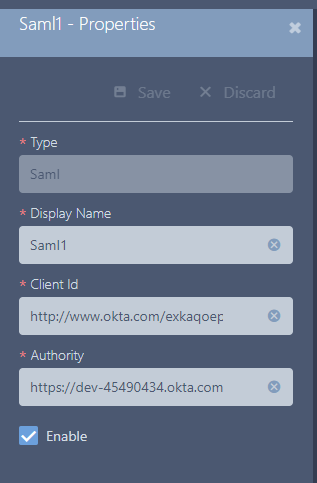
These two properties Identity Provider Single Sign-On URL and Identity Provider Issuer can be used later on in ATS Configuration Manager for configuring of Saml Identity provider.
How to configure SAML Identity Provider in ATS Configuration Manager
To configure identity providers in ATS Security Manager ,navigate to the Security card and go to the Identity Providers section on the menu to the left. Use the SAML application details from the View Setup Instructions in Okta to configure the SAML identity provider.
The following properties should in Security Manager should be mapped accordingly with the properties in the Okta configuration described in the previous chapter:
ClientId = Identity Provider Issuer
Authority = Identity Provider Single Sign-On URL
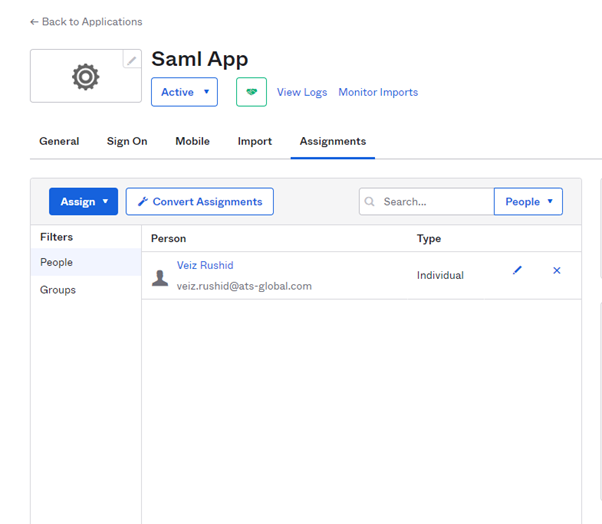
Assignments in SAML application in Okta
Following the successful configuration of the SAML application in Okta, users and groups can be assigned to the application in the Assignments section. The application can be only be used to assigned users or groups.
Expected Result
It is most important when configuring the SAML application that the single endpoint is assigned so SAML responses will be sent.
For example: http://securitymanagerurl/OAuthSAMLBridge/AuthnResponse where http://securitymanagerurl is your ATS Security Manager service.
The configured SAML application can be used only by one ATS Security Manager.
If there are multiple instances of ATS Security Manager service deployed on different machines, then a SAML application is required for each instance.