There may be instances where the user doesn't have the required certificates during the installation of ATS Security Manager to use HTTPS and additional configuration is needed.
This section provides information for setting up ATS Security Manager and ATS Configuration Manager to operate using HTTPS.
Configure Security Manager for HTTPS
The ATS Security is configured to run as a self-hosted application. The ATS Security Manager service will be visible and running in the Services console in Windows.
ATS Security and Configuration Manager are browser based HTML5 applications and use OAuth2 authentication. Browser based applications should always use HTTPS but it is mandatory for OAuth2. Most companies that operate an Active Directory also operate an integrated CA (Certificate Authority). All domain computers will trust a certificate issued by that CA.
For improved security it is recommended to setup ATS Security Manager to run with a trusted certificate:
Ensure that a trusted certificate is available on the machine.
If a trusted certificate is unavailable or you are unsure on which one to use, please consult your IT department and request a certificate.
Obtain the Subject Alternative Name information.
Note that the value provided in the DNS Name is the value that can be used for setting up ATS Security Manager on HTTPS. There can be multiple values which means that the application can use any of those configurations.
Navigate to the installation folder of ATS Configuration Manager. By default this is C:\Program Files\Applied Tech Systems\ATS Configuration Manager\ATS Security Manager\.
Open the appsettings.json file. The following configuration should be present.
"Kestrel": {
"EndPoints": {
"Http": {
"Url": "http://hostname:portnumber"
}
}
}
Replace the http configuration with the following configuration.
"Kestrel": {
"HttpsInlineCertStore": {
"Url": "https://full_qualified_name:httpsportnumber",
"Certificate": {
"Subject": "Certificate_subject",
"Store": "My",
"Location": "LocalMachine",
"AllowInvalid": "false"
}
}
}
}
Replace the following:
full_qualified_name is one of the DNS values from the certificate described in step 2.
httpsportnumber is the port on which we want the application to run.
Certificate_subject is the value from the Subject property in Manage Computer Certificate
Edit the following properties:
Section ATSSecurityManager: Change Authority to be the newly configured address from step 5 value Kestrel:HttpsInlineCertStore:Url.
IssuerUri should be the same value as Authority unless there is a reverse proxy configured. In that case it should be the redirect URL from the reverse proxy
Open c:\Program Files\Applied Tech Systems\ATS Configuration Manager\ATS Configuration Manager\appsettings.json file and In the Configuration section edit the values for
ATSSecurityManager – set the value that is specified in step 6 for Authority
For each plugin inside Configuration Manager folder c:\Program Files\Applied Tech Systems\ATS Configuration Manager\ATS Configuration Manager\wwwroot open the appsettings.json file and change the value for Configuration: ATSSecurityManager to point to the new HTTPS configuration URL for Security Manager
Configure Configuration Manager for HTTPS
The ATS Configuration Manager is configured to run as a self-hosted application. The ATS Configuration Manager service will be visible and running in the Services console in Windows.
The following steps describes how to perform the setup for HTTPS
Navigate to the installation folder of ATS Configuration Manager: By default this is C:\Program Files\Applied Tech Systems\ATS Configuration Manager\ATS Configuration Manager\.
Open the appsettings.json file. The following configuration should be present.
"Kestrel": {
"EndPoints": {
"Http": {
"Url": "http://hostname:portnumber"
}
}
}
Replace the http configuration with the following configuration.
"Kestrel": {
"HttpsInlineCertStore": {
"Url": "https://full_qualified_name:httpsportnumber",
"Certificate": {
"Subject": "Certificate_subject",
"Store": "My",
"Location": "LocalMachine",
"AllowInvalid": "false"
}
}
}
}
Replace the following:
full_qualified_name is one of the DNS values from the certificate described in step 2.
httpsportnumber is the port on which we want the application to run.
Certificate_subject is the value from the Subject property in Manage Computer Certificate
Modify the following configuration files:
Open the appsettings.json file in the ATS Configuration Manager installation folder and edit the property Configuration:ATSSecurityManager to point to the new ATS Security Manager on HTTPS which is configured in Configure Security Manager for HTTPS.
Open appsettings.json file in the ATS Security Manager installation folder and edit the property ATSSecurityManager:Authority to point to the new ATS Security Manager on HTTPS which is configured in Configure Security Manager for HTTPS.
Also change the property ATSSecurityManager:ATSConfigurationManager to point to the new Configuration Manager url defined in step 3 and change the ATSSecurityManager:forceHttpInProd to false.
Last step is to restart both services for ATS Security Manager service and ATS Configuration Manager service. If there are issues when restarting the services investigate the logs for the specific application, which are located in their installation folder in the /logs folder.
Create and Register certificates for TLS/SSL
ATS ADOS applications can be configured to use TLS and therefore requires a certificate. A self-signed certificate will work but it is recommended to use a production grade certificate.
Create certificates for ATS ADOS applications (recommended)
Follow the steps below to create a certificate for the ADOS web API’s that require HTTPS and is the recommended approach. Self-signed certificates should not be used for ADOS web API’s.
Open the certificate manager for the local computer using the following command: certlm.msc
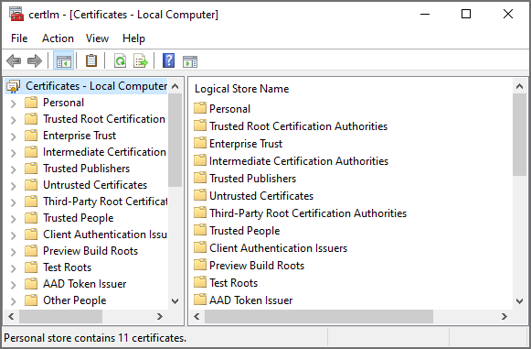
Right click on the Personal folder and select All Tasks > Request New Certificate.
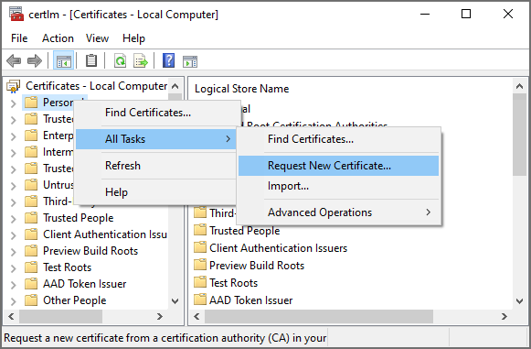
Click Next.
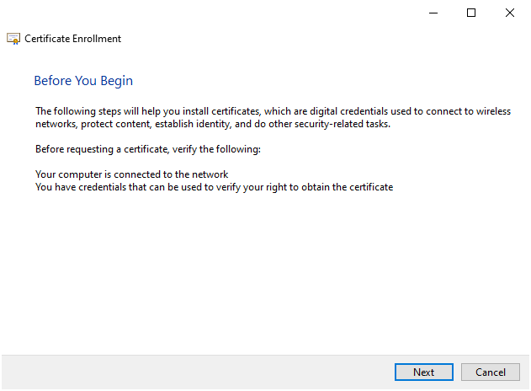
Select the Active Directory Enrollment Policy and press Next.
 #
#
Request a certificate of a specific type that is required for the web API and click Enroll.
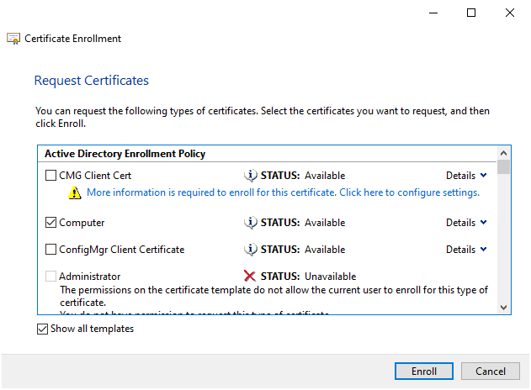
Review the certificate and press Finish.
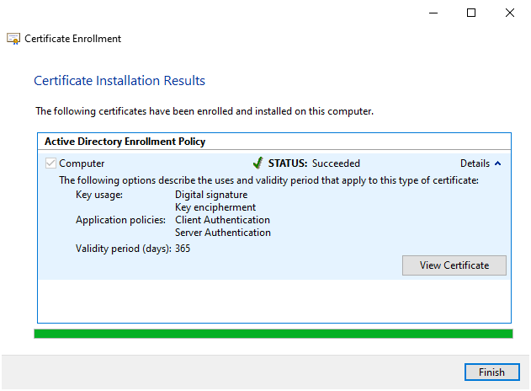
The certificate uses a FQDN in the Subject Alternative Name and therefore the ADOS web API’s (Security Manager, Configuration Manager, License Manager, Bus services, Inspect services, CM4D services) should configure the FQDN everywhere the hostname is required. Clients should then invoke the services using the FQDN otherwise the server responds with HTTP Bad Request.
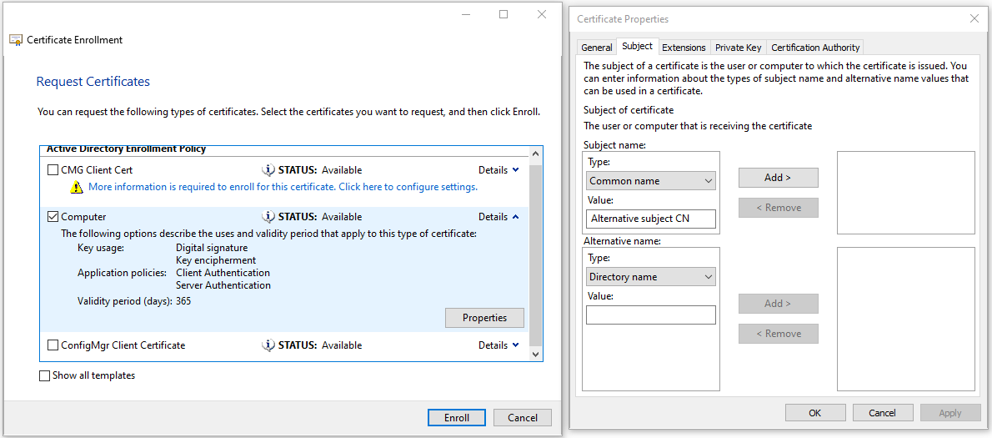
There may be multiple certificates in the personal store with the same ‘Issue to’ property. This causes an issue when the certificate that has the ‘Server authentication’ set expires earlier than the certificate that does not have that intended purpose set. The ADOS web API’s select the certificate by its subject CN and the longest validity. It does not check the intended purpose.
It is recommended to check if the subject common name can be changed in the certificate type selection window as indicated below:
Configure self-signed certificate (not recommended)
The ATS Security Manager installers do not provide and install a self-signed certificate. However, a temporary certificate can be created after ATS Security Manager and ATS Configuration Manager is installed.
A temporary certificate can be created using the following PowerShell command:
New-SelfSignedCertificate -DnsName <FQDN>, <Hostname> -CertStoreLocation “cert:\LocalMachine\My” -NotAfter “2030-01-01” -Subject "CN=AtsSecuritySelfSignedCert"
Replace the following:
- <FQDN> is a string holding the computer name including the domain name
- <Hostname> is a string holding the computer name without domain name
This will create a certificate with the common name AtsSecuitySelfSignedCert in the Local Computer certificate store at the Personal location. Please copy this certificate to the Trusted Root Authority to ensure that the chain is trusted.
For further information on working with certificates, please refer to the official documentation.
For additional documentation regarding configuration on Kestrel please refer to the official documentation.