Roles are used to assign rights to users, like depicted in the diagram below. When a role is deleted the rights for all users that were mapped through that particular role are removed from the users. They can be re-assigned through another role if needed:
Through an existing role: by assigning the rights to an existing role.
Through a new role: by creating a new role, assigning the desired rights to the new role, then assigning the role to the users as required.

View User Roles in the Roles grid
The Roles grid can be loaded by clicking on the Roles icon on the Security Card. The Roles grid shows information for the configured User Roles in two columns; Role and Description.
Each row in the Roles grid has a context menu, which can opened by clicking on the context menu icon (...). There are two context menu options available; Open and Delete.
View role details in the Role details blade
Selecting the Open option from the context menu loads the Role details blade on the right of the window. The Roles details blade displays details about the User Role such as its name and description.
Edit roles in the Roles grid
Each row in the Roles grid has a context menu, which can opened by clicking on the context menu icon (...). There are two context menu options available; Open and Delete.
Delete a User Role
A User Role can be deleted by selecting the Delete option in the context menu of the User Role. Once confirmed, a success notification is displayed and the Role is no longer visible in the grid.
Edit User Role from Roles details blade
A User Role can be edited by selecting the Open option in the context menu of the User Role. The Roles details blade is loaded on the right of the window. The Roles details blade displays details about the User Role such as its name and description, the members of the role and the Rights it has been assigned.
Two options, Save and Save and close, are disabled until the contents of the fields are modified.
When clicking the Save option all the entered data is saved and the same blade remains open.
Clicking the Save and close option will save all entered data, the blade is closed, and the user is redirected to the parent blade.
Remove a member from a role
From User-Role details blade
Select the Open option from the role member context menu.
A User-Role details blade is opened on the right describing the user-role relation and which rights the user gets by being assigned this particular role.
Select the Remove option in the User-Role details blade.
Click on the Yes button in the confirmation pop-up window.
The User-Role details blade is closed. A success notification appears for successfully removed role. The removed user/member is gone from the Role-members grid in the Members tab of the Role details blade.
Using the context menu Delete option
Select the Delete option from the role member context menu.
Click on the Yes button in the confirmation pop-up window.
A success notification appears for successfully removed role. The removed member is gone from the Role-members grid in the Members tab of the Role details blade.
Add single user
Click on the Add button in the top right corner of the Role-members grid.
An Add members blade opens on the right with a list of users and a search box.
Find the desired user and check its check-box.
Click on the Save and close button.
The Add members blade is closed. A success notification appears for successfully added member. The added user is visible in the Role-members grid in the Members tab of the Role details blade.
Add multiple users
Click on the Add button in the top right corner of the Role-member grid.
An Add members blade opens on the right with a list of users and a search box.
Find the desired users and check its check box.
Click on the Save and close button.
The Add members blade is closed. A success notification appears for successfully added members. The added users are visible in the Role-members grid in the Members tab of the Role details blade.
Remove right from a role
Click on the Rights tab on the Role Details blade.
A tree structure with all applications is displayed.
Expand the applications and deselect the desired right/rights.
Click on the Save or Save and close button.
If the Save option is clicked, all entered data is saved and the Role Details blade remains open. If the Save and close option is clicked all entered data is saved, the blade is closed, and the user is redirected to the parent blade.
A success notification appears for a successfully updated role.
Add rights to a role
Add single right
Click on the Rights tab on the Role Details blade.
A tree structure with all application is displayed.
Expand an application and select the desired right.
Click on the Save or Save and close button.
If the Save option is clicked, all entered data is saved and the Role Details blade remains open. If the Save and close option is clicked all entered data is saved, the blade is closed, and the user is redirected to the parent blade.
A success notification appears for a successfully updated role.
Add multiple rights from one application
Click on the Rights tab on the Role Details blade.
A tree structure with all application is displayed.
Expand an application and select the desired rights.
Click on the Save or Save and close button.
If the Save option is clicked, all entered data is saved and the Role Details blade remains open. If the Save and close option is clicked all entered data is saved, the blade is closed, and the user is redirected to the parent blade.
A success notification appears for a successfully updated role.
Add multiple rights from multiple applications
Click on the Rights tab on the Role Details blade.
A tree structure with all application is displayed.
Expand an application and select the desired rights.
Expand another application and select the desired rights.
Click on the Save or Save and close button.
If the Save option is clicked, all entered data is saved and the Role Details blade remains open. If the Save and close option is clicked all entered data is saved, the blade is closed, and the user is redirected to the parent blade.
A success notification appears for a successfully updated role.
Add all rights from all applications
Click on the Rights tab on the Role Details blade.
A tree structure with all applications is displayed.
Select the option for All rights.
Click on the Save or Save and close button.
If the Save option is clicked, all entered data is saved and the Role Details blade remains open. If the Save and close option is clicked all entered data is saved, the blade is closed, and the user is redirected to the parent blade.
A success notification appears for successfully updated role.
The role now has all rights from all applications. The rights for the desired applications that were selected before enabling this option are displayed as disabled on the tree structure.
The All rights option enables a quick way to assign all rights to a role and while applying manually assigned rights. When the option is unchecked, the last granted rights are assigned back to the role.
Add new role
A user role can be created by selecting the Add Roles button on the Roles card in Security. The Add role blade is displayed and prompts for the following information:
Provide a Name for the role. This name must be unique.
Provide Description for the role (optional).
Click on the Save or Save and close button.
If the Save option is clicked all the entered data is saved and the Role Details blade is shown. If the Save and close option is clicked all entered data is saved, the blade is closed, and the user is redirected to the parent blade.
An appropriate push notification will appear depending on the outcome and a successfully created role will appear in the top position of the Roles - All roles grid.
Associate with Active Directory Groups
ATS Configuration Manager offers the option to associate Windows and Azure Active Directory groups with Roles. For this purpose both need to be configured in the Identity Providers module of ATS Security Manager.
For Windows Active Directory to be set the ATS Security Manager needs to be deployed on a Windows Operating system and in the Identity Providers module, the Windows provider must be set with host and port information.
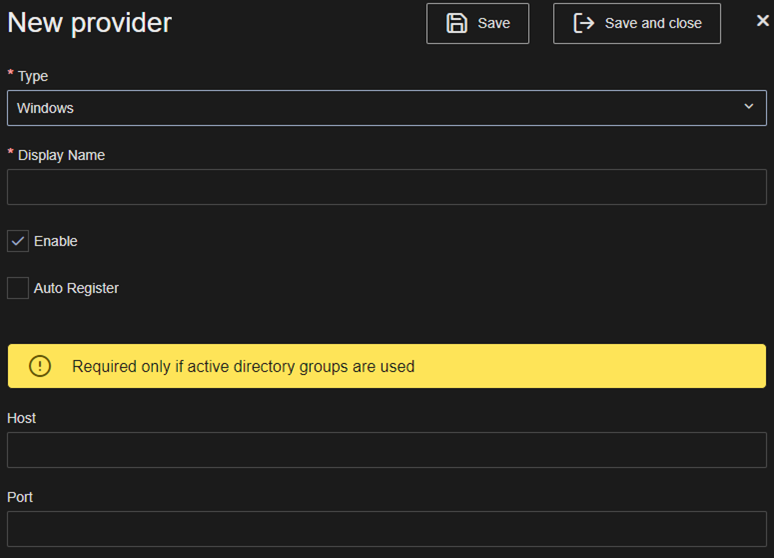
The host and port information are used when searching for Windows Active Directory groups.
Add/Remove Active Directory groups
To edit the Active Directory groups of a role navigate to the Roles module and edit a role. The Role details blade has two tabs: Windows AD groups or Azure AD groups one for each provider. The Active Directory groups are displayed in a grid for the chosen provider. This grid has two columns: Windows/Azure Active Directory groups and Action. For each Windows/Azure Active Directory group, there is a context menu which is opened by clicking on the context menu icon (...). In the context menu, there is an option for Delete.
Add Active Directory groups to a role
Add a single Windows Active Directory group
Click on the Add button in the top right corner of the Role-Windows Active Directory groups grid.
An Add Windows AD Groups to Role blade opens on the right with required fields for User name and Password and an optional field for Filter.
Enter a User name and Password. The account information is a valid user from the Windows Active Directory. Additionally you can insert a value in the Filter field to be applied for filtering the results.
The list of Windows Active Directory groups is loaded with a search box on top.
Find the desired Windows Active Directory group and check its check box.
Click on the Save or Save and close button.
The Add Windows AD Groups to Role blade is closed. A success notification appears for successfully added Windows Active Directory group. The added Windows Active Directory group is visible in the Role-Windows Active Directory groups grid in the Windows AD groups tab of the Role details blade.
Add a single Azure Active Directory group
Click on the Add button in the top right corner of the Role- Azure Active Directory groups grid.
An Add Azure AD Groups blade opens on the right required field Filter and Search button.
Insert a value in the Filter field to be applied for filtering the results and click on Search.
The list of Azure Active Directory groups is loaded with a search box on top.
Find the desired Azure Active Directory group and check its check box.
Click on the Save or Save and close button.
The Add Azure AD Groups blade is closed. The added Azure Active Directory group is visible in the Role- Azure Active Directory groups grid in the Azure AD groups tab of the Role details blade.
Remove Active Directory group from a role
Using the context menu Delete option
Select the Delete option from the Windows/Azure Active Directory groups context menu.
Click on the Yes button in the confirmation pop-up window.
A success notification appears for successfully removed Windows/Azure Active Directory group. The removed Active Directory group is gone from the Role-Windows/Azure Active Directory groups grid in the Windows/Azure AD groups tab of the Role details blade.
Troubleshooting
In order to check if LDAP is accessible you can use the following powershell script to determine the ports.
function Test-LDAPPorts {
[CmdletBinding()]
param(
[string] $ServerName,
[int] $Port
)
if ($ServerName -and $Port -ne 0) {
try {
$LDAP = "LDAP://" + $ServerName + ':' + $Port
$Connection = [ADSI]($LDAP)
$Connection.Close()
return $true
} catch {
if ($_.Exception.ToString() -match "The server is not operational") {
Write-Warning "Can't open $ServerName`:$Port."
} elseif ($_.Exception.ToString() -match "The user name or password is incorrect") {
Write-Warning "Current user ($Env:USERNAME) doesn't seem to have access to to LDAP on port $Server`:$Port"
} else {
Write-Warning -Message $_
}
}
return $False
}
}
Function Test-LDAP {
[CmdletBinding()]
param (
[alias('Server', 'IpAddress')][Parameter(Mandatory = $True)][string[]]$ComputerName,
[int] $GCPortLDAP = 3268,
[int] $GCPortLDAPSSL = 3269,
[int] $PortLDAP = 389,
[int] $PortLDAPS = 636
)
# Checks for ServerName - Makes sure to convert IPAddress to DNS
foreach ($Computer in $ComputerName) {
[Array] $ADServerFQDN = (Resolve-DnsName -Name $Computer -ErrorAction SilentlyContinue)
if ($ADServerFQDN) {
if ($ADServerFQDN.NameHost) {
$ServerName = $ADServerFQDN[0].NameHost
} else {
[Array] $ADServerFQDN = (Resolve-DnsName -Name $Computer -ErrorAction SilentlyContinue)
$FilterName = $ADServerFQDN | Where-Object { $_.QueryType -eq 'A' }
$ServerName = $FilterName[0].Name
}
} else {
$ServerName = ''
}
$GlobalCatalogSSL = Test-LDAPPorts -ServerName $ServerName -Port $GCPortLDAPSSL
$GlobalCatalogNonSSL = Test-LDAPPorts -ServerName $ServerName -Port $GCPortLDAP
$ConnectionLDAPS = Test-LDAPPorts -ServerName $ServerName -Port $PortLDAPS
$ConnectionLDAP = Test-LDAPPorts -ServerName $ServerName -Port $PortLDAP
$PortsThatWork = @(
if ($GlobalCatalogNonSSL) { $GCPortLDAP }
if ($GlobalCatalogSSL) { $GCPortLDAPSSL }
if ($ConnectionLDAP) { $PortLDAP }
if ($ConnectionLDAPS) { $PortLDAPS }
) | Sort-Object
[pscustomobject]@{
Computer = $Computer
ComputerFQDN = $ServerName
GlobalCatalogLDAP = $GlobalCatalogNonSSL
GlobalCatalogLDAPS = $GlobalCatalogSSL
LDAP = $ConnectionLDAP
LDAPS = $ConnectionLDAPS
AvailablePorts = $PortsThatWork -join ','
}
}
}
Save the code above in file with extension .ps1 . Open powershell and navigate to the folder where the file has been saved and execute the following command:
Test-LDAP -ComputerName 'AD1','AD2' | Format-Table
Where ComputerName is the Host specified in the record for Windows Identity Provider.
Here is one example how this should be executed:
