In this Topic ShowHide
Time periods are pre-defined options that select certain range of time
in two separate date-time parameters (fields) configured as From
and To fields. For example: This year time
period would select 1st of January this year in the From
field and the current date (today) in the To
field.
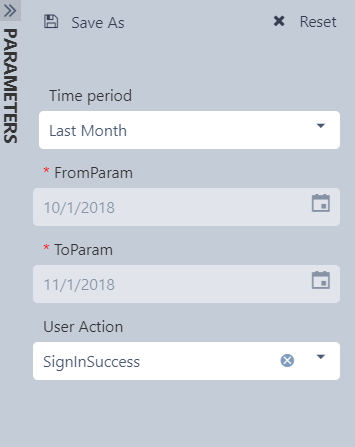
When time periods for a report are enabled then the configured From
and To parameters of the report will show as read-only in the Parameters
panel of ATS Reporting Portal and an additional Time period select list
field will appear to hold all allowed time period values for this report.
Selecting a value in the Time period field will set the values in the
read-only From and To fields.
Configure time periods for a report
Time periods can be configured and enabled for any report with at least
two parameters of type date-time at any time manually from the Time periods
tab of the report details blade.
On reporting source level default From-To parameter names can be configured.
Every time a report instance from this reporting source is added that
has parameters of type date-time and there is a match with the default
From-To parameters set on reporting source level then the From-To parameters
for this report will be configured and time periods will be enabled automatically.
Select From-To parameters
In order to use time periods for a report this report needs to have
minimum two parameters of type date-time.
To configure the From-To parameters for report time periods:
- Open the Organize reports menu blade.
- Select the report menu item OR select the Open option from a report
menu item's context menu.
- The report details blade is loaded with the Properties tab active.
- Select the Time periods option from the blade tab menu.
- The Time period tab becomes active. There is a disabled (can not
be checked) Enable time periods
check-box and two select list fields From
parameter and To parameter.
- Select parameter (from the available options) for the
From parameter field.
- Select parameter (from the available options) for the To
parameter field.
- The Enable time periods
check-box now becomes enabled. Also a Time periods grid appears in
the Time periods tab, under the From
parameter and To parameter
fields.
- Click on the Save option in the report details blade.
- The blade is closed. A success notification appears.
- For reports that have no date-time parameters or have
less than two date-time parameters a proper information that time
periods can not be used will ne shown to the user upon loading of
the Time periods tab of the report details blade.
Enable/disable time periods
Time periods can be enabled only when the From-To parameters for the
report are configured.
To enable time periods for a report with configured From-To parameters:
- Open the Organize reports menu blade.
- Select the report menu item OR select the Open option from a report
menu item's context menu.
- The report details blade is loaded with the Properties tab active.
- Select the Time periods option from the blade tab menu.
- The Time period tab becomes active. The Enable
time periods check-box is not checked. The values for the fields
From parameter and To parameter are set and
there is a Time periods grid under the From
parameter and To parameter
fields.
- Check the Enable time periods
check-box.
- Click on the Save option in the report details blade.
- The blade is closed. A success notification appears.
To disable time periods for a report with enabled time periods:
- Open the Organize reports menu blade.
- Select the report menu item OR select the Open option from a report
menu item's context menu.
- The report details blade is loaded with the Properties tab active.
- Select the Time periods option from the blade tab menu.
- The Time period tab becomes active. The Enable
time periods check-box is checked.
- Remove the check from the Enable
time periods check-box.
- Click on the Save option in the report details blade.
- The blade is closed. A success notification appears.
Configure time period values
When From-To parameters are configured for a report the Time periods
grid appears under the From parameter
and To parameter fields in the
Time periods tab of the report details blade showing ALL
currently configured time periods in ATS Reporting. If time periods
for this report are enabled at that moment then ALL defined time period
values will be available for selection from the Time period field when
this report is loaded in ATS Reporting Portal.
To restrict/remove a value from the time periods field select list for
a report:
- Open the Organize reports menu blade.
- Select the report menu item OR select the Open option from a report
menu item's context menu.
- The report details blade is loaded with the Properties tab active.
- Select the Time periods option from the blade tab menu.
- The Time period tab becomes active.
- Click on the context menu icon
 for the time period value to remove.
- Select the Delete option from the context menu.
- Click on the Yes button in the confirmation pop-up.
- The pop-up is closed. A success notification appears. The deleted
value is no longer present in the Time periods grid.
To allow/add a value from the time periods field select list for a report:
- Open the Organize reports menu blade.
- Select the report menu item OR select the Open option from a report
menu item's context menu.
- The report details blade is loaded with the Properties tab active.
- Select the Time periods option from the blade tab menu.
- The Time period tab becomes active.
- Click on the Add button above the Time periods grid.
- The Add time period blade is loaded on the right.
- Select the time period to add from the Time period select list.
- Optionally set the selected time period as Default (check the Set as default check-box).
- Click on the Save button in the Add time period blade.
- The blade is closed. A success notification appears. The added
value is present in the Time periods grid.
Default value for the time period field
One of the allowed time period values on report instance level can be
set a default for the time period field. The default value will be pre-selected
in the Parameters panel in ATS Reporting Portal.
To set a default value for the time period field for a report:
- Open the Organize reports menu blade.
- Select the report menu item OR select the Open option from a report
menu item's context menu.
- The report details blade is loaded with the Properties tab active.
- Select the Time periods option from the blade tab menu.
- The Time period tab becomes active.
- Check the Default check-box for the value you want to set as default
in the Time periods grid.
- The grid is refreshed. A success notification appears.
To remove a default value for the time period field for a report:
- Open the Organize reports menu blade.
- Select the report menu item OR select the Open option from a report
menu item's context menu.
- The report details blade is loaded with the Properties tab active.
- Select the Time periods option from the blade tab menu.
- The Time period tab becomes active.
- Remove the check from the Default check-box for the value set as
default in the Time periods grid.
- The grid is refreshed. A success notification appears.
Enable/Disable the "Custom" option for the time period field
By default there is a "Custom" option in the Time period field
in ATS Reporting Portal (for a report for which time periods are enabled).
When this option is selected the otherwise disabled (i.e. read-only) From-To
fields become enabled and can be edited. In this case the Reporting Portal
user can select custom values in the From-To parameter fields to run the
report with.
To disable the Custom option for the time period field for a report:
- Open the Organize reports menu blade.
- Select the report menu item OR select the Open option from a report
menu item's context menu.
- The report details blade is loaded with the Properties tab active.
- Select the Time periods option from the blade tab menu.
- The Time period tab becomes active.
- Check the Disable custom time
period check-box above the Time periods grid.
- Click on the Save option in the report details blade.
- The report details blade is closed. A success notification appears.
To enable the Custom option for the time period field for a report where
it is disabled:
- Open the Organize reports menu blade.
- Select the report menu item OR select the Open option from a report
menu item's context menu.
- The report details blade is loaded with the Properties tab active.
- Select the Time periods option from the blade tab menu.
- The Time period tab becomes active.
- Remove the check from the Disable
custom time period check-box above the Time periods grid.
- Click on the Save option in the report details blade.
- The report details blade is closed. A success notification appears.
Reports that have Date Range parameter
The reports that have Date Range parameter should be properly configured
in the ATS Reporting Configuration first:
- Open the Organize reports menu blade.
- Select the report menu item OR select the Open option from a report
menu item's context menu.
- The report details blade is loaded with the Properties tab active.
- Select the Parameters tab.
- The Parameters tab becomes active.
- For the Date Range parameter select <<Custom>>.
- Check Hidden and Read Only check-boxes next to the Date Range parameter.
- Click Save option of the Parameters tab.
- Select the Time periods option from the blade tab menu.
- The Time period tab becomes active.
- Check Enable Time Periods check-box and configure the time period.
- Click on the Save option in the report details blade.
- The report details blade is closed. A success notification appears.
After the report is properly configured in ATS Reporting Configuration,
when opened in ATS Reporting Portal, instead of report server Date Range
parameter, Time Periods will be used. Begin Date and End Date parameters
will be read-only fields, with values dependent of the selected
Time Period field value.