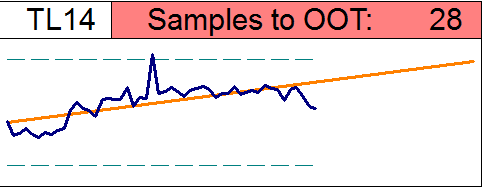
The goal of this tutorial is to go through the steps required to create a Trend Line report similar to the image below, as well as receive email notifications when the trend line prediction hits a specified threshold. For example, if the measurements of a feature are predicting that it will be out of tolerance in less than 30 samples, you would receive an email alerting you to this situation.
This tutorial includes the following tasks:
Create a simple DataSet for Trend data
Create a DataStack for Trend to Out of Tolerance
Create Trend Charts as a graph object
Enable and customize Trend Lines
Create an annotation to show the number of points until the feature goes Out of Tolerance
Create custom styles to indicate which features are going Out of Tolerance
Set up event notifications for features going Out of Tolerance
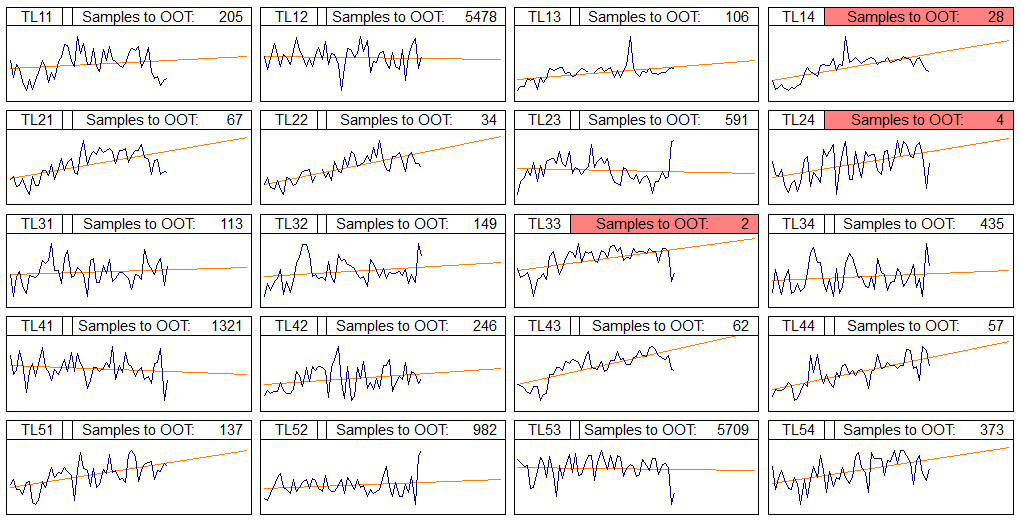
The number of samples you want to set as the threshold is completely configurable, as is the appearance of the chart, trend line, text boxes, colors, etc. These components are common parts of CM4D reports (not only for trend lines). Any of the concepts in this tutorial can be leveraged to create any style report or set other data conditions for which you want to be alerted.
Create Styles
Go to Document Properties > Styles.
Create a New style.
Enter a label, such as "TrendToOOT".
Go to the Brush tab.
Select "LtRed" from the dropdown.
Go to the Font tab.
Set the Point Size to 24.
Set the Alignment to "Center Right".
Click OK.
Close the Document Properties dialog.
Create a DataSet
If you have not already created a DataSet for your trend data, do so now.
Create a DataStack
Create a new DataStack.
Edit the DataStack properties.
Go to the General tab.
Enter a label, such as "TrendToOOT".
In the "Additional Processing (in order) section, enable the Transpose check box.
Go to the DataSource tab.
In the "DataStack" section, select Evaluation.
From the dropdown menu, select Row Variable.
Click DataSets.
In the "DataSets in Document" window, select the DataSet for your trend data.
Click the left arrow [<--] button to move the selected DataSet into the "DataSets in DataStack" window.
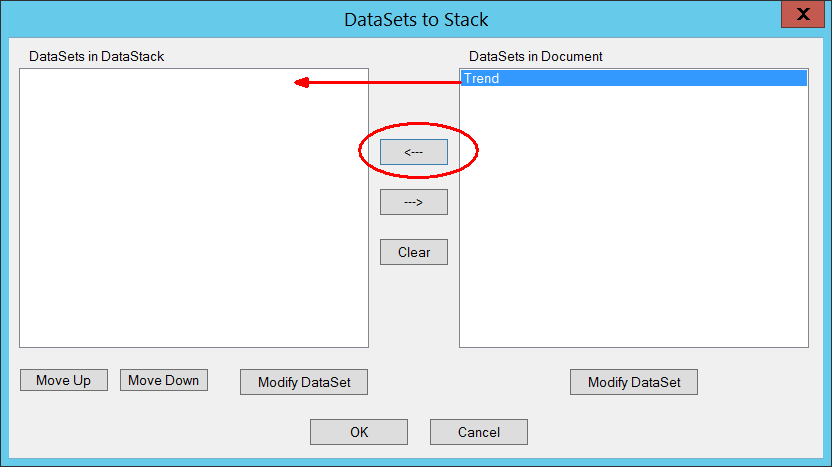
Click OK.
Click Setup.
Enter the variable "~trendtooot~.
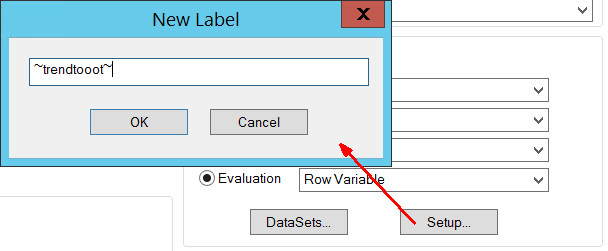
Click OK.
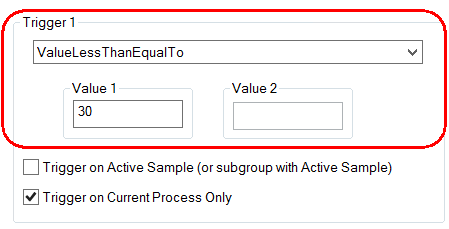
Go to the Event tab.
In the "Trigger 1" section, select ValueLessThanEqualTo from the dropdown menu.
For the Value 1 field, enter the Out of Tolerance threshold that you want to set for the trend line.
In this example, the value has been set to 30 so that if the data is going to go outside of tolerance in the next 30 or less samples an alert will be triggered.
The "Event Properties" section at this point will be disabled. This will only become accessible after the document has been saved as a Managed Document, which will be covered later on in this tutorial.
Click OK.
Create Graph
Create a new Graph ( ) annotation.
Double-click the graph annot to put it into Edit Mode.
Add a Text Box annotation inside the graph space.
Click outside of the graph to exit Edit Mode.
Right-click the graph and select Properties.
Go to the Graph tab.
Edit the <Graph>Trend Chart A (Chart) component.
Edit the <Graph>Trend PlotSpace A (PlotSpace) component.
Go to the Plot Top Area tab.
Click Lines.
Enable the Trend Line check box.
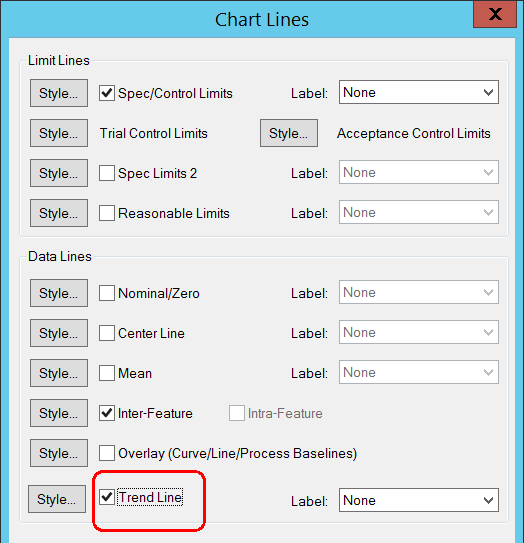
Edit the Style and set the Label option as needed.
Click OK.
Click OK.
Edit the Text 1 (Text) component.
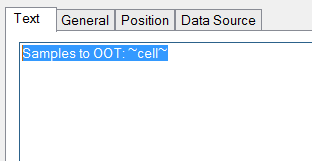
Go to the Text tab.
Enter the text "Samples to OOT: ~cell~".
Go to the DataSource tab (in the Text component).
Select the DataStack "TrendToOOT" from the DataSet dropdown.
Select Use Row 1 Thru 1.
Click OK.
Go to the Data Source tab (in the main graph).
Select the DataSet "Trend" from the DataSet dropdown.
Select Use Row 1 Thru 1.
Click OK.
Configure the rest of the graph appearance as needed.
Manage the Document
Save the document to a network shared folder location.
Once the document has been saved, go to the Document menu in CM4D.
Select Management Settings.
In the Managed CM4D Document dialog:
Enable the "Make this document a Managed Document" check box.
If the Shared Network Folder is not already entered, browse to the UNC path of the saved document.
Click OK.
Save the CM4D document again.
In the Generate Default Managed Report dialog, select No.
Configure DataStack Events
Edit the properties of the DataStack created in the "Create a DataStack" step above.
Go to the Event tab.
Now that the document has been saved as a Managed Document, the Event Properties section is enabled.
Set Sheet Image Type to None.
Set Event Coverage to Entire DataSet.
Click OK.
Save the CM4D Document.
Create a Managed Report
Open CM4D Web and select the Managed Reports ( ) tab.
Click the Create link (not the Create Filter link).
Enter a Label, such as "Trend To OOT".
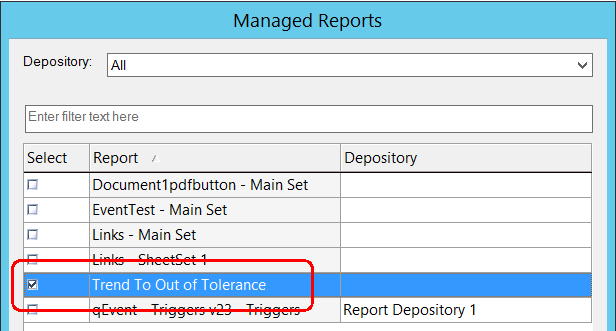
Go to the SheetSets to Select tab.
Type "Trend" into the DocumentName column header field to quickly find the template.
Click the check box for the SheetSet(s) that include the trend charts.
Click Create.
Next, sign up the user(s) that you want to receive email notifications for the trend line alerts.
Subscribe to Event
Go to the Event Subscription ( ) page.
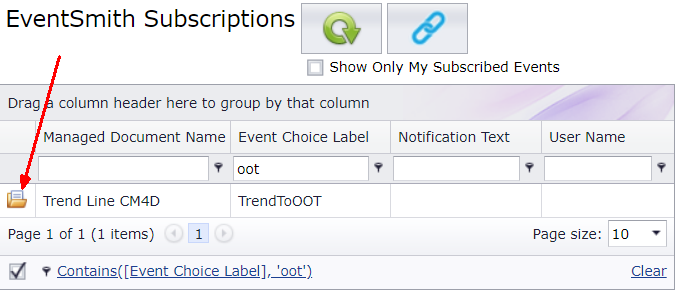
Find the Managed Document name for the trend lines.
Click the manage subscriptions ( ) icon.
Select the user(s) you want to add to the event list.
Optionally, you can add a notification text to the users.
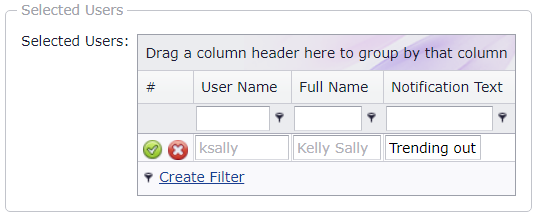
Click Update.

Create Event Job
Start Scheduler Manager.
Connect as the CM4D service user.
Go to the Job Setup tab to create a Scheduled task.
Click Add to create a new job.
Enter a job name.
Select Active from the Enabled dropdown.
Select the job user.
Set the Category to Static.
Set Type to Data Processed.
Set the Report Type to Event.
This tutorial is for events only, but keep in mind that if you want to set the job to Both so that reports are created along with the events, you must have a Depository defined for the Managed Report.
Double click the Managed Reports field.
Select the check box for the Managed Report created earlier for the trend report.
Click OK.
Save the job.
Click Test to run the job to check the settings.