|
The General Reports section of the Managed Reports module in the CM4D plugin is where you create, view or delete Managed Reports available for printing by multiple users through CM4D Scheduler and ATS Reporting. To access this section, you must have the Document Manager user right. For more background details, see the topic Managed Reports. |
At the top of the page, you must choose a Site and Datasource before loading reports into the grid.
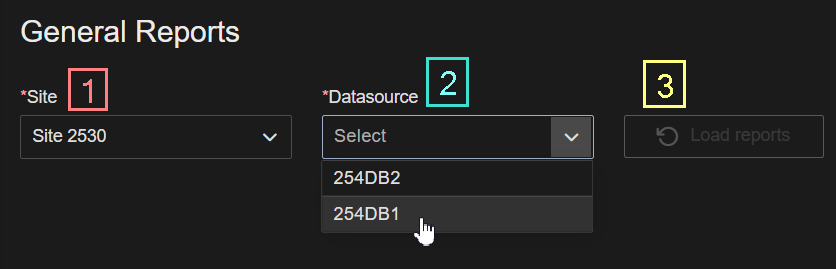
To get started:
- Select a Site from the dropdown.
- Select a Datasource from the dropdown.
- Click Load Reports.
- Click Add to create a new report, or if the grid contains existing reports, click the grid row or select the Action menu and click Open to view the report Properties.
- Site - Select a CM4D Site from the dropdown. This selection determines which Datasources are populated in the Datasource dropdown.
- Datasource - Select a CM4D Database from the dropdown. This selection determines which reports are loaded.
- Load reports - Click to load all available reports for the selected Datasource. This button is disabled until the required inputs (Site/Datasouce) are selected.
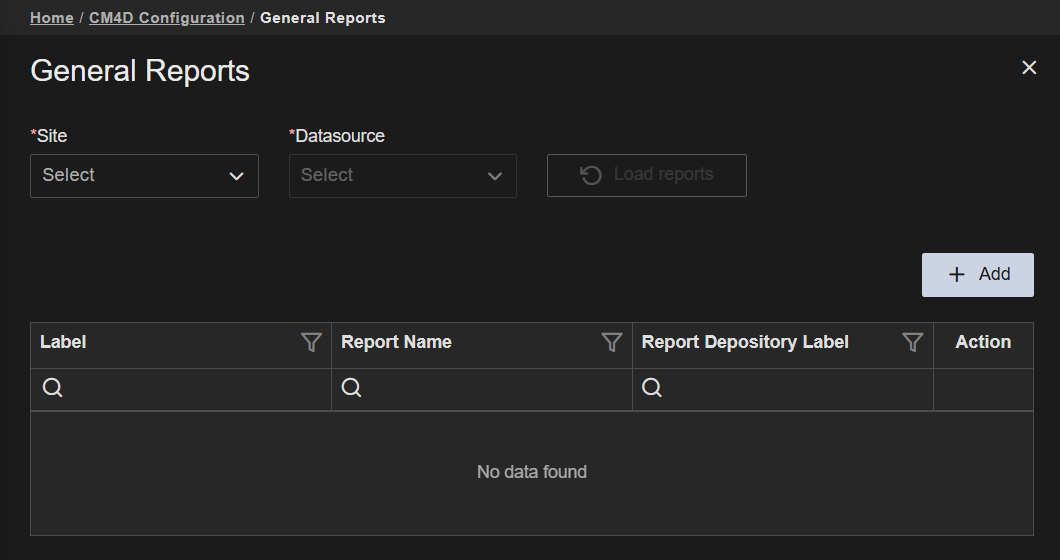
- Add - Create a new report. Opens the Report Properties blade.
- Properties - Click on a grid row to modify the properties, or use the Action menu ( Open).
 |
|
| Action | Click the three dots
to open the menu of available actions for the selected row.
|
| Label | The unique label assigned to the report. |
| Report Depository Label | The label of the assigned Report Depository. |
| Report Name | The filename of generated PDF report. Variables may be used as partial/whole report names, which are resolved at the time the PDF is generated. |
The grid can be searched, sorted or filtered using the column headers. See the topic Grid Functions for more details.
Create or Modify General Reports
The properties blade is opened to create or modify general Managed Reports. This blade is accessed two ways:
- New - Click Add on the General Reports page to open a blank form to create a new managed report.
- Edit - Click on a grid row, or click the Action menu button and select Open to modify an existing managed report.
The General Report blade is divided into two tabs: Properties and SheetSets.
General Report | Properties
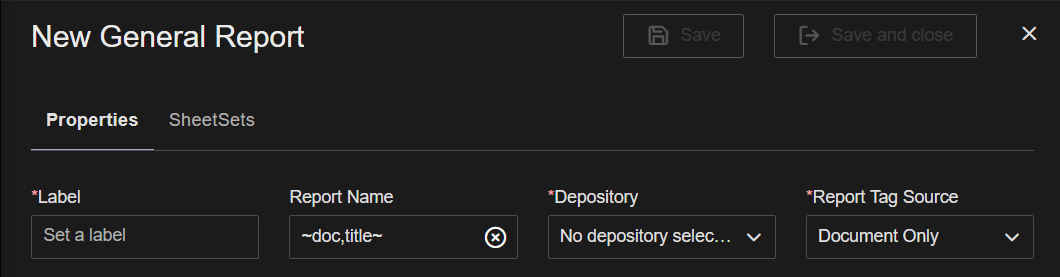
The Managed Report Label plus the Report Depository Label are required to make the report unique. Report Tags help users to find and organize reports once they are generated.
 |
|
| Label | Enter a unique label to identify the managed report. |
| Report Depository Label | The Report Depository is the labeled storage area (network folder) where generated Reports (and Thumbnail images, if defined) are stored once the report is successfully printed. Report Depositories are managed using CM4D Scheduler. All available Depositories appear in the dropdown list. The User Depository is not a valid option for General Reports, so it is not displayed.
See here for more details about Report Depositories in CM4D Scheduler. |
| Report Name | Enter a name for the report. This value determines the filename of the generated PDF report. You can use variables as part of the label that will be resolved for a value when the PDF is generated. Hide Report Name VariablesShow Report Name Variables
Using variables in the Report Name creates unique file names and helps to eliminate accidentally overwriting existing reports. However, not all CM4D variables are valid for use as a Report Name. Variables that resolve dates, times, or Managed Document names are commonly used, but variables used in Report Names cannot be guaranteed to resolve. The following are some common variables that can be used in Report Names:
|
| Report Tag Source | A Report Tag is Routine/Feature/Sample Filter information that is assigned to a Managed Report to help identify and organize reports in web applications (e.g., ATS Reporting). The Report Tag Source setting determines where the Managed Report will look for tags. By default, this is set to Document Only. Hide tag definitionsShow tag definitions
|
General Report | SheetSets
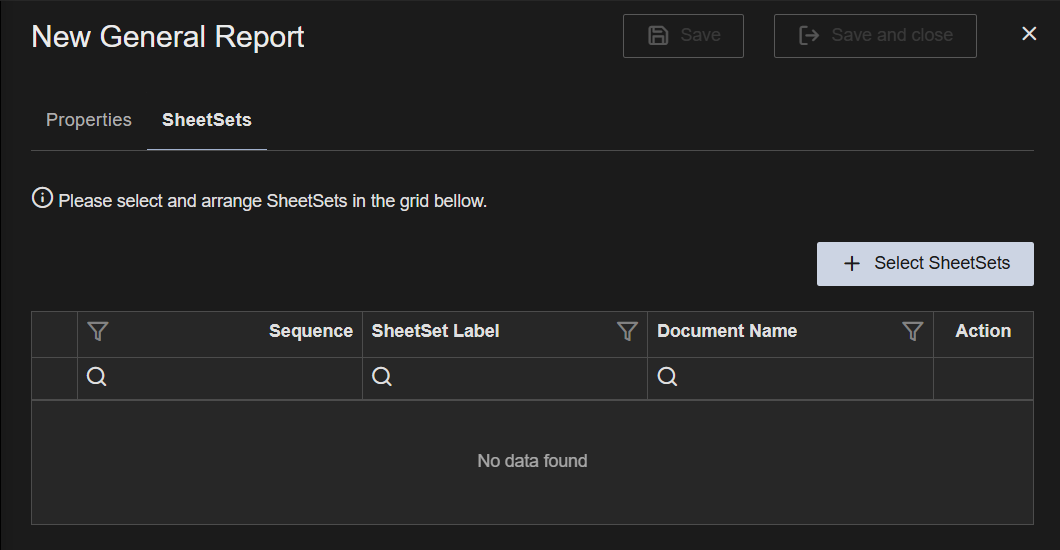
The SheetSets assigned to the Managed Report define the structure and sequence in which documents are printed in the final generated report. A Managed Report must contain at least one SheetSet, but may contain more SheetSets from one or more Managed Documents. The order in which the SheetSets are printed is part of the Managed Report definition.
- Select SheetSets - Opens the Select SheetSets blade.
 |
|
| Action | Click the three dots
to open the menu of available actions for the selected row.
|
| Document Name | The name of the Managed Document containing the SheetSet. |
| Sequence | The order the SheetSet is selected, which is then used to determine the page printing order when the PDF is generated. SheetSet order may be adjusted after the SheetSets are chosen once you have saved the selections and return to the Managed Report SheetSet blade. |
| SheetSet Label | The name of the SheetSet, taken from the Managed Document. |
Select SheetSets
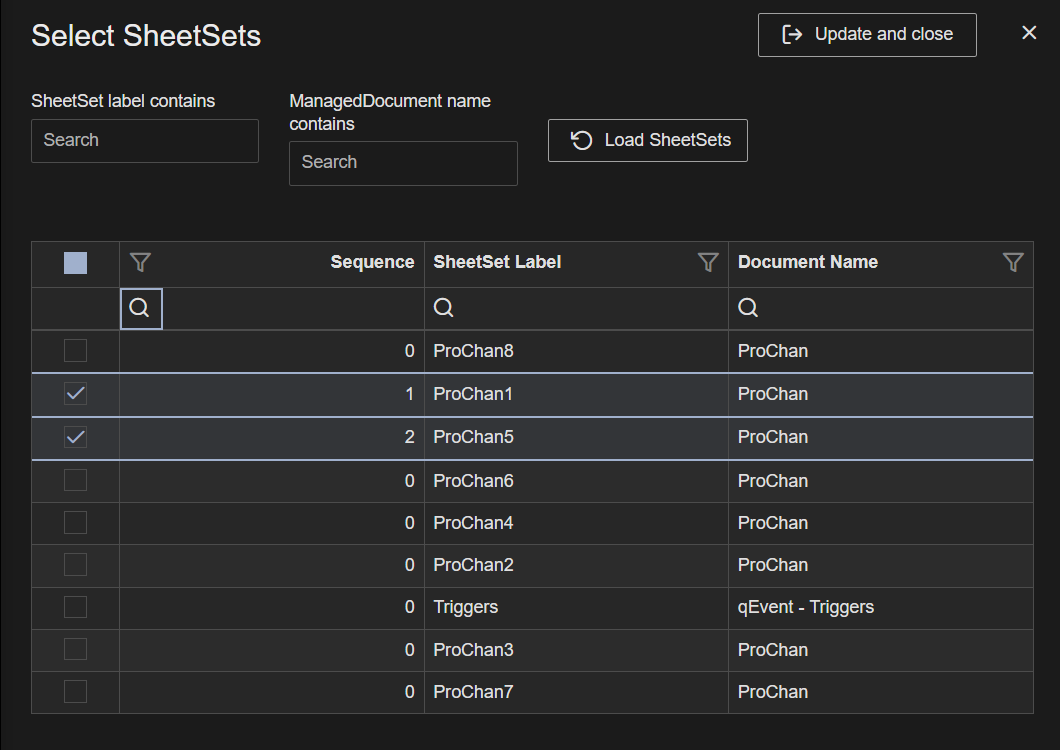
At least one SheetSet must be selected to create or save a report. To choose one or more SheetSets, click the Select SheetSets button on the General Report SheetSets tab. Select the check box for the SheetSet grid row you want to include in your report.
Above the grid are some filtering options that allow you to limit the search for SheetSets within a managed document or by specific labels. Clicking Load SheetSets without any of these filters returns all SheetSets from all Managed Documents in the database.
- SheetSet label contains - Enter text of complete or partial SheetSet labels to fetch SheetSet labels matching the entered string.
- Managed Document name contains - Enter text of complete or partial document labels to fetch SheetSets from managed documents matching the entered string.
- Load SheetSets - Fetch the available SheetSets.
 |
|
| Document Name | The name of the Managed Document containing the SheetSet. |
| Sequence | The order the SheetSet is selected, which is then used to determine the page printing order when the PDF is generated. SheetSet order may be adjusted after the SheetSets are chosen once you have saved the selections and return to the report SheetSet blade. A sequence of zero (0) indicates a SheetSet is not selected. |
| SheetSet Label | The name of the SheetSet, extracted from the Managed Document. |
Modifying SheetSets
When editing a report, any previously saved SheetSets are pre-selected in the grid, with the stored order displayed in the Sequence column.
Multiple Selection
Multiple SheetSets can be selected individually by clicking each check box, or in a range by checking the first box, holding the Shift key, then clicking the last check box. Click the Select All check box in the column header to add all SheetSets in the grid to the report list.
Change SheetSet Order
The sequence of the SheetSets in the final printed PDF can be changed once you have selected multiple SheetSets from the selection blade.
To change the order:
- Click and hold on the icon in the first column for the SheetSet that you want to move.
- Drag and drop it in the location you want it to appear.
Can we improve this topic? Click Send Feedback in the upper right of the screen to share your comments!