-
To see how this item is associated to other items refer to the Item Relationship topic.

Repairs are the actions that can be taken to fix a defect on a part. Example repair types might be Add Fluid, Reapply Coating or Manual Refinish.
It can be useful to have a repair type called No defect or something similar. This is for situations where the operator carrying out the repair doesn't think that a repair is required. It means that the defect doesn't have to be deleted.
It can also be useful to create repair folders. Repair folders are optional and can be used to organise repair types into repair folders to minimise having to scroll through long lists of repairs. Folders also make it easier to assign repairs to a part + concern combination.
Creating Single-step Repairs
Select the Attribute tab.
Click Repair Types (![]() ).
).
The screen is divided into three sections:
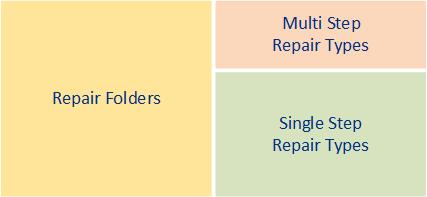
Click the add icon (![]() ) below the lower-right pane.
) below the lower-right pane.
The following popup appears:
Enter a description and code for the repair type.
Click OK.
The repair type is added to the list.
The repair can now be associated to part/concern combinations. See here.
Creating multi-step repair types
A multi-step repair, as its name implies, is used to set up repairs that take more than one step. Setting up a multi-step repair type simply involves creating the multi-step repair and then assigning single-step repairs to it. A multi-step repair displays all the steps necessary for the repair – it does not actually 'require' that all steps are completed. The repair technician can skip a repair step if it is not necessary for a specific repair on a unit.
Select the Attribute tab.
Click Repair Types.
The repair window opens.
Click the add icon (![]() ) below the upper-right pane.
) below the upper-right pane.
The following popup appears:
Enter a description and code for the multi-step repair.
Click OK.
The multi-step repair is added to the list.
Drag and drop repair types from the lower-right pane onto multi-step repair types in the upper-right pane.
Change the order in which the repairs should take place using click and drag or by using the up and down arrow icons.
The repair can now be associated to part/concern combinations. See here.
Please note that multi-step repairs are recorded as a task and not a repair.
Creating Repair Folders
Repair folders are optional and can be used to organize repair types to prevent the administrator having to scroll through long lists of them. Folders also make it easier to assign repairs to a part + concern combination.
Select the Attribute tab.
Click Repair Types (![]() ).
).
The repair window opens.
Click the add icon (![]() ) below the left-hand pane.
) below the left-hand pane.
A popup opens.
Enter a description and code.
Click OK.
The folder is added to the list.
Drag and drop repair types (both single and multi-step) from the right-hand panes onto the folders in the left-hand pane to associate them.
Importing Repairs and Folders
Repairs and repair folders can be specified in an Excel spreadsheet and then imported directly to the Inspect database.
There are three different import options. Each one requires a separate spreadsheet and different information as shown below:
|
Data being imported |
Information required in first two columns |
|
Repair Types |
Repair description, Repair code |
|
Repair Folders |
Repair Folder description, Repair folder code |
|
Multistep Repairs |
Multistep Repair description, Multistep Repair code |
Create the spreadsheet
Create a new spreadsheet in Excel.
Fill in the required information as listed in the table above.
There is no header row.
Save the file with a descriptive name.
Import the spreadsheet
Select the Attribute tab.
Click Repair Types (![]() ).
).
A list of the existing repair folders and repairs is displayed.
Import as follows:
Repair Types - Click the Import button ( ) below the lower-right pane.
Repair Folders - Click the Import button () below the left-hand pane.
Multistep Repair Types - Click the Import button () below the upper-right pane.
The Import Wizard window opens.
Click Next.
Either enter a file path or click the folder icon to locate and open the spreadsheet.
The spreadsheet information is checked to see if it is valid. Invalid data will be highlighted in red.
If required, select the Errors tab to see which data is incorrect.
Errors must be fixed in the original spreadsheet. You can then click the Refresh button ( ) in the wizard to re-import the spreadsheet.
Click Next.
If required, disable any items you don't want to import.
Click Next.
Click Finish.
The data is imported to the Inspect database.