What is a Product?
A product is a unique item being manufactured and inspected. You should define products the way the assembly plant wants them reported. For example, a Trail Master mountain bike and a Trail Blazer mountain bike should be separate products so you can generate reports for them separately.
The objective is to have as few products as possible because it reduces the amount of time required to setup and configure Inspect. The more products you create, the more setup time that is required.
Creating Products
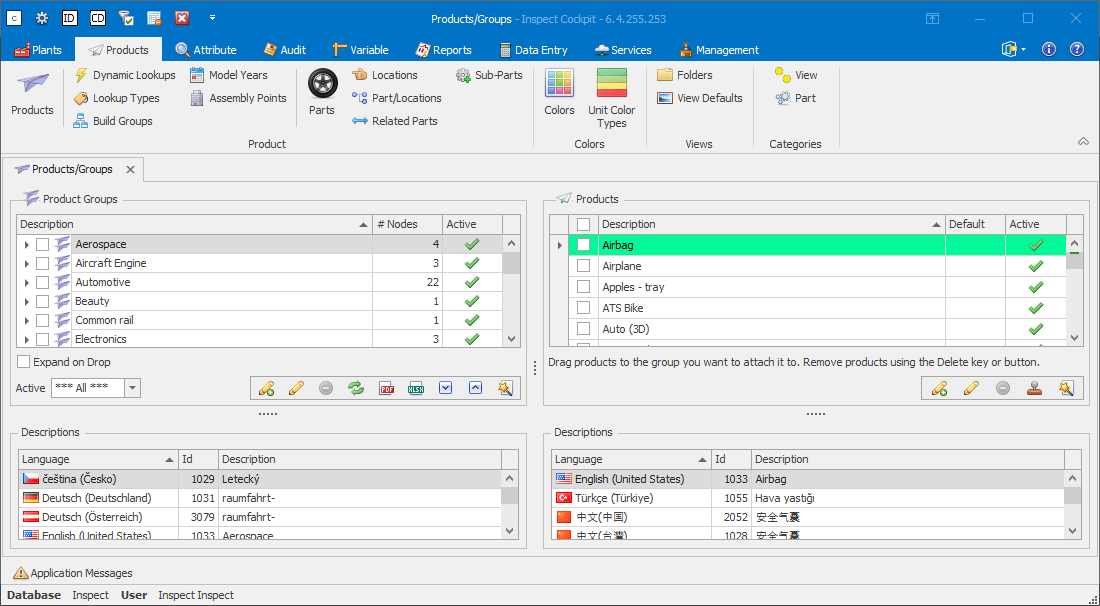
Select the Products tab.
Click Products.
Two panes are displayed. The left pane contains product groups. The right pane contains products.
Click the add icon (![]() ) in the right pane.
) in the right pane.
Enter a description in the default language.
Enter an identification code.
If required, enter a description
in another language by selecting the language from the drop-down list
and clicking the add icon (![]() ). You can then
enter a description in that language.
). You can then
enter a description in that language.
Click OK.
The product is added to the list.
Creating Product Groups
After adding two or more products, you can set up product groups. Product groups are used in reporting to group product data.
For example, if your facility produces washing machines and dryers, the quality data can be reported separately for each product. However, by creating a product group containing both, reports can be generated for the two items together.
Click the add icon (![]() ) in the left pane.
) in the left pane.
Enter a description in the required languages.
Click OK.
The product group is added to the list.
Drag a product into the product group.
The product has now been added to the group.
Importing Products and Groups
Products and groups can be specified in an Excel spreadsheet and then imported directly to the Inspect database.
There are three different import options. Each one requires a separate spreadsheet and different information as shown below:
|
Data being imported |
Information required in first two columns |
|
Products |
Product description, Product code |
|
Product Groups |
Product group description, Product group code |
|
Product Groups / Products |
Product group code, Product code |
Create the spreadsheet
Create a new spreadsheet.
Fill in the required information as listed in the table above.
There is no header row.
If you are importing product groups and products then you can include as many combinations as you like, as shown below.
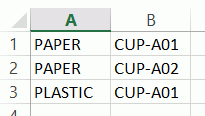
Save the file with a descriptive name.
Import the spreadsheet
Select the Products tab.
Click Products.
A list of the existing product groups and products is displayed.
Import as follows:
Products - Click the Import button ( ) below the right-hand pane.
Product Groups - Click the Import button () below the left-hand pane, select Product Groups and click OK.
Product Group / Products - Click the Import button () below the left-hand pane, select Product Groups/Products and click OK.
The Import Wizard window opens.
Click Next.
Either enter a file path or click the folder icon to locate and open the spreadsheet.
The spreadsheet information is checked to see if it is valid. Invalid data will be highlighted in red.
If required, select the Errors tab to see which data is incorrect.
Errors must be fixed in the original spreadsheet. You can then click the Refresh button ( ) in the wizard to re-import the spreadsheet.
Click Next.
If required, disable any items you don't want to import.
Click Next.
Click Finish.
The data is imported to the Inspect database.