In this topic: Hide
A batch can be thought of in two parts – the plan and the view.
The view is what you see as you are using the batch (click here for details).
The plan is a description of what will be measured and how, and you configure this in the Batch Plan dialog.
When you create a new batch you should set up the batch plan first and then the view.
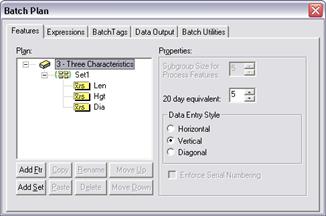
The Batch Plan dialog shows the structure of a batch in terms of features and measurement sets. You can add new features and sets, and edit and delete existing ones.
Open and close branches of the tree view by clicking the small + and – signs next to the feature and set names.
The order of features and sets in the tree view window is the order in which ATS SPC will measure them. Drag features and sets around the batch to change the measurement order.
Features attached directly to the batch are measured on their own, one at a time, in the order shown from top to bottom. Features contained in a measurement set are measured together, one set at a time, in the order shown – again from top to bottom. Generally, if you are using hand held measuring instruments you will measure your features one at a time, if you are using a gauge to measure several features at once you should group those features in a measurement set.
The short feature and set names in the tree are those ATS SPC uses in referring to features in data source expressions. The longer descriptive names for features and sets are for your benefit only.
1. Press the Add Feature below the tree view. ATS SPC shows the new feature in the tree view.
 You
can add a feature to an existing set by first clicking on the set
before pressing Add Feature. You can add a new feature
after an existing one by first clicking on the existing feature and
then pressing Add Feature.
You
can add a feature to an existing set by first clicking on the set
before pressing Add Feature. You can add a new feature
after an existing one by first clicking on the existing feature and
then pressing Add Feature.
2. Rename the new feature if necessary and then fill in the feature properties in the right hand side.
3. Attach cursor and chart controls to the new feature as required.
1. Click on the feature in the tree view.
2. Change the feature’s short name by right clicking it in the tree view or by clicking the Rename button below.
3. Edit the remaining feature properties in the property page to the right of the tree view. Move from one property to the next using the mouse or Tab key.
See Feature Properties on page 40 for more details.
To
change which controls are attached to a feature; right click the control
in the batch view and choose Name.
1. Click on the feature in the tree view.
2. Deleting a feature is permanent so check the property page on the right to confirm that you have selected the correct feature.
3. Press the [Del] key or click the Delete button below the tree view.
 If
you delete a feature that already contains data, you will permanently
delete the data as well.
If
you delete a feature that already contains data, you will permanently
delete the data as well.
1. Click on the feature to be copied in the tree view.
2. Either press [Ctrl+C] or click the Copy button below the tree view.
A copy of the feature is placed in the clipboard.
3. Click on the batch or a target set or feature in the tree view.
4. Press [Ctrl+V] or click the Paste button below the tree view.
A copy of the feature is pasted into the highlighted set or after the highlighted feature.
1. Press Add Set. ATS SPC adds a new measurement set in the tree view.
You
can add a new set after an existing one by first clicking on the existing
set and then pressing Add Set.
2. Rename the new set if necessary.
3. Add new features to the set or drag existing features and drop them into the new set.
1. Edit the set’s short name by clicking on the set in the tree view and then pressing the Rename button below.
2. Edit the set’s descriptive name in the measurement set property page to the right of the tree view.
1. Click on the set in the tree view.
2. Deleting a measurement set is permanent and also deletes all the features in the set as well, so check the property page on the right to confirm that you have selected the correct set.
3. Press the [Del] key or click the Delete button below the tree view.
1. Click on the set to be copied in the tree view.
2. Either press [Ctrl+C] or click the Copy button below the tree view.
3. A copy of the set, including all its features, is placed in the clipboard.
4. Click on the batch or a target set in the tree view.
5. Press [Ctrl+V] or click the Paste button below the tree view.
A copy of the feature is pasted after the highlighted set. If the set has any features that have the same (short) name as another feature in the batch then ATS SPC renames the offending features to avoid a clash of names. You should rename them again to something meaningful.
You can edit the following properties of a batch. Note that you can configure the default properties of new batches in New Batch Defaults in the configuration options property pages.
Subgroup Size
If the batch contains at least one process feature (i.e. mean/range or mean/sigma) then you can set the subgroup size to any value between 2 and 25.
20 Day Subgroup Equivalent
Enter here the number of subgroups typically measured in 20 working days.
Some statistical results are valid only for processes that are demonstrably in control. ATS SPC checks the number of subgroups completed since the most recent out of control condition and, if this is at least equal to the number of subgroups typically entered in a 20 day working period, the feature is deemed ‘in control’.
Data Entry Pattern
This determines when ATS SPC moves from one feature (or set of features) to the next when you make measurements. Imagine writing down the measurements from; say three features of twenty five parts, in a table. Each row in the table is a part, one below the other, and each column is a feature. You can fill in this table in three ways…
Row (part) at a time - this is horizontal data entry.
If you are using the same hand held instrument to measure all the features of a part it is probably most convenient to measure all the features from one part before moving on to the next.
You fill in the table along the rows so this is horizontal data entry.
Features
must always be measured in the same order – determined by the design
of the batch.
Column (feature) at a time - this is vertical data entry.
Sometimes, if you use different instruments to measure different features, it is convenient to continue with one instrument and measure one feature from every part before moving on to the next instrument and the next feature.
You fill in the table down the columns so this is vertical data entry.
The parts do not have to be measured in the same order – unless you want to correlate the data from one feature to another.
A combination of the two: column (feature) at a time for a subgroup then moves to the next row (part) – this is diagonal data entry.
Diagonal data entry is used only for subgroup based features (mean/range or mean/sigma) and is effectively vertical data entry for a single subgroup. When you have measured one feature from each part in the subgroup ATS SPC automatically moves on to the next feature (or set of features) and expects the first part again.
Enforce Serial Numbering
Check this box if you want ATS SPC to insist that you enter a serial number for every part measured. You do this via a serial number control placed in the batch view.
Once you have started entering data into the batch you must carry on collecting, or not collecting, serial numbers. You cannot change your mind once the batch contains data.
You can edit the following properties feature by feature. You can also change the default properties for new features by changing the New Feature Defaults page of the Configuration Options Dialog.
· Name - ATS SPC uses the name to refer to this feature. You will use it in data source expressions and when attaching batch view controls to this feature.
· Feature Type - Basic, Mean/Range, or Mean/Sigma. Select one from the drop-down list box.
· Description - A descriptive name meaningful to you. ATS SPC uses only the shorter name internally.
· Tolerance Limits - Enter the upper and lower tolerance limits for this feature from drawing details. ATS SPC uses the tolerance limits to provide a default scale for some cursor and chart controls.
· Target Value - This is the desired (or claimed) value of this feature. Typically it will be at the centre of the tolerance band but it doesn’t have to be.
· Tolerance Check Boxes - Many features are inherently single sided and have only an upper tolerance limit – flatness or run-out for example. You can turn off the use of either tolerance limit by unchecking the corresponding check box. If only one limit is used, ATS SPC uses the target value and the remaining tolerance limit to provide a scale.
· Measurement Units - This is just a text string for the benefit of anyone looking at the batch. ATS SPC itself makes no use of the unit.
· Data Source - Select, from the drop down list box, the name of the instrument you will use to measure this feature. For more complex measurements, ATS SPC will accept not just instrument names here but other features, constant values, and functions combined into mathematical expressions.
· The Keyboard as a Data Source - To type in data from the keyboard, you should specify the (short) feature name itself as the data source and include a keyboard data entry control in your view, bound to that feature.
Related topics:
Moving and Copying Features on page 41
Control Switches on page 43
Data Source Expressions on page 111
Measuring Instruments on page 104
ATS SPC measures the features of your batch in the order they are shown in the batch Plan tree view – from top to bottom. To change the measurement order you can move the features and sets around the tree by dragging them with the mouse. If you move a set you will move all the features belonging to the set as well.
Moving a feature on to the batch name will make it become the first feature.
Moving a feature on to a set will make that feature become the first in the set.
Moving a feature on to another feature will position it directly after (below) that feature. If the feature you drop it on to is a member of a set then the feature you drop will become part of that set too.
Using Copy and Paste you make copies of features – either within the batch or into other batches.
This must be done in Design Mode.
1. Open the Batch Plan Dialog.
By mouse…
2. If necessary expand the batch by clicking the plus symbol to the left of the batch name.
3. If this reveals a set, click the plus symbol next to it to expand the set and reveal the features.
4. Click on the name of the feature you want to move and drag it to its new position.
By keyboard…
2. If necessary expand the batch by pressing the Right cursor key.
3. If this reveals a set press Right to highlight the set and then Right again to expand the set. This reveals the features.
4. Press Down to highlight the feature to be moved.
5. Press the Tab key until the Up or down button is selected.
6. Press Space to move the highlighted feature up or down according to the button.
This must be done in Design Mode.
1. Open the Batch Plan Dialog.
By mouse…
2. If necessary expand the batch by clicking on the plus sign to the left of the batch name. This reveals the sets.
3. If necessary expand the set containing the feature you want to copy - as (2) above.
4. Click the feature to copy.
5. Click the Copy button below the tree view.
By keyboard…
2. If necessary expand the batch by pressing the Right cursor key. This reveals the sets.
3. If necessary expand the set containing the feature you want to copy - as (2) above.
4. Press the Down cursor key to highlight the feature to copy.
5. Press [Alt+C] to copy the selected feature to the clipboard, or press the Tab key until the Copy button below the tree view is selected and then press Space to copy the feature.
This must be done in Design Mode.
1. Open the Batch Plan Dialog.
By mouse…
2. If necessary expand the batch by clicking on the plus sign to the left of the batch name. This reveals the sets and any features directly under the batch.
3. Click the batch, or the set you want to paste the feature into. Alternatively click a feature – the new copy will appear immediately after the selected feature.
4. Click the Paste button below the tree view.
By keyboard…
2. If necessary expand the batch by pressing the Right cursor key. This reveals the sets.
3. Press the Down cursor key to highlight the batch or the set you want to paste into. Alternatively highlight a feature – the new feature will be pasted immediately after this one.
4. Press [Alt+P] to paste the feature on the clipboard into your batch, or press the Tab key until the Paste button below the tree view is selected and then press Space to paste the feature.
The expression table is another view of the data source property of the batch features. Basically it contains a line for each feature showing where the measurements for that feature come from. See Data Source Expressions for more details.
The expression table editor is where you create and edit data source expressions when you need more functionality that the data source item in the feature properties can provide. The main part of the editor shows the expression for each feature in a set. You can choose which set to look at in the list box at the top.
At the bottom are two controls to help you create expressions. On the left is a drop down list of all the possible data sources you can include in your expressions – instruments, other features, and expression variables. On the right is a list of the functions ATS SPC supports along with a reminder of how many arguments each needs. You can choose data sources and functions from these lists and paste then into your expressions.
Each feature has an associated set of control switches which determine which types of control and tolerance violation are relevant and should be reported. These are part of the process rather than the part and do not appear in the batch plan. Never the less, you can change the control switches, for each individual feature, or a group of features, in the Control Switches dialog.
You can also change the default control switch settings used to create new features in the Tools+Options property page Control Reporting.
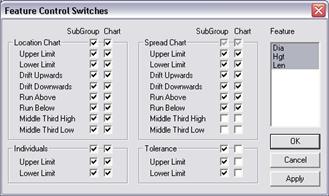
The batch must be open in design mode to edit the control switches.
1. Choose Tools+Control Switches to open the Control Switches dialog.
2. At the right hand side select the feature you want to change.
By holding down the Ctrl key as you click the mouse button you can select several features at once to set all their control switches the same.
3. Check the boxes to indicate which types of violation you want reported.
Check the box in the ‘chart’ column to have the violation indicated as a highlighted point in the chart, or the ‘subgroup’ column to have it reported in a pop-up message box as you are measuring.
4. Clear the boxes for the violations you want ATS SPC to ignore.
If you check or clear a box set into a frame you check or clear all the boxes below it inside the frame.
5. If other features are to be set differently select them and set their switches appropriately.
6. When you have edited all the required features press the OK button to save your changes.
The only editable properties of a measurement set are its short name and descriptive name. Like features, ATS SPC uses the short name to reference the set. The descriptive name is meaningful only as a reminder to you.
ATS SPC measures the sets and features of your batch in the order they are shown in the Batch Plan tree view – from top to bottom. To change the measurement order you can move the sets and features around the tree by dragging them with the mouse. Moving a set moves all the features belonging to the set as well.
Moving a set on to the batch name will make it become the first set.
Moving a set on to another set will position it directly after (below) that set.
This must be done in Design Mode.
1. Open the Batch Plan Dialog.
By mouse…
2. If necessary expand the batch by clicking the plus symbol to the left of the batch name. This reveals the sets.
3. Click on the name of the set you want to move and drag it to its new position.
By keyboard…
2. If necessary expand the batch by pressing the Right cursor key. This reveals the sets.
3. Press Down to highlight the set to be moved.
4. Press the Tab key until the Up or Down button is selected.
5. Press Space to move the highlighted feature up or down according to the button.
This must be done in Design Mode.
1. Open the Batch Plan Dialog.
By mouse…
2. If necessary expand the batch by clicking on the plus sign to the left of the batch name. This reveals the sets.
3. Click the set to copy.
4. Click the Copy button below the tree view.
By keyboard…
2. If necessary expand the batch by pressing the Right cursor key. This reveals the sets.
3. Press the Down cursor key to highlight the set to copy.
4. Press [Alt+C] to copy the selected set and all its features to the clipboard, or press the Tab key until the Copy button below the tree view is selected and then press Space to copy the set and all its features to the clipboard.
This must be done in Design Mode.
1. Open the Batch Plan Dialog.
By mouse…
2. If necessary expand the batch by clicking on the plus sign to the left of the batch name. This reveals the sets.
3. Click the batch, or click a set – the new copy will appear immediately after the selected set.
4. Click the Paste button below the tree view to paste the set from the clipboard into place.
By keyboard…
2. If necessary expand the batch by pressing the Right cursor key. This reveals the sets.
3. Press the Down cursor key to highlight a set – the copy will be pasted immediately after this one.
4. Press [Alt+P] to paste the set on the clipboard, along with all its features, into your batch, or press the Tab key until the Paste button below the tree view is selected and then press Space to paste the set and all its features.