The Page Setup dialog is where you configure paper size and orientation, and the margins for your print-outs. In the ‘Advanced’ section you can also set up a title and headers and footers, and set the colours and fonts to be used.
The margins are shown in millimetres from each edge of the paper. When changing these you should ensure that they are bigger than your printer’s non-printable region. In most cases the non-printable region is only a few millimetres wide, but many inkjet printers have a much greater non-printable region at the bottom of the page (portrait orientation) than at the other edges.
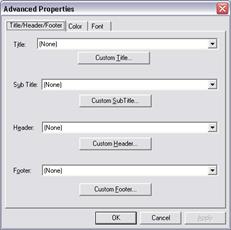
ATS SPC print-outs have a title and subtitle on the first page and a header and footer on every page. In the Title/Header/Footer tab of the Page Setup dialog you can customize them to display fixed text (of your choice) and/or any of the following: page number, date, time, batch name, feature name, your company name.
Title/Header/Footer property page
(Set up the company name in the Tools Options property sheet – see Configuration Options for details.)
1. Choose Page Setup from the Batch Menu
2. Click the Advanced button or press [Alt+D] to open the advanced property pages.
3. If it is not already open, choose the Title/Header/Footer tab by clicking on it or pressing [Ctrl+Tab].
4. Click the Customize Header button or press [Alt+H] to open the header dialog.
Using the mouse…
5. Click in the left, centre, or right region to choose where to add header items.
6. Type in any fixed text you require and/or press the buttons at the top of the dialog to add page number, date etc.
7. Repeat for any other regions and click OK when finished.
Using the keyboard…
5. Press Tab to move to the left, centre, or right region.
6. Type in any fixed text you require and/or include the following tokens…
· %P - page number
· %D - print date
· %T - print time
· %B - batch name
· %F - feature name
· %C - company name
7. Repeat for any other regions and press Enter when finished.
You can customize the colours of various printed chart items via the Colour tab in the Page Setup property pages.
Colour property page
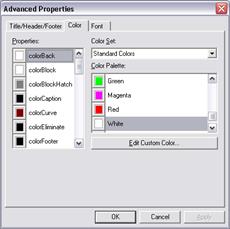
The list box on the left shows the chart items you can colour while the list on the left shows the colours you can choose from. In fact, the colour list is really two lists in one since you can choose (at the top) to fill it with the 16 standard PC colours or with the Windows colour scheme colours currently in use on your computer.
Choose an item and then choose a colour for it.
You can customize the fonts used to print the various chart items via the Font tab in the Page Setup property pages.
Font property page
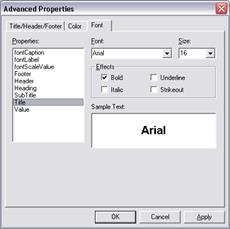
The list on the left shows the chart items and the list box at the top right shows the fonts installed on your computer. Choose an item and choose a font for it. You can also set the font weight (regular or bold) and choose italics if required.
The bottom right of the page shows a sample of what the font will look like.
In portrait orientation ATS SPC fits 50 chart points on each printed page and in landscape 70. These numbers will suit most applications, giving a chart that is both informative and easy to read, but if you want to fit more or less points per page you can create registry entries to change them.
You must create these manually with the Windows Regedit tool and the entries you need to add are called 'PointsLandscape' and 'PointsPortrait'. They should be placed in the key…
HKEY_CURRENT_USER/Software/ATS/ATS SPC/4.0/Page Setup
1. Click the start button and choose Run. Type in the command Regedit and press ENTER or click OK.
2. In the left hand pane, double click HKEY_CURRENT_USER to open this key.
3. Then double click Software, then ATS, then ATS SPC, then 1.1, the Page Setup. Initially Page Setup should contain only a default with value not set.
4. Choose New from the Edit menu and then choose DWORD Value from the submenu.
5. Overwrite the default name with PointsPortrait and press ENTER.
6. Press ENTER again to edit the new value. In the dialog, type in the number of chart points you want to print on each page in portrait orientation, and press ENTER.
 ATS
SPC cannot check what you are doing here so it is up to you to be
sensible and not enter unreasonable numbers – somewhere between 20
and 60 is probably reasonable for an A4 sheet in portrait mode.
ATS
SPC cannot check what you are doing here so it is up to you to be
sensible and not enter unreasonable numbers – somewhere between 20
and 60 is probably reasonable for an A4 sheet in portrait mode.
7. Repeat steps 4-6 to create another DWORD value, PointsLandscape, and set this to the number of points you want per page in landscape mode. Values of between 30 and 100 are probably realistic here.