![]() The Templates
tab is the primary section of CM4D Web, containing all of the Reports
that have been made available to you. Select one of the two links in the
first column:
The Templates
tab is the primary section of CM4D Web, containing all of the Reports
that have been made available to you. Select one of the two links in the
first column:
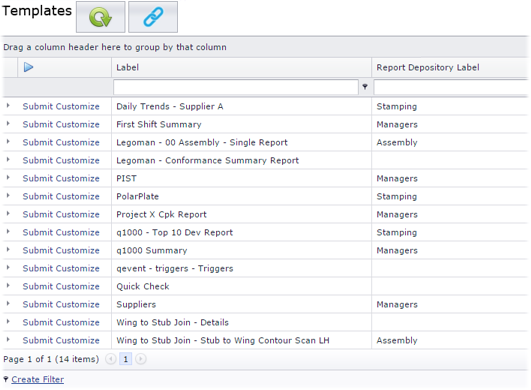
· Click Submit to generate a new PDF of the report.
· Click Customize to change what Sample data will be loaded into the report before it is submitted for generation.
Once the report has been created successfully, it will appear in the list on the Web Reports page.
You can customize this page by sorting, grouping or filtering. See the topic CM4D Web Interface for more information on customizing the CM4D Web interface.
The Reports in this list are predefined by your Report Administrators and Template Developers. The reports that you generate from this list are live, on-demand reports. This means that when you submit a report for printing, CM4D Web will access the latest data from a database and use that to populate the report.
· Label - the label of the Managed Report.
· Report Depository Label - the label of the Report Depository assigned to the Managed Report. An empty field is valid if the Report is only printed as a Web Report.
For Scheduled Reports, Report Depository is a mandatory setting.
Any additional columns are dependant on the information programmed into your report templates by the Template Developer or enabled at the Site level by your CM4D Administrator.
See the topic CM4D Web Interface for more information.
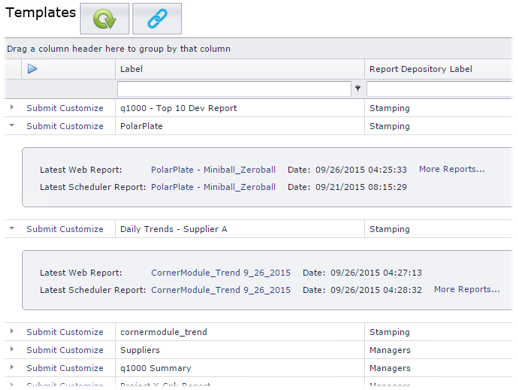
To see more information about a specific report template, click the arrow at the beginning of the report row. This will expand a panel that displays details such as when the report was last generated, what the report file name is, and provides a link to all related reports.
Click ( )
to collapse all expanded report information panels.
)
to collapse all expanded report information panels.
Click More Reports... to generate a filtered list of any existing reports that were previously created for the selected Template.
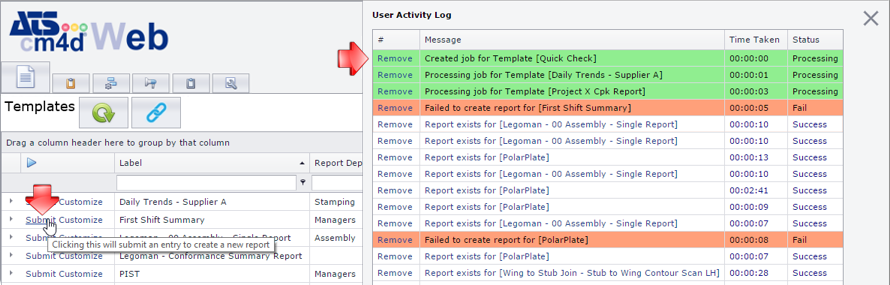
Click Submit to send the report out to be populated with the latest data and generate a PDF. Successfully printed reports will be added to the Web Reports page. To view the generated report, you can either go to the Web Reports page or click on the Report name in the Message column of the User Activity Log.
The User Activity Log will be automatically opened for a few seconds when a job is submitted. The User Activity Log displays the status of your submitted reports.
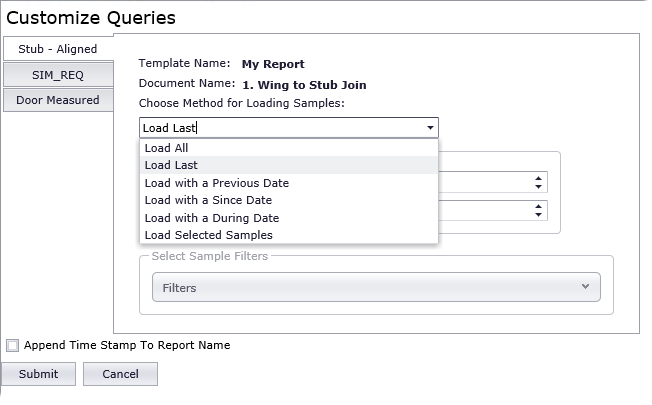
Before submitting a report to be printed, you can modify some of the parameters for what Sample measurement data you want to appear loaded in the report. The Customize Queries page load with the loading method that is set for that Report by default.
Changes made here will only be used for this instance of generating the Report. To change the default Query options, you must edit the Managed Document(s) used by the Report Template.
Each Query in the Template will appear as a tab labeled with each Query Label from each Managed Document that is part of the Report Template. Remember to check the parameters for each Query if the Report uses more than one.
1. Select the tab of the Query you want to customize.
a. From the dropdown, pick a one of the Sample Loading options.
b. Change the Parameters according to the method selected.
c. Set Sample Filters, if needed.
2. Repeat this for each Query in the Template.
3. Click Submit to send the Report to be generated with data according to your custom Query.
Each Query in a Template will use the Sample Load settings that are saved in the Managed Documents used for a Report Template. However, you can make changes to what Samples you want to see in the report, and how you want those Samples loaded before the report is generated.
To change the method of how samples are loaded into the report from the database, select the dropdown menu and choose the method you want to use:
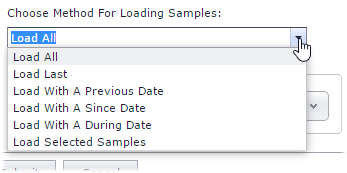
· Load All - Loads all available Samples into the report.
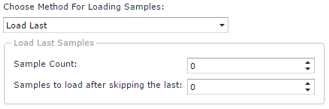
· Load Last - Loads the last set number of Samples. Additionally, you can set a number of Samples to skip before selecting the last Sample Count.
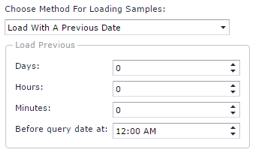
· Load with a Previous Date - load samples from a set number of days, hours or minutes starting today (query date) at the time set.
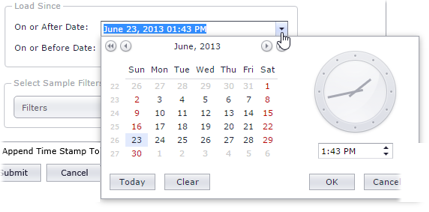
· Load with a Since Date - loads Samples that were created between the two set dates/times. Either type in the date and time, or select it from a calendar widget by clicking the dropdown arrow.
· Load with a During Date - loads samples that were created during the designated period of time.
§ Period Count - select days, weeks, months or years as your interval type from the dropdown. Then enter the number of that interval that you want to include samples for.
§ Beginning - enter your starting point for counting the time interval.
o query day - today
o query week - this week (counting from Sunday)
o query month - this month (counting from the 1st of the month)
o query year - this year (counting from January 1st)
§ Minus - subtracts a set time period from the Period Count.
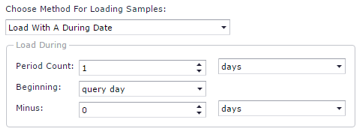
For example: If you want to load
the last weeks' worth of samples, you would enter the following:
- Period Count: '7'
'days'
- Beginning: 'query
day'
- Minus: '7' 'days'
This would result in Samples
loaded for a time period of one week (7 days) prior to the current
date.
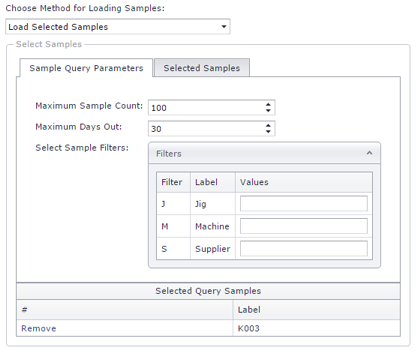
· Load Selected Samples - Select specific Samples to load into the Report from a list of Samples that are available.
§ Sample Query Parameters - Set the options on the Sample Query Parameters tab before going to the Selected Samples tab to load the list of Samples.
o Maximum Sample Count - Set the highest number of Samples that you want to load into the Selected Samples tab. For example, if there are 250 Samples available for the selected template, only the most recent 100 Samples will show up in the list for selection.
o Maximum Days Out - Set the number of Days from the current date that you want to load into the Selected Samples tab. For example, if a Sample has a create date that is older than 30 days, it will not show up in the list for selection.
o Select Sample Filters - See the Sample Filters section below for more information.
The default values for Maximum Sample Count and Maximum Days Out can be changed in your User Profile Settings.
§ Selected Samples - Choose specific Samples by Label and/or date to be loaded into the report. This list is loaded based on the Sample Query Parameters. The Filter fields at the top can be used to enter search strings that will dynamically narrow down the results. Use the filtering options by typing text in to the header fields to find Samples that fit specific label or date criteria.
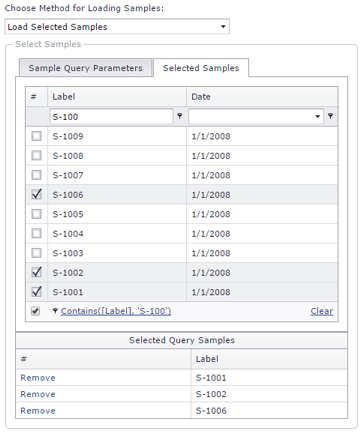
o Selected Query Samples - Displays the Samples that are currently selected to be loaded into the report when it is printed.
If no Samples appear in the Selected Samples list, check the Maximum Sample Count and Maximum Days Out settings on the Sample Query Parameters tab. If those numbers are not set to numbers that correlate to your Samples, the Selected Samples list may be empty.
If you want to load Samples based on Sample Filters, click the down arrow in the Filters header to show the available Sample Filter options.

Select the check boxes of the Filters you want to use, and either enter a value for unrestricted filters or select a Restricted Filter from the dropdown.

If a sample uses any of the set filters, the sample data will be loaded in the report. If no Samples have the filters selected, no sample data will appear in your report.
When customizing queries before submitting a report, there is now an option to append a timestamp to the Report Name. This allows you to print the same report with different sample selections, without overwriting any report already printed with the original report label. Once enabled, this setting is persistent in the Customize page until it is turned off.
This option does not apply when submitting a report directly from the Template page.
The User Activity Log displays information about the web reports you submit to be generated. This list only displays your submitted reports; reports submitted by other users will not appear in this log.
When a report is submitted, the User Activity Log will be automatically open for a few seconds.
To open the User Activity Log, click the ( ) icon
in the top right of the Web interface.
) icon
in the top right of the Web interface.
When you click the Log () icon, the panel will remain
open until you refresh your browser or click the ( )
icon to close the Log panel.
)
icon to close the Log panel.
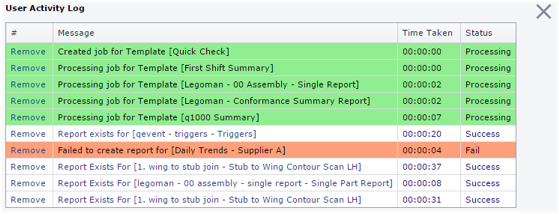
The message column displays information related to the status of the job. If a job completes successfully, you can click on the report name displayed in the image column to open the PDF report.
A timer that shows the length of time a job has taken to finish (whether successfully or if it fails). The time is formatted as hh:mm:ss.
The current state of each Web report is displayed with text and color coded for easy identification.
· Processing - report is actively being generated, or is waiting to be generated; used for jobs with Messages such as "Created job for [Template]" and "Processing job for [Template]".
· Success - report generation has completed and the report is available for viewing and printing; used for jobs with the Message "Report exists for [Template]". Click on the message of successful reports to view the PDF.
· Fail - report has not been generated; used for jobs with the Message "Failed to create report for [Template]".
Click Remove to delete the report entry from the list.