.gif)
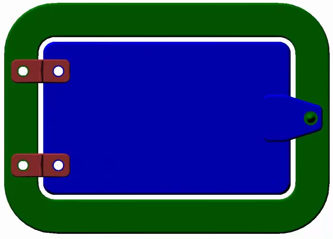
When a View is set to the Animated Alignment Feature Mode, 3D part models can be animated to represent the deviation between two joined components. This is accomplished using the calculations obtained from performing a Stacked Alignment. These animations can be output from CM4D as an animated GIF that can be viewed with reports in CM4D Web, attached to Email notifications for EventSmith alarms, or used for other purposes.
CM4D animates the 3D images to show a comparison of the Nominal position of the parts and a representation of the deviations of the measured position of the parts. CM4D will generate an animated GIF that contains a minimum of two frames:
· First
Frame represents the position of the two components relative to
each other in their nominal (defined) state. show/hide
· Last
Frame represents the position of the two components relative to
each other in their actual (measured) state. show/hide
The GIF will oscillate between the frames indefinitely. The content of the frames will be an entire Sheet from the CM4D report. While only the 3D model will be animated, any additional annotation (text, charts, etc.) displaying other information will be included.
Subroutines used in the Stacked Alignment must have their own images assigned to them.
Use
Case: One automotive manufacturer displays the animated GIFs
on screens along their production line so they can see how they are
doing while they are building vehicles. This allows shop floor operators
to see if the parts are starting to show issues that will affect the
entire assembly. By giving them real-time visual cues as to where
the issues are, the operators can see what adjustments can be made
to the parts in production in order for the final assembly will be
successful.
For example, if CM4D predicts that the Door will shift up and to the
right, operators can check to see what could be causing the offset.
The issue may not be the Door itself, but perhaps with the holes on
the Frame or on the Hinges. Identifying this problem before the Door
is physically attached to the Frame and Hinges allows operators to
resolve the issue in the Frame or Hinge production line rather than
reworking the entire Access Panel Assembly later on.
Animated Alignments are only displayed in Views set to the Animated Alignment View Feature Mode.
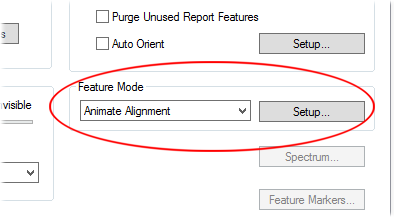
In the View Annot Properties:
1. Select Animate Alignment from the Feature Mode dropdown menu.
2. Click Setup for additional settings.

The change in the position of the parts will be exaggerated to make small deviations easy to see. By default, this is set to 1, but this may be set to a larger integer if needed to better display your part positions.
The Animation will be two frames by default. Additional frames may be configured, but any frames between the first frame and last frame are simply calculated representations of the intervals between the Nominal and measured positions.
The time between frames can be set in milliseconds, between 250 and 2000. The default is 1000.
To see the animated part, right-click on the View and select Animation Viewer from the context menu.
· Run Animation - Turns the animation on and off. Must be unchecked to make any adjustments to the Animation Settings.
· Animation Speed - Adjusting the slider bar will slow down or speed up the time between frames. Move to the left to slow down, and move it to the right to speed up.
· Current Sample - Not yet implemented.
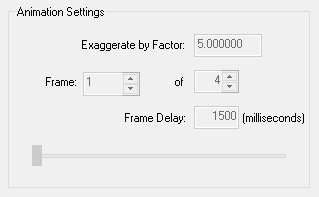
· Animation Settings - The settings that dictate how your animation appears. By default, these settings are what has been defined in the View Properties Animated Alignment Setup options.
| Animation Viewer: | View Properties: | |
 |
 |
§ Exaggerate by Factor - The change in the position of the parts will be exaggerated to make small deviations easy to see. By default, this is set to 1, but this may be set to a larger integer if needed to better display your part positions.
§ Frame - The Animation will be two frames by default. Additional frames may be configured, but any frames between the first frame and last frame are simply calculated representations of the intervals between the Nominal and measured positions. While the animation is turned off, you can select a specific range of frames to see a certain position of the part.
§ Frame Delay - The time between frames can be set in milliseconds, between 250 and 2000. The default is 1000.
§ Frame Slider - The slider can be dragged to advance the animation frame. This is the same as entering specific frame numbers in the Frame fields.
· Image Transparency - Adjust the slider to make the part images more or less opaque. To alter the degree of transparency, slide the bar between Solid and Invisible.
· Print GIF - Prints the current animated image as shown in the Animation Viewer to a GIF. The GIF will be created in the same location as the document.
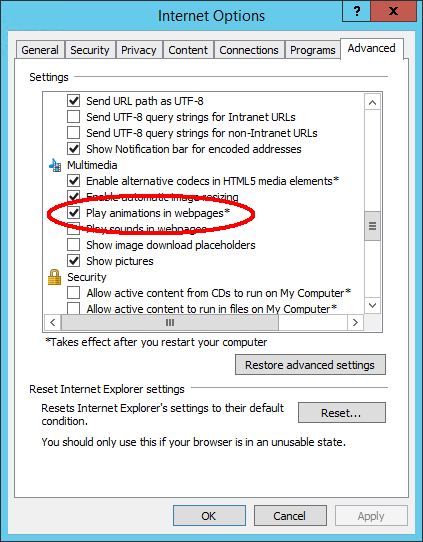
If you are viewing the GIFs using
Internet Explorer, but the images are not animated, check that the
following setting is enabled: Internet
Options > Advanced > Multimedia > Play animations in webpages*
show/hide