CM4D View Snapshots convert a 3D image into a 2D Bitmap. View Snapshots (i.e. bitmaps) are stored within the CM4D document and apply to all Views within that document. This Snapshot "freeze frame" functionality serves two primary purposes:
1. Use with WTC and Scheduler: Since WTC and Scheduler are used for viewing and printing of CM4D reports, Views cannot be edited in either modules' interface. Using View Snapshots in place of 3D images in WTC and Scheduler Reports will speed up the run time because the 3D images will not need to be loaded from the Database every time a report is run.
2. Web Servers: Most Web Servers do not have graphics cards with which to process 3D images. Using View Snapshots will allow 3D images to be simulated while only requiring the servers to load a 2D Bitmap image.
View Snapshots are a Document property, enabled and disabled within the Document Defaults Property dialog. When Snapshots are created, the entire View is captured and "frozen" into a Bitmap of whatever is being displayed in the view at the time of their creation. The View annotation still exists in the document, but is locked so that editing cannot be done while Snapshots are enabled. When snapshots are enabled, all annotation will be shown on top of the views and may still be edited normally.
View Snapshots may also be created or updated using the API.
There are three Resolution settings available for View Snapshots: Low, Medium, and High. Each correlates to the Bitmap resolution which is captured and stored within the CM4D document. Resolution is the fineness of detail that can be distinguished in an image. In the case of View Snapshots, selecting a lower or higher Bitmap resolution will directly impact the size of the CM4D document. For example, a CM4D document with size of 184KB before creating snapshots will result in a file size of 1,581KB with Low Resolution Snapshots. With that same document, High Resolution Snapshots will generate a file size of 22,360KB. File sizes will vary depending on the number of Views and size of the images.
Setting the Resolution is not recommended for normal use due to the large file sizes this produces. Although there may be some situations where this result is desired, such as high resolution printing.
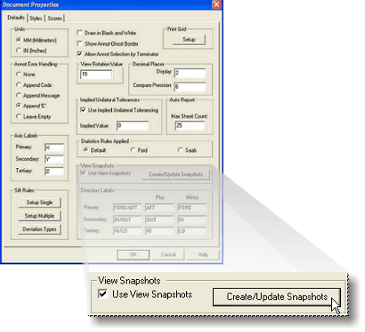
1. To create View Snapshots, open the Document Defaults Tab dialog.
2. Enable the Use View Snapshots check box, and click the Create/Update Snapshots button.
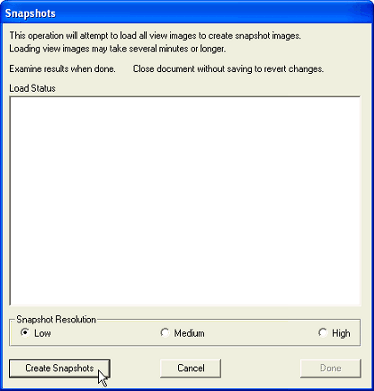
3. In the Snapshots dialog, select the Snapshot Resolution you wish to use for your bitmap Snapshots. In this example, the default Low Resolution is used.
4. Click the Create Snapshots button.
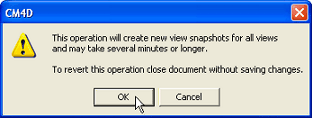
5. The following warning dialog will appear. Click OK.
6. Once the Snapshot creation runs through completion, a message will appear in the Load Status display saying that Snapshots were successfully created.
7. Click Done to exit the Snapshots dialog.
8. All views in the document will now be bitmap Snapshots.
9. Save the document to preserve the Snapshots.
To edit a view that is currently a Snapshot, disable the Use View Snapshots check box in the Document Defaults Tab, and the proceed with editing the View. To restore Snapshots, simply re-create them using the Create/Update Snapshots button.
To remove Snapshots from a document, open the Document Defaults dialog and disable the Use View Snapshots check box. All snapshots will be erased from the document and the original View annotation will be restored.