 )
button on the toolbar.
)
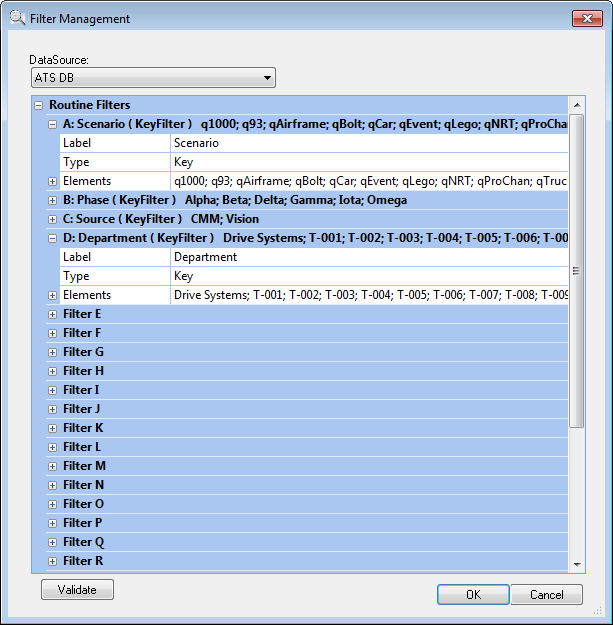
button on the toolbar.The Filter Management dialog allow you to create, modify, or delete Routine, Feature, or Sample Filters from the Database. You must have a Filter Manager privilege in order to access the Filter Management dialog in DataUtility.
See the Site Manager Help Documentation for more information on Filter privileges.
Routine, Sample, and Feature Filters can also be created and changed in DataSmith by creating characteristics and using the Filter associations in the Associations tree. Refer to the DataSmith Help Documentation for more information.
To open the Filter Management dialog, click the Filter ()
button on the toolbar.
Creating new filters or making changes to filters in an already existing database is not recommended. Assigning filters should be done at the time the database is first created, using DataSmith. After the initial creation of the database, new filters should not be created, and existing filters should not be changed. Filter Elements may be created or changed, but should not be deleted.
Filters are a way to sort data as it enters a database. By default, Filters are organized according to the 26 available primary filters, Filter A through Filter Z per Filter (i.e. 26 Routine Filters, 26 Sample Filters, and 26 Feature Filters). To customize your Filters, enter a Filter Label. Although the Filters will still be referred to and organized according to the original alphabetical arrangement (e.g. Filter A), a custom label will serve as a secondary identification for the Filter (e.g. Filter A: Scenario). Filter labels are not case sensitive.
There are four available filter Types which may be used when defining a Filter:
· Unused - An Unused filter is one which does not have any values (i.e. labels or elements) assigned.
· Unrestricted - An Unrestricted filter is one which is associated to a feature, sample or routine. It may be used for sorting, but does not determine whether or not the associated data will enter the database. Unrestricted filters do not have a defined set of values (i.e. elements). When using an Unrestricted filter in CM4D or DataSmith, it will have an edit field where any text may be entered as a parameter.
· Restricted - Restricted filters have a defined set of values (i.e. elements). A Routine does NOT need a value for its restricted filters. Blank is always a valid option for Restricted filters. If a Restricted filter has a value, however, it must match one of the options defined in the database or it will not be put into the Database when processed. When using a Restricted filter in CM4D or DataSmith, it will have a menu from which a predefined filter value (including <unassigned>) may be selected as a filter parameter.
· Key - Key filters are only used with Routines. Key filters have a defined set of values (i.e. elements). A Routine does NOT need a value for its Key filters. Blank is always a valid option for Key filters. If a Key filter has a value, however, it must match one of the options defined in the database or it will not be put into the Database when processed. When using a Key filter in CM4D or DataSmith, it will have a menu from which a predefined filter value (including <unassigned>) may be selected as a filter parameter. Key filter values become part of the unique Routine ID. Using Key filters allows you to have multiple Routines with the same Routine Label, as long as each has at least one unique Key filter value assigned.

Key Filters should not be deleted from the Database, but as long as a filter remains void of all values, it will be treated as though it does not exist.
Elements are the values of a filter (not case sensitive), used for sorting data as it enters the Database on a secondary level to the primary Filter.
The following example demonstrates the structure of filters and their elements:
Filters |
Elements |
|||||||
A: Scenario |
q93 |
qBlock |
qCar |
qImages |
qLego |
qNRT |
qPlane |
|
B: Phase |
Alpha |
Beta |
Gamma |
Iota |
Omega |
Spartacus |
|
|
C: Source |
CMM |
Vision |
|
|
|
|
|
|
When loading data from the Database, then, you can use elements in order to load only the data fitting the specified parameters. If data does not match the filter parameters, that data will not be loaded from the Database.
The Validate button may be used to confirm that all changes made to the filters are acceptable. Any changes that would cause conflict with another Routine/Feature/Sample filter would be invalid. This check is also done each time the OK button is selected.
For example, if the only difference between two Routines was that one had a Key Routine filter defined and the other did not have any Routine filter defined, then removing the values from the defined Key filter would cause the two Routines to be identical. This would be invalid and would not be allowed.
To create a new Filter, expand the filter tree and click within the row of the filter you would like to define.
Enter a new Label, and choose your Filter Type. Either Restricted or Key is necessary if you want defined values, or elements.
Add Elements.
Click the add ( )
button in the Element row to add the first element and type a
label.
)
button in the Element row to add the first element and type a
label.
Repeat as desired.
Click OK to commit your changes to the Database.
The display region will reload.