The Menu Bar contains CM4D Interactive's menus. Each menu lists several related selections, and each selection performs a specific action.
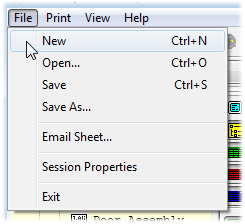
From the File menu, you can start a new session of CM4Di, open a saved CM4Di managed document, save the current session of CM4Di as a managed document, view the Session Properties, or Exit CM4Di.
When Sticky Report mode is enabled (ReportTweak is toggled 'on'), the Save and Save As... menu options will act as 'Save a Sticky Report' and 'Save a Sticky Report As'. See the topic, Sticky Reports.
Prints the active report to a PDF and attaches it to an e-mail. As with other CM4D printing methods, whatever is in your main display region will be printed (view the Array Sheet to print entire report). This option is also available as a toolbar button ( ).
).
An e-mail client (e.g., Microsoft Outlook) must be installed on the machine that CM4D is running on in order for the PDF to be attached to an e-mail. If a mail client is not found, a message will be displayed that allows you to save the PDF to a file location.
E-mail sheet uses a built-in PDF writer. However, this PDF writer is not used for printing reports via CM4D Scheduler or WTC, so you will still need an alternative PDF writer (such as eDoc PDF Printer) to print your reports.
Clicking Print in the Menu bar brings up CM4Di's printing options:
|
Opens the Print dialog. |
||
|
Sends the active sheet of the report directly to the default printer. |
||
|
Print All Sheets |
Prints all of the sheets in the active report. |
|
|
Displays a preview of how the active sheet of the report will appear when printed. |
||
|
Opens the Print Setup dialog before printing. |
||
|
Displays a sub-menu of additional printing methods: |
||
|
Print Batch |
Opens the Batch Printing dialog, which allows for the selection (using Ctrl or Shift) of multiple sheets from any SheetSet to be printed as a single print job. Batch printing also allows for printing to a file type (such as PDF or JPEG) while still using the batch printing operation. |
|
|
Print Box |
Prints the document region as it appears on your screen. |
|
|
Print to Clipboard |
Sends an image of the active sheet of the report to the clipboard. |
|
|
Print to Metafile |
Prints the active sheet of the report as a Metafile (*.wmf) image file. |
|
|
Print Bitmap |
Prints the active sheet of the report as a Bitmap (*.bmp) image file. |
|
|
Print JPEG |
Prints the active sheet of the report as a JPEG (*.jpg) image file. |
|
|
Print PDF |
Prints the active sheet of the report as a PDF document. |
|
|
The Print Grid menu allows users to print the contents of the Grid window or the CM4Di Tree. |
||
|
Print Tree |
Prints the contents of the Nav tree. |
|
|
Grid Header/Footer Setup |
The header and footer of the DataSet's Feature and Sample Grids can be formatted using the Print Grid Setup dialog. CM4D variables can be used in the fields of the header and footer. Non-variable text entered in the fields will appear as it does in the fields. The variables shown below are default variables provided in the CM4D.ini file. If you would like to change the default variables, they can be edited in the CM4D.ini file. |
|
|
Print Feature Set Filter |
Prints the contents of the Feature Grid. |
|
|
Print Sample Set Filter |
Prints the contents of the Sample Grid. |
|
|
Print Data Set Filter |
Prints the contents of the DataSet Grid. |
|
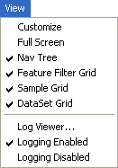
The View menu contains options for customizing the CM4Di window. Selecting full screen will hide the CM4Di Tree and the Grids, and make the document region larger. Selecting Nav Tree, Feature Filter Grid, Sample Grid, or DataSet Grid from the list will toggle them on and off.
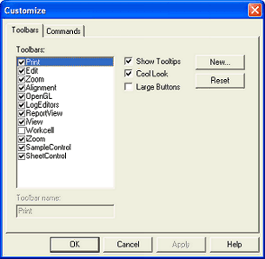
Selecting Customize in the View Menu opens the Customize dialog containing the Toolbars and Commands tabs.
On the Toolbars tab, the CM4Di toolbars can be toggled on or off by selecting the check box next to its name. Selecting or clearing the check box next to Show Tooltips will toggle the messages which appear as the mouse pointer hovers over toolbars. Selecting or clearing the check box next to Cool Look will change the appearance of the toolbars. Selecting or clearing the check box next to Large Buttons will change the size of the buttons in the toolbars.
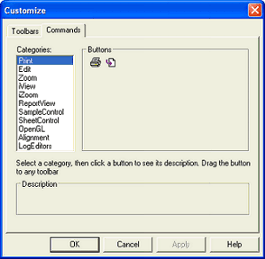
A new toolbar can be created by clicking New, typing a name for your toolbar, and clicking OK. The new toolbar will appear in the User Interface, and buttons can be added to the new toolbar using the Commands tab. Select the Commands tab, then select a name of a toolbar from the list. The buttons will appear to the right. To add them to your new toolbar, click and drag the buttons from the Customize dialog onto the new toolbar in the user interface.