Topic Contents: Hide
Since CM4D Interactive is simply another mode of CM4D Classic, there is some setup required to get it to run in the Interactive mode. Typically, this is set up once during installation of CM4D for the users who intend to use CM4D Interactive on a regular basis. For all of these setup methods you must have a CM4D Interactive startup document available.
The CM4D Interactive startup document is developed by creating a CM4D Classic template document. See the topic, Create a CM4Di Template.
There are several ways to start CM4D Interactive, depending on how you have it set up:
· Start Menu - requires the CM4D Interactive startup template to be defined in the Cm4d.ini file.
· Shortcut - uses a shortcut to the Cm4d.exe file, and requires command line parameters.
§ Setup 1 - uses the default Cm4d.ini file in the CM4D installation folder for both mode and template.
§ Setup 2 - uses command line parameters to run in i4 mode, using the template defined in the default Cm4d.ini file.
§ Setup 3 - uses a copy of the default Cm4d.ini file with mode and template defined.
When ATS CM4D is installed on a computer, a shortcut to CM4D Interactive is put in the Start menu by default. However, if you try to run it this way without the proper setup, it will revert to run CM4D Classic.
To set up the Start menu to run CM4D Interactive, complete the following steps:
1. Run a text editor, such as Notepad, as Admin.
a. Browse to the Cm4d.ini file in the CM4D installation folder.
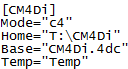
b. The settings for CM4D Interactive are under the heading [CM4Di].
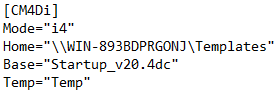
i. Change the Mode to "i4".
ii. Change Home to the full UNC path of the folder the CM4Di startup document is located.
iii. Change Base to the name of the CM4Di document, including the 4dc extension.
c. Save the file.
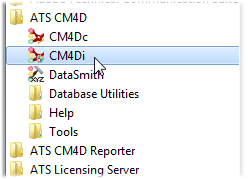
2. Go to the Start menu and select the CM4Di shortcut.
With this setup, if you run the CM4D.exe, CM4D Interactive will start instead of Classic.
From the CM4D installation folder, create a shortcut for the Cm4d.exe file. Most often, the Shortcut must be sent to the Desktop. You can choose to leave it there, or move it to a convenient location.
A useful option is to create a folder to store all of your CM4D shortcuts, and then create a toolbar on your Taskbar that points to your shortcut folder. This will allow you to display the shortcut icons right on the Taskbar for easy access.
Once you have your CM4D Shortcut, choose one of the following methods for setting up that Shortcut to run CM4D Interactive.

The simplest option for configuring your Shortcut for CM4Di is to let it simply run the Cm4d.exe file. This would also use the default Cm4d.ini file, so if you set that file up to run in Interactive mode and has a Startup document defined, then CM4D Interactive will start when the Shortcut is run.
To set up the default Cm4d.ini file, follow the same steps as described in the Start Menu setup above.
The second option for configuring your Shortcut for CM4Di is to set up your default Cm4d.ini file to define the Startup document, but without changing the Mode (leave as "c4"). Then in the properties of the Shortcut, you enter a command line parameter that changes the Mode to Interactive when the Shortcut is run.
1. Run a text editor, such as Notepad, as Admin.
a. Browse to the Cm4d.ini file in the CM4D installation folder.
b. The settings for CM4D Interactive are under the heading [CM4Di].
i. Change Home to the full UNC path of the folder the CM4Di startup document is located.
ii. Change Base to the name of the CM4Di document, including the 4dc extension.
c. Save the file.
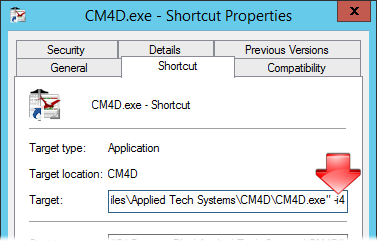
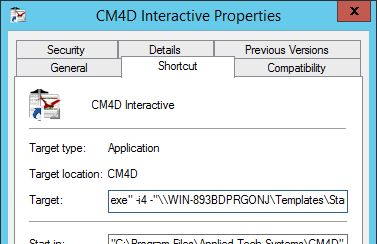
2. Right-click the CM4D.exe - Shortcut and select Properties.
a. In the Target field, click your cursor at the end of the text.
b. After .exe", enter a space and then type -i4.
c. You could also change the name of the Shortcut to "CM4Di" or "CM4D Interactive" to differentiate the mode of CM4D that it runs.
3. Run the Shortcut to start CM4D Interactive.
The third option for configuring your Shortcut for CM4Di is to set up a copy of the default Cm4d.ini file, leaving the default ini file to run Classic. This method is used primarily when both Interactive and Classic are run on the same machine.
Once you have a copy of the Cm4d.ini file, then in the properties of the Shortcut are changed to run using the new Cm4d.ini file.
1. Copy the default Cm4d.ini file and save it in another location. A common location is in the same folder as your Startup template.
2. Rename the Cm4d.ini file to the same name as your Startup document, but keeping the *.ini extension. For example, "Startup.ini".
3. Run a text editor, such as Notepad, as Admin.
a. Browse to the new ini file.
b. Under the heading [CM4Di]:
i. Change the Mode to "i4".
ii. Change Home to the full UNC path of the folder the CM4Di startup document is located.
iii. Change Base to the name of the CM4Di document, including the 4dc extension.
c. Save the file.
4. Right-click the CM4D.exe - Shortcut and select Properties.
a. In the Target field, click your cursor at the end of the text.
b. After .exe", enter a space and then type -i4 "\\computername\foldername\Startup.ini".
c. You could also change the name of the Shortcut to "CM4Di" or "CM4D Interactive" to differentiate the mode of CM4D that it runs.
5. Run the Shortcut to start CM4D Interactive.
Another use for CM4Di Shortcuts pointing to unique Cm4d.ini files could be if you had more than one Startup document to use at different times.