 button on the toolbar
There are three ways to start a new CM4D Document:
· Click the New Document
 button on the toolbar
· Select New from the File Menu
· Use the keyboard shortcut, Ctrl+ N
There are four ways to open an existing CM4D File:
· Click the Open  button on the toolbar
· Select Open from the File Menu
· Press Ctrl+O on the keyboard
· Double click the .4dc file in Windows Explorer
CM4D documents can also exist as Managed
Documents, which can be opened initially using the Open Managed Document
 button on the toolbar.
For more information on this type of document, see the topic Managed
Documents and Saving
Your Document as a Managed Document.
There are four ways to close a CM4D document when you are finished:
Select Close from the File Menu
Select the Document Window icon on the Menu Bar and select Close
Double click the Document Window icon
Click the X on the right end of the Menu Bar
When closing a document CM4D will ask you to choose yes, no or cancel. Select Yes if you would like to save your changes, No if you do not want to save any changes you may have made, or Cancel if you do not want to close the document.
There are three different ways a CM4D document can be saved:
● Select Save As from the File menu, Name the file and select the directory you wish to place the file in (this option is used when you save a new file)
● Select Save from the File menu (if the file has not been previously saved the Save As dialogue will appear)
● Click the Save  button
on the menu bar
It is a good practice to periodically save your file as you work. This will prevent the loss of a lot of data should something happen.
There are several options within CM4D to print your document. Clicking
the Print  button will print your CM4D
document as per your Print Setup.
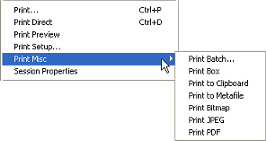
Clicking File in the Menu bar brings up CM4D's printing options:
· Print will open the Print dialog.
· Print Direct will send the active sheet of the report directly to the printer.
· Print Preview will display how the sheet will look when it is printed. When the Array sheet is selected, all of the sheets in the SheetSet will be printed as a single job.
· Print Setup opens the Print Setup dialog.
· Print Misc displays a menu of optional printing methods.

When you copy a selection, it is placed on the clipboard to be pasted to another location on the current sheet, or another sheet or document.
Use one of the following methods to copy your selection(s):
Select what you want to copy. Click Edit in the menu bar. Click Copy in the Edit menu. Click in the area you want to place your selection. Click Paste from the Edit menu.
To do this, select what you want to copy, then either click the Copy
 button
on the menu bar. Click in the area you want to paste the selection. Click
the Paste
  button. This method is useful for copying and pasting between documents
and applications.
Select what you want to copy. Hold down the Control (Ctrl) key and press C. This will copy your selection. Click on the sheet you want to paste the selection on, then hold down the Control key and press V. This will paste your selection.
Select what you want to copy. This method will only copy and paste selections to the current sheet. Hold down the Control key on your keyboard while clicking on the selection with the left mouse button. Continue to hold the Control key and the left mouse button while you drag the selection to where you would like it copied. A copy of your selection will be placed on the sheet where you let go of the mouse button.
When you cut a selection, it is placed on the clipboard and can be pasted
to another sheet or document. To do this, select the object or objects
you wish to cut, then either click the Cut  button on
the menu bar or select Cut from the Edit menu. You can now paste the object
to another sheet or document.
Should you need to delete a selection, there are many ways to do it.
After selecting the desired object, the easiest ways are to either click
the Delete  button on the Menu bar, select
Delete from the Edit Menu, or press the Delete button on the keyboard.